

- No mixing required: layer pumpkin puree, dry cake mix, and melted butter in one pan for a quick fall dessert.
- Soft, custardy pumpkin base contrasts with a golden, buttery, crisp topping between a cobbler and a cake.
- Use 100% pumpkin puree and evaporated milk for proper texture; avoid pumpkin pie filling and regular milk.
- Evenly sprinkle cake mix and drizzle cooled melted butter so the topping bakes crisp, covering all dry spots.
- Let cake rest 15 to 20 minutes before slicing; store refrigerated up to 4 days and freeze slices up to 2 months.
If you’re looking for an effortless fall dessert that delivers warm, spiced flavors with minimal effort, this pumpkin dump cake is exactly what you need. Made by layering pumpkin puree, cake mix, and melted butter in a single pan, this recipe requires no mixing, no beaters, and no complicated steps. The result is a dessert with a soft, custardy pumpkin base and a golden, buttery topping that’s somewhere between a cobbler and a cake. It’s the kind of dessert you can pull together in under 10 minutes and let the oven do the rest, making it ideal for busy weeknights, potlucks, or last-minute holiday gatherings.
What makes this pumpkin dump cake so appealing is its foolproof nature. The pumpkin filling sets into a smooth, spiced layer while the dry cake mix transforms into a crisp, crumbly topping as the butter melts and seeps through. You don’t need to worry about over-mixing or achieving the perfect batter consistency—the layering technique does all the work. Serve it warm with a scoop of vanilla ice cream or a dollop of whipped cream, and you have a comforting dessert that tastes like you spent hours in the kitchen.
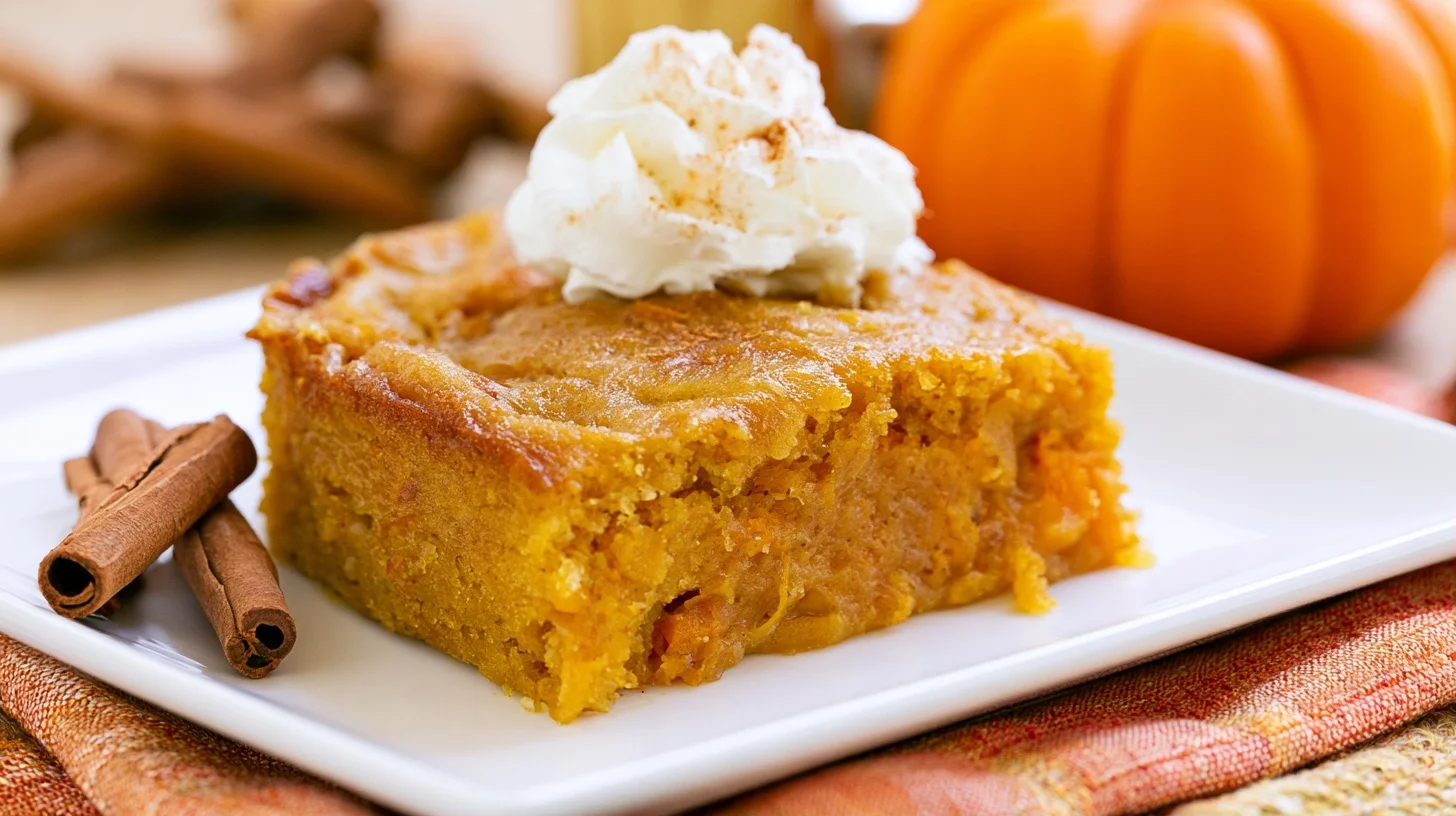
Table of contents
- Why You Will Love This Pumpkin Dump Cake
- What You Need to Make Pumpkin Dump Cake
- How to Make Pumpkin Dump Cake That Turns Out Perfect
- Tips for the Best Pumpkin Dump Cake Every Time
- Common Mistakes and How to Avoid Them
- Ways to Customize Your Pumpkin Dump Cake
- Nutrition and Health Considerations
- How to Serve Pumpkin Dump Cake
- How to Store and Reheat Pumpkin Dump Cake
- Frequently Asked Questions
Why You Will Love This Pumpkin Dump Cake
- No mixing required—just layer the ingredients and bake for a hands-off dessert.
- Uses pantry staples like canned pumpkin and boxed cake mix for maximum convenience.
- Creates a beautiful contrast between the soft pumpkin base and the crispy, buttery topping.
- Easily adapts to dietary needs with simple ingredient swaps.
What You Need to Make Pumpkin Dump Cake
This recipe requires minimal equipment, and you likely have everything you need already. The beauty of a dump cake is that it’s designed to be simple, so the tools are just as straightforward as the method.
- 9×13-inch baking dish: This size ensures the pumpkin layer spreads evenly and the cake mix topping bakes through without burning. A metal or glass dish works equally well.
- Whisk or fork: Used to combine the pumpkin puree with the eggs, spices, and evaporated milk into a smooth mixture before pouring.
- Measuring cups and spoons: Accurate measurements ensure the pumpkin base sets properly and the topping crisps without becoming greasy.
- Small saucepan or microwave-safe bowl: For melting the butter evenly before drizzling it over the dry cake mix.
How to Make Pumpkin Dump Cake That Turns Out Perfect
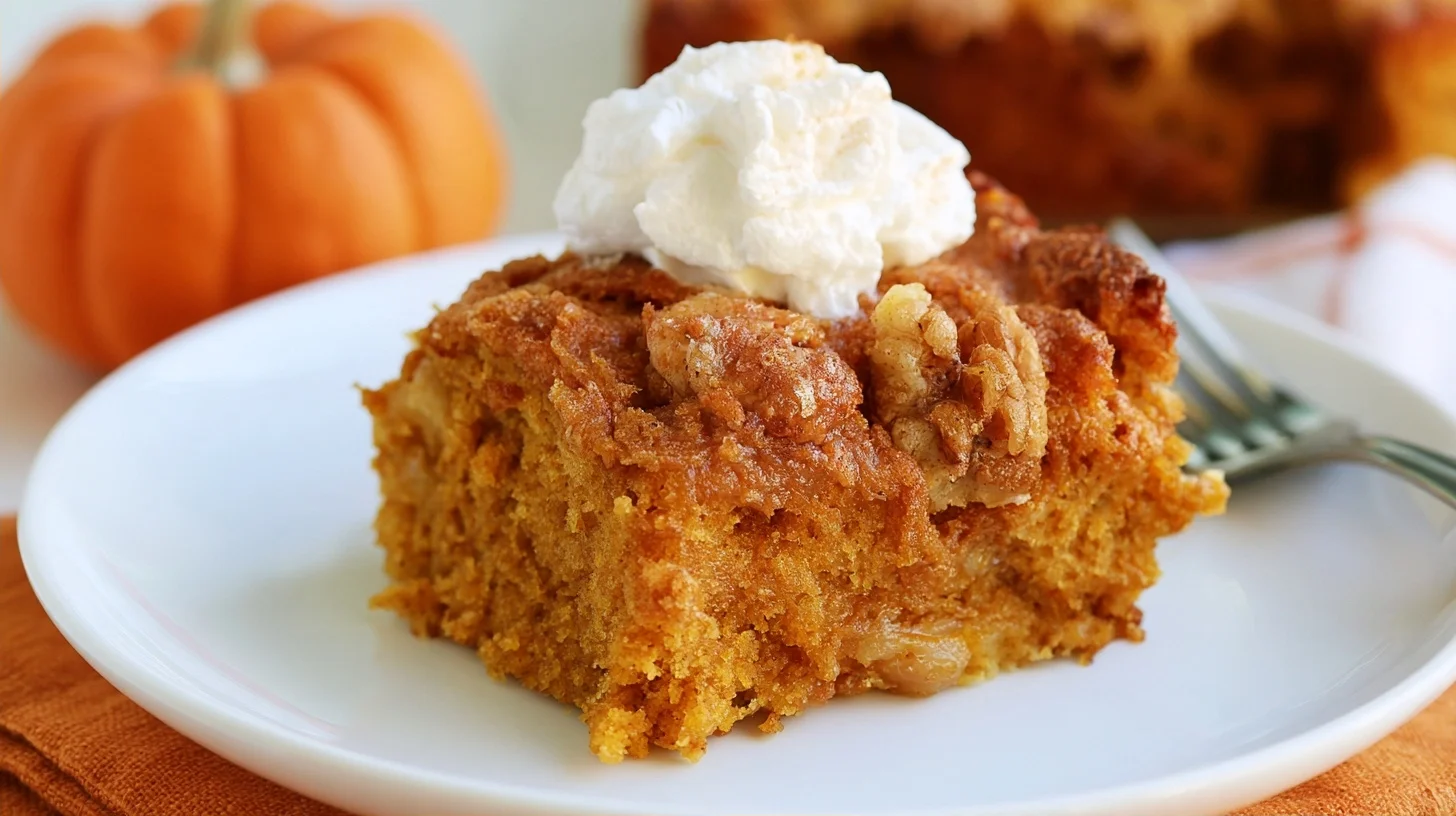
Pumpkin Dump Cake
12
servings10
minutes55
minutes320
kcalThis easy pumpkin dump cake layers spiced pumpkin puree with dry cake mix and melted butter for a no-mix dessert that bakes into a soft, custardy base with a crispy, golden topping. It’s the perfect fall dessert that comes together in minutes and requires no special equipment or technique.
Keep the screen of your device on
Ingredients
1 can pumpkin puree
3 large eggs
1 can evaporated milk
0.5 cup granulated sugar
1 teaspoon ground cinnamon
0.5 teaspoon ground ginger
0.25 teaspoon ground nutmeg
0.25 teaspoon salt
1 box yellow cake mix
1 cup unsalted butter
1 cup chopped pecans
1 teaspoon vanilla extract
Directions
- Preheat your oven to 350°F and lightly grease a 9×13-inch baking dish with butter or nonstick spray. This ensures the pumpkin layer won’t stick to the pan when you slice and serve the cake.
- In a large mixing bowl, whisk together the pumpkin puree, eggs, evaporated milk, granulated sugar, cinnamon, ginger, nutmeg, and salt until the mixture is smooth and well combined. The mixture should be pourable and free of lumps.
- Pour the pumpkin mixture into the prepared baking dish and spread it evenly across the bottom. The layer should be about 1 inch thick and cover the entire surface.
- Sprinkle the dry cake mix evenly over the pumpkin layer without stirring or mixing. Use a spoon to gently distribute the mix if needed, but avoid pressing it down into the pumpkin base.
- If using pecans, scatter the chopped pecans evenly over the dry cake mix before adding the butter. The nuts will toast as the cake bakes, adding a crunchy texture to the topping.
- Drizzle the melted butter evenly over the entire surface in a zigzag pattern, making sure every section of the cake mix is covered. Any dry spots will remain powdery and unpleasant to eat.
Notes
- Evaporated milk is essential for achieving the smooth, custard-like texture of the pumpkin base—regular milk is too thin and will result in a watery filling.
- If the topping browns too quickly, tent the pan with foil and continue baking until the pumpkin layer is fully set in the center.
- Store leftovers covered in the refrigerator for up to 4 days. Reheat individual slices in the microwave for 20 to 30 seconds or warm the entire dish in a 300°F oven for 15 minutes.
Nutrition Facts
- Serving Size: 1 g
- Total number of serves: 12
- Calories: 320kcal
- Fat: 14g
- Carbohydrates: 46g
- Fiber: 3g
- Protein: 4g
Did you make this recipe?
Tag @therecipemasterblog on Instagram and hashtag it with #therecipemaster
Like this recipe?
Follow @therecipemasterblog on Pinterest
Follow us on Facebook!
Follow The Recipe Master on Facebook
Tips for the Best Pumpkin Dump Cake Every Time
The key to a successful pumpkin dump cake is understanding how each layer behaves during baking. The pumpkin base should set into a smooth, custard-like texture, while the cake mix topping should turn golden and crisp. Here’s how to make sure both layers turn out right.
Spread the Dry Cake Mix Evenly
After pouring the pumpkin mixture into the pan, sprinkle the dry cake mix evenly across the entire surface without stirring. This creates a uniform topping that will absorb the melted butter and bake into a consistent texture. If the cake mix is clumped in one area, that section may become soggy while other parts stay dry and powdery. Use a spoon to gently distribute the mix if needed, but avoid pressing it down into the pumpkin layer.
Drizzle the Butter Thoroughly
The melted butter is what transforms the dry cake mix into a crisp, golden topping. Pour the butter in a zigzag pattern across the entire surface, making sure every section gets covered. Any dry spots will remain powdery and unpleasant to eat. If you notice areas that look untouched, use the back of a spoon to lightly guide the butter over those spots without disturbing the cake mix layer underneath.
Use Pure Pumpkin Puree, Not Pie Filling
This recipe calls for plain pumpkin puree, which has no added sugar or spices. Pumpkin pie filling already contains sweeteners and flavorings, which will throw off the balance of the recipe and make the dessert overly sweet and one-dimensional. Always check the label to make sure you’re buying 100% pumpkin. If you want a more detailed look at the nutritional benefits of pumpkin, this guide explains why pumpkin is a nutrient-rich ingredient.
Don’t Skip the Evaporated Milk
Evaporated milk is thicker and creamier than regular milk, which helps the pumpkin base set into a smooth, custard-like texture rather than a watery layer. Substituting regular milk will result in a thinner, less cohesive filling that may not hold its structure when sliced. If you need a dairy-free option, use full-fat coconut milk from a can, which has a similar richness.
Let It Cool Before Slicing
Pumpkin dump cake is best served warm, but it needs at least 15 to 20 minutes of cooling time after it comes out of the oven. Cutting into it immediately will cause the pumpkin layer to ooze and the topping to slide off. The filling needs time to firm up slightly so each slice holds its shape. If you’re serving it at a gathering, you can bake it ahead and reheat individual portions in the microwave for 20 to 30 seconds.
Common Mistakes and How to Avoid Them
Stirring the Layers Together
One of the most common mistakes is mixing the pumpkin base and the cake mix together, which defeats the purpose of the dump cake method. The layers need to stay separate so the pumpkin bakes into a smooth filling and the cake mix crisps on top. If you stir them together, you’ll end up with a dense, uneven texture that’s neither cake nor custard. Simply pour, sprinkle, drizzle, and bake without any mixing.
Using Melted Butter That’s Too Hot
If the butter is extremely hot when you pour it over the cake mix, it can cause the dry mix to clump or even start cooking prematurely in spots. Let the melted butter cool for a minute or two before drizzling so it spreads more evenly and absorbs into the cake mix without creating hard, greasy clumps. Room temperature or slightly warm butter works best.
Overbaking Until the Top Is Too Dark
Because the topping is made from cake mix and butter, it can go from golden to burnt quickly. Check the cake at the 50-minute mark and cover it loosely with foil if the top is browning too fast. The pumpkin layer should be set in the center and the topping should be evenly golden. If the edges are dark but the center is still jiggly, tent the pan with foil and continue baking until the filling is firm.
Skipping the Greasing Step
Even though the butter drizzled on top adds fat to the recipe, the pumpkin base can still stick to the pan if it’s not greased. Lightly spray or butter the baking dish before adding the pumpkin mixture to ensure clean slices and easy serving. This is especially important if you’re using a glass dish, which tends to hold onto baked-on sugars more than metal.
Ways to Customize Your Pumpkin Dump Cake
Add Chopped Pecans or Walnuts
For extra texture and a nutty flavor, sprinkle 1 cup of chopped pecans or walnuts over the dry cake mix before drizzling the butter. The nuts will toast as the cake bakes, adding a crunchy contrast to the soft pumpkin base. This variation works especially well if you’re serving the dessert for Thanksgiving or other fall gatherings.
Use Spice Cake Mix Instead of Yellow
Yellow cake mix is the most common choice because it lets the pumpkin flavor shine, but spice cake mix adds an extra layer of warmth and complexity that pairs beautifully with the pumpkin base. If you use spice cake mix, you can reduce the cinnamon and ginger in the pumpkin layer slightly to avoid overpowering the dessert.
Make It Dairy-Free
To make this recipe dairy-free, replace the evaporated milk with full-fat coconut milk and use a plant-based butter substitute. The coconut milk provides the same richness and helps the pumpkin layer set properly. Make sure the cake mix you choose is also dairy-free, as some brands contain milk powder or whey.
Add a Cream Cheese Swirl
For a richer, tangier dessert, dollop softened cream cheese over the pumpkin layer before adding the cake mix. Use about 8 ounces of cream cheese and drop spoonfuls across the surface, then swirl gently with a knife. The cream cheese will create pockets of tangy richness that balance the sweetness of the cake mix topping.
Nutrition and Health Considerations
Pumpkin dump cake is a dessert, so it’s naturally higher in sugar and fat, but it also contains nutrient-dense pumpkin puree, which provides fiber, vitamin A, and potassium. Each serving contains approximately 320 calories, 14 grams of fat, 46 grams of carbohydrates, and 4 grams of protein. The dessert also provides about 3 grams of fiber and 28 grams of sugar per serving, depending on the specific brands of cake mix and evaporated milk used.
If you’re looking to reduce the sugar content, you can use a sugar-free or reduced-sugar cake mix, though the texture of the topping may be slightly less crisp. You can also cut back on the sweetness by reducing the granulated sugar in the pumpkin layer to 1/3 cup instead of 1/2 cup. The dessert will still taste balanced and flavorful, especially if you serve it with unsweetened whipped cream.
How to Serve Pumpkin Dump Cake
This dessert is best served warm, straight from the oven or reheated gently in the microwave. Top each slice with a scoop of vanilla ice cream, a dollop of whipped cream, or a drizzle of caramel sauce for a classic presentation. The contrast between the warm, spiced pumpkin and the cold, creamy topping is what makes this dessert so satisfying.
If you’re serving it at a potluck or holiday dinner, you can bake it in advance and reheat it in a 300°F oven for 15 to 20 minutes before serving. It also pairs beautifully with coffee or spiced chai tea. For another fall-inspired treat, try pairing it with these soft, frosted pumpkin bars for a dessert spread that highlights the best of autumn flavors.
How to Store and Reheat Pumpkin Dump Cake
Store leftover pumpkin dump cake in an airtight container or cover the baking dish tightly with plastic wrap or aluminum foil. It will keep in the refrigerator for up to 4 days. The topping will soften slightly as it sits, but it will still taste delicious, especially when reheated.
To reheat, place individual slices on a microwave-safe plate and heat for 20 to 30 seconds, or warm the entire dish in a 300°F oven for 15 minutes. If you want to crisp up the topping again, place the dish under the broiler for 1 to 2 minutes, watching closely to prevent burning. You can also freeze pumpkin dump cake for up to 2 months. Wrap individual slices tightly in plastic wrap and place them in a freezer-safe bag. Thaw in the refrigerator overnight and reheat before serving.
Frequently Asked Questions
No, pumpkin pie filling contains added sugar and spices, which will make the dessert overly sweet and throw off the flavor balance. Always use plain 100% pumpkin puree for this recipe.
The topping becomes soggy if the butter isn’t drizzled evenly or if the cake mix clumps in certain areas. Make sure to spread the dry cake mix evenly and pour the melted butter in a zigzag pattern across the entire surface.
Yes, you can bake it up to 2 days in advance and store it covered in the refrigerator. Reheat individual slices in the microwave for 20 to 30 seconds or warm the entire dish in a 300°F oven for 15 minutes before serving.
Yes, pumpkin dump cake freezes well for up to 2 months. Wrap individual slices tightly in plastic wrap and store them in a freezer-safe bag. Thaw in the refrigerator overnight and reheat before serving.





Leave a Reply