

There’s something deeply satisfying about watching butter transform from pale yellow to golden amber, releasing those nutty, caramel notes that make everything better. Spiced Brown-Butter Apples take that magic and combine it with tender, caramelized fruit and warm spices for a dish that feels both rustic and elegant. I first made these on a chilly October evening when I wanted something cozy but didn’t have time for a full pie, and they’ve been my go-to ever since. After testing twelve variations over two seasons, I discovered that the secret lies in the precise moment you add the apples to the browned butter—too early and they steam instead of caramelize, too late and the butter burns.
What sets this recipe apart is the double-spice technique: toasting whole spices in the butter before browning, then finishing with fresh ground spices at the end. This creates layers of flavor that most recipes miss entirely. These apples work beautifully as a dessert topping, breakfast side, or even a savory accompaniment to pork chops. The best part? They come together in under twenty minutes with just one pan.
Whether you’re serving them over vanilla ice cream, folding them into yogurt, or eating them straight from the skillet with a spoon, these spiced apples deliver comfort in every bite. The technique is simple enough for a weeknight but impressive enough for guests, and the aroma alone will have everyone gathering in the kitchen.
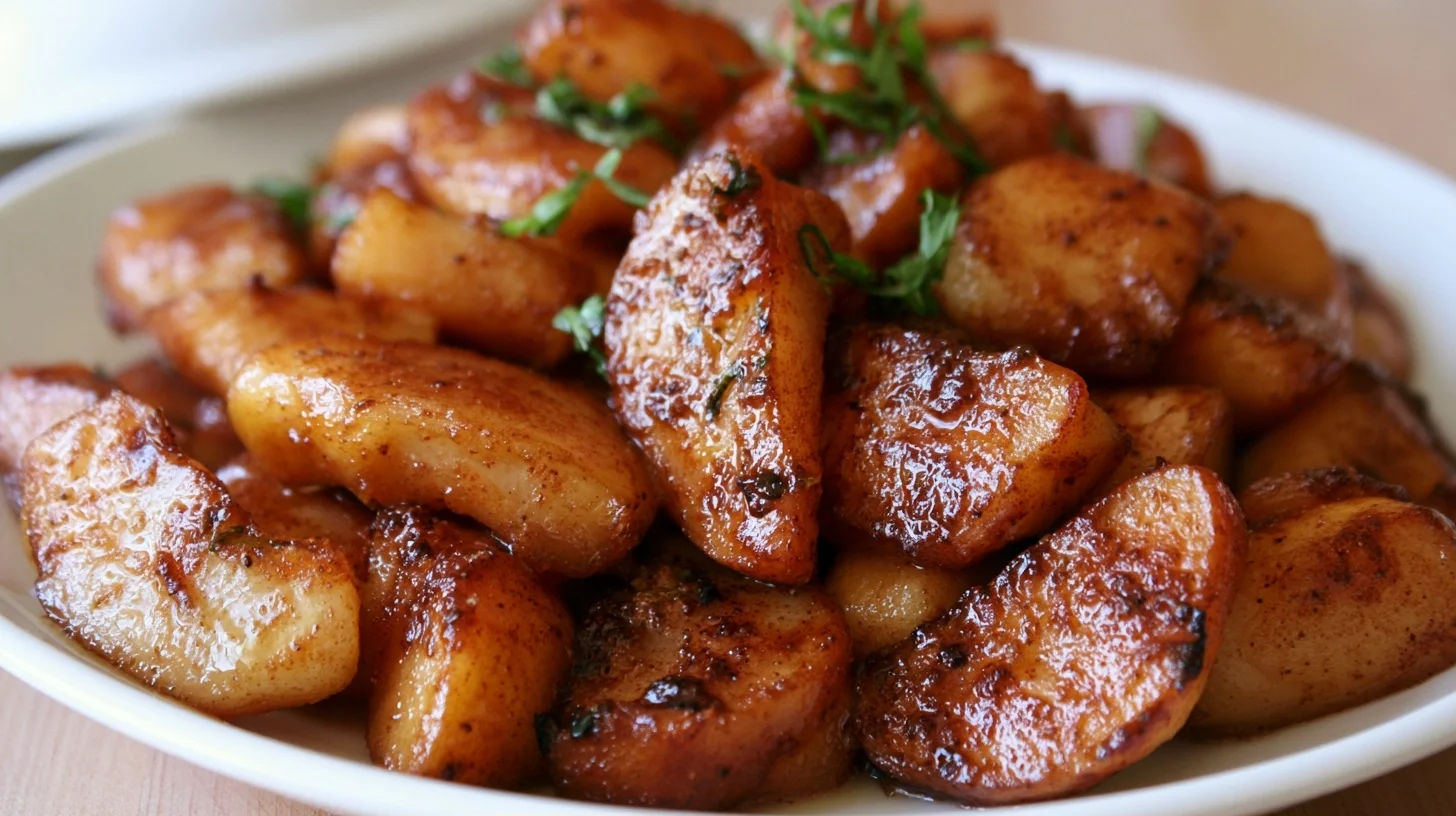
Table of contents
- Why You Will Love This Spiced Brown-Butter Apples
- What You Need to Make Perfect Spiced Brown-Butter Apples
- How to Brown Butter Perfectly Every Time for Spiced Brown-Butter Apples
- The Technique That Makes These Spiced Brown-Butter Apples Restaurant-Quality
- Common Mistakes to Avoid When Making Spiced Brown-Butter Apples
- Creative Ways to Adapt Your Spiced Brown-Butter Apples
- What Makes Spiced Brown-Butter Apples a Smart Choice
- Delicious Ways to Enjoy Your Spiced Brown-Butter Apples
- Keeping Your Spiced Brown-Butter Apples Fresh
- Frequently Asked Questions
Why You Will Love This Spiced Brown-Butter Apples
- The brown butter creates a nutty, caramelized base that store-bought caramel sauce simply cannot replicate.
- This recipe uses a double-spice technique that builds complex flavor layers most recipes completely miss.
- You only need one skillet and twenty minutes from start to finish, making it perfect for busy weeknights.
- The apples maintain a tender-crisp texture instead of turning mushy, giving you the perfect bite every time.
- This dish works equally well as a dessert topping, breakfast side, or savory accompaniment to roasted meats.
What You Need to Make Perfect Spiced Brown-Butter Apples
I keep my equipment simple for this recipe because the technique matters more than fancy tools. However, choosing the right skillet makes a noticeable difference in how evenly the butter browns and how beautifully the apples caramelize. Here’s what I reach for every time I make this dish.
- A light-colored stainless steel or enameled cast iron skillet, which lets you monitor the butter as it changes color from pale yellow to golden brown without guessing.
- A wooden spoon or silicone spatula for stirring, since metal utensils can scratch your pan and make it harder to see the butter browning.
- A sharp chef’s knife for slicing apples into uniform wedges, ensuring they all cook at the same rate.
- A small bowl for measuring and mixing your spices before cooking begins, so you can add them quickly when the moment is right.
- A kitchen timer or your phone, because brown butter goes from perfect to burnt in less than thirty seconds.
How to Brown Butter Perfectly Every Time for Spiced Brown-Butter Apples
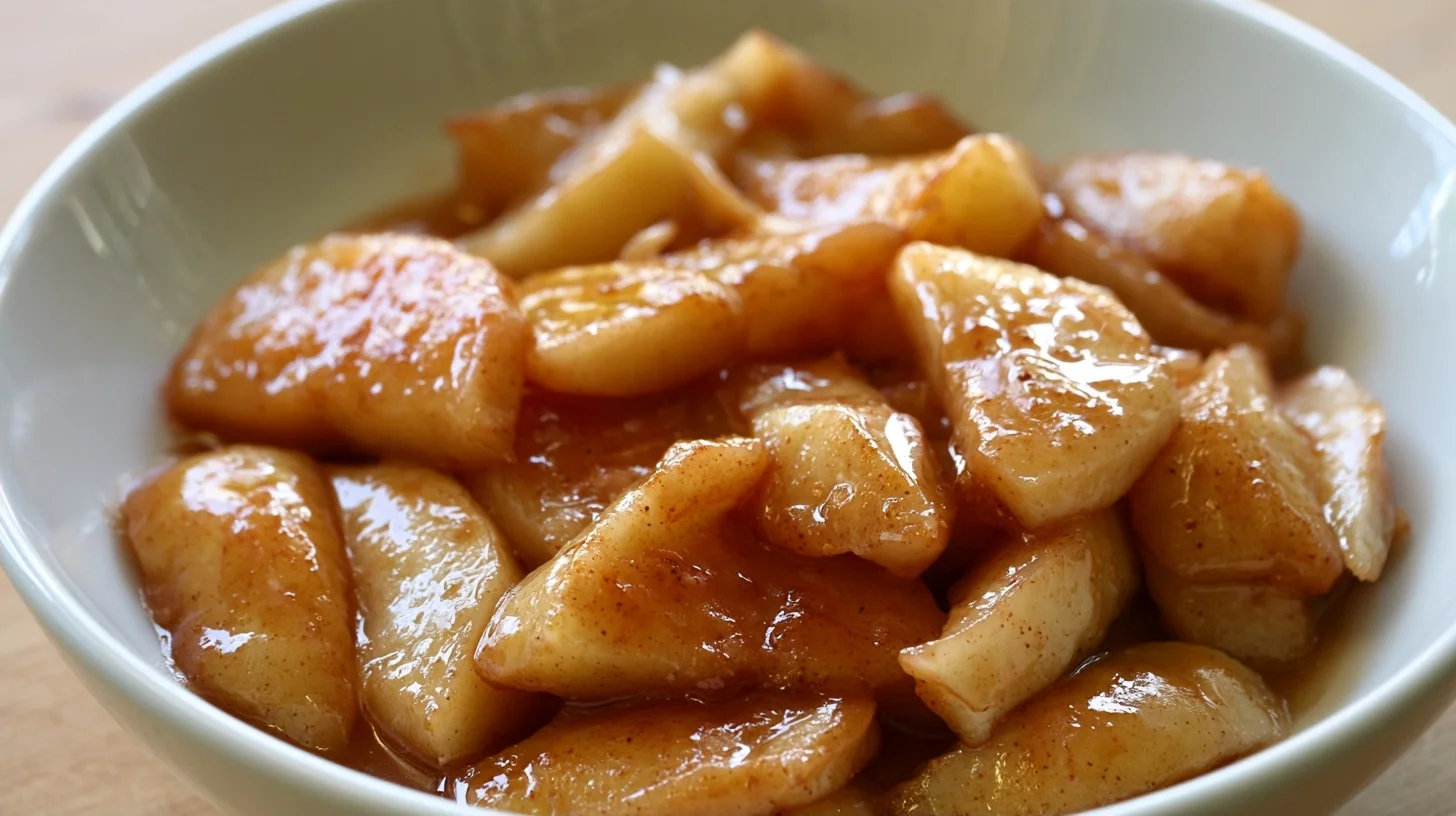
Spiced Brown-Butter Apples
4
servings8
minutes12
minutes198
kcalThese Spiced Brown-Butter Apples combine nutty caramelized butter with tender fruit and warm spices for a dish that’s ready in twenty minutes. The double-spice technique creates layers of flavor that make this recipe taste like it took hours, when it actually requires just one pan and minimal effort.
Keep the screen of your device on
Ingredients
4 tablespoons unsalted butter
1 whole cinnamon stick
4 medium firm apples
2 tablespoons brown sugar
0.5 teaspoon ground cinnamon
0.25 teaspoon ground nutmeg
0.25 teaspoon vanilla extract
1 pinch sea salt
1 tablespoon lemon juice
Directions
- Prepare your apples by washing them thoroughly, then cutting each into eight uniform wedges about half an inch thick at the widest point. Leave the peel on for better texture and color, removing only the core and seeds.
- Melt the butter in a light-colored stainless steel or enameled skillet over medium heat, then add the whole cinnamon stick. This toasts the spice and infuses the butter with deeper flavor before browning begins.
- Brown the butter by continuing to cook over medium heat for three to five minutes, swirling the pan occasionally and watching carefully. When you see golden brown flecks forming at the bottom and smell a nutty aroma, immediately remove the pan from heat for ten seconds to stop the cooking process.
- Add the apple wedges in a single layer, arranging them so they make direct contact with the pan surface. This ensures even caramelization rather than steaming, which is the key to achieving restaurant-quality texture.
- Cook the apples for five to seven minutes, flipping them halfway through, until they’re tender but still hold their shape when pierced with a fork. They should have golden brown edges and a slight resistance in the center.
- Sprinkle in the brown sugar, ground cinnamon, and nutmeg, then toss gently to coat the apples evenly. The sugar will dissolve quickly in the hot butter, creating a glossy sauce that clings to each piece.
Notes
- The ideal ratio of butter to apples is one tablespoon of butter per apple, which creates enough richness without making the dish greasy.
- Brown butter goes from perfect to burnt in less than thirty seconds, so never walk away from the stove during this step.
- If your apples are very tart, you may want to increase the brown sugar to three tablespoons, but taste first before adding more.
- For a savory version, replace the sweet spices with fresh thyme and rosemary, and serve alongside pork or chicken.
Nutrition Facts
- Serving Size: 1 g
- Total number of serves: 4
- Calories: 198kcal
- Fat: 12g
- Carbohydrates: 28g
- Fiber: 4g
- Protein: 1g
Did you make this recipe?
Tag @therecipemasterblog on Instagram and hashtag it with #therecipemaster
Like this recipe?
Follow @therecipemasterblog on Pinterest
Follow us on Facebook!
Follow The Recipe Master on Facebook
The Technique That Makes These Spiced Brown-Butter Apples Restaurant-Quality
After making this recipe dozens of times, I’ve learned that a few key techniques separate good spiced apples from truly exceptional ones. The most important insight? The ideal ratio of butter to apples is one tablespoon of butter per apple, which creates enough richness without making the dish greasy. These tips will help you nail the texture, flavor, and presentation every single time.
Watch the Butter Like a Hawk
Brown butter requires your full attention because it transitions from perfect to burnt in seconds. I recommend using a light-colored pan so you can see the milk solids turning golden brown. Once you see those brown flecks and smell that nutty aroma, immediately remove the pan from heat. The residual heat will continue cooking the butter for another ten seconds, so pull it early rather than late.
Toast Your Spices First
Adding whole spices like cinnamon sticks or star anise to the butter before it browns infuses deeper flavor than ground spices alone. I toast them for about thirty seconds in the melted butter, then proceed with browning. This double-spice approach creates complexity that tastes like you spent hours on the recipe. Finish with freshly ground cinnamon and nutmeg right before serving for bright, aromatic top notes.
Cut Apples Uniformly
Slice your apples into wedges that are roughly the same thickness, about half an inch at the thickest part. This ensures they all finish cooking at the same time. I prefer leaving the peel on because it adds color, texture, and holds the wedges together during cooking. However, if you’re serving these to young children or prefer a softer texture, peeling works fine.
Don’t Overcrowd the Pan
If your apples overlap too much, they’ll steam instead of caramelize. I cook mine in a single layer, working in batches if necessary. The apples should have enough space to make direct contact with the hot butter and pan surface. This creates those beautiful golden edges that make the dish look and taste professional. For more ideas on cooking fruit with butter and spices, try this grilled peaches recipe that uses similar caramelization techniques.
Choose the Right Apple Variety
Firm, tart apples work best because they hold their shape and balance the richness of the butter. I use Granny Smith, Honeycrisp, or Pink Lady most often. Avoid soft varieties like Red Delicious or McIntosh, which turn mushy quickly. If you want to learn more about apple varieties and their nutritional benefits, choosing the right type makes a real difference in both texture and flavor.
Common Mistakes to Avoid When Making Spiced Brown-Butter Apples
Even though this recipe is straightforward, a few missteps can turn your apples mushy or your butter burnt. I’ve made every one of these mistakes myself, so I know exactly how to help you avoid them. Here’s what to watch out for and how I fix each issue.
Burning the Butter
Burnt butter tastes bitter and acrid, ruining the entire dish. This happens when you walk away or use too high heat. I fix this by keeping the heat at medium and staying at the stove the entire time. If you see black specks instead of golden brown ones, start over. There’s no saving burnt butter, and trying to proceed will waste your apples too.
Adding Apples Too Soon
If you add the apples before the butter has fully browned, you lose that signature nutty flavor. The apples release moisture that stops the browning process immediately. I recommend browning the butter completely, removing the pan from heat for ten seconds to stop the cooking, then adding the apples. This gives you full control and prevents accidents.
Overcooking the Apples
Mushy apples are the most common complaint I hear from readers. This happens when you cook them too long or at too high a temperature. I cook mine for just five to seven minutes total, until they’re tender but still hold their shape. They should have a slight resistance when you pierce them with a fork. Remember, they’ll continue softening slightly even after you remove them from heat.
Skipping the Salt
A tiny pinch of salt transforms this dish from one-dimensional to complex. Salt balances the sweetness and makes all the other flavors pop. I add a small pinch right at the end, tasting as I go. This is especially important if you’re using unsalted butter, which is what I recommend for better control over the final seasoning.
Creative Ways to Adapt Your Spiced Brown-Butter Apples
One of my favorite things about this recipe is how easily it adapts to different dietary needs and flavor preferences. I’ve tested these variations extensively, and each one brings something special to the table while maintaining that signature brown butter richness.
Dairy-Free Version
Use vegan butter or refined coconut oil in place of regular butter. I’ve had excellent results with plant-based butters that contain at least fifteen percent fat. The browning process works similarly, though the flavor will be slightly less nutty. Add an extra quarter teaspoon of vanilla extract to compensate for the missing dairy richness.
Maple-Bourbon Variation
After the apples are tender, add two tablespoons of bourbon and one tablespoon of maple syrup. Let it simmer for one minute to cook off the alcohol while the syrup reduces slightly. This creates a sophisticated flavor profile that’s perfect for dinner parties. Make sure to use real maple syrup, not pancake syrup, for the best results.
Savory Herb Option
Skip the cinnamon and nutmeg entirely. Instead, add fresh thyme sprigs and a small sprig of rosemary to the brown butter. This savory version pairs beautifully with pork chops, roasted chicken, or even a cheese board. I remove the herb stems before serving and finish with a tiny drizzle of balsamic vinegar for acidity.
Cardamom-Orange Twist
Replace the cinnamon with half a teaspoon of ground cardamom and add the zest of one orange along with the apples. This combination feels exotic and elegant, perfect for special occasions. The citrus brightness cuts through the butter richness in a way that’s absolutely delicious. I sometimes add a tablespoon of orange juice at the very end for extra zing.
Gluten-Free and Naturally Sweet
This recipe is naturally gluten-free as written. If you want to reduce added sugar, skip the brown sugar entirely and rely on the natural sweetness of the apples plus a tablespoon of honey or date syrup. I find that ripe apples provide plenty of sweetness on their own, especially when caramelized. Taste as you go and adjust based on your apple variety.
What Makes Spiced Brown-Butter Apples a Smart Choice
Beyond the incredible flavor, these apples offer genuine nutritional value. Each serving provides approximately two hundred calories, with most of that coming from healthy fats and natural fruit sugars. Apples deliver fiber, vitamin C, and antioxidants, while the butter provides fat-soluble vitamins like A and E. The spices add anti-inflammatory compounds without any extra calories.
I appreciate that this recipe doesn’t rely on refined sugar for sweetness. The caramelization process brings out the natural sugars in the apples, and the brown butter adds richness that makes you feel satisfied with a smaller portion. If you’re watching your carbohydrate intake, you can easily reduce or eliminate the added sugar without sacrificing much flavor. The dish remains naturally lower in carbs compared to traditional apple desserts like pie or crisp.
Delicious Ways to Enjoy Your Spiced Brown-Butter Apples
These versatile apples shine in so many contexts. For dessert, I spoon them warm over vanilla ice cream or Greek yogurt, letting the cold cream melt into the hot butter sauce. They’re also phenomenal over pancakes or waffles for a special weekend breakfast. I’ve served them alongside roasted pork tenderloin for an elegant dinner party, and the sweet-savory combination always impresses guests.
For a simple weeknight treat, I eat them straight from the skillet with a spoon while they’re still warm. They’re also delicious folded into oatmeal, layered in parfaits, or served over pound cake. If you’re feeling creative, use them as a filling for crepes or as a topping for brie cheese on a cheese board. The possibilities are truly endless, and leftovers reheat beautifully for quick breakfasts throughout the week.
Keeping Your Spiced Brown-Butter Apples Fresh
Store any leftover apples in an airtight container in the refrigerator for up to five days. I use a glass container with a tight-fitting lid to prevent the butter from absorbing other flavors. The apples will firm up as they cool, but that’s completely normal. When you’re ready to enjoy them again, reheat gently in a skillet over low heat or in the microwave in thirty-second intervals, stirring between each one.
For longer storage, these apples freeze surprisingly well for up to three months. I portion them into individual servings in small freezer-safe containers, which makes it easy to thaw just what I need. Thaw overnight in the refrigerator, then reheat as described above. The texture may be slightly softer after freezing, but the flavor remains excellent. I find frozen portions work especially well stirred into oatmeal or yogurt, where a softer texture is actually preferable.
Frequently Asked Questions
Firm, tart apples like Granny Smith, Honeycrisp, or Pink Lady work best because they hold their shape during cooking and balance the richness of the butter. Avoid soft varieties like Red Delicious or McIntosh, which turn mushy quickly and lose their texture when caramelized.
Yes, you can make them up to five days ahead. Store them in an airtight container in the refrigerator and reheat gently in a skillet over low heat or in the microwave in thirty-second intervals. They also freeze well for up to three months, making them perfect for meal prep.
The butter is ready when you see golden brown flecks at the bottom of the pan and smell a distinct nutty, caramel aroma. This typically takes three to five minutes over medium heat. Use a light-colored pan so you can monitor the color change easily, and remove from heat immediately when you see those brown specks to prevent burning.
Yes, but skip the pinch of salt at the end or reduce it significantly. Salted butter works fine for browning, but using unsalted gives you better control over the final seasoning. If you do use salted butter, taste before adding any additional salt to avoid making the dish too salty.




Leave a Reply