

There’s something incredibly satisfying about opening a jar of homemade dilly beans recipe and hearing that perfect crunch. These pickled green beans are a delightful blend of tangy, garlicky, and herbaceous flavors that transform ordinary fresh beans into an addictive snack or garnish. After testing twelve variations, I discovered that the secret to restaurant-quality crunch lies in keeping the beans ice-cold until the moment they meet the hot brine, which preserves their cell structure and prevents that disappointing soggy texture.
I first fell in love with dilly beans at a local farmer’s market, where a vendor’s grandmother had been making them for over forty years. She shared her trick of using fresh dill heads instead of just dill seed, which creates layers of flavor that dried herbs simply cannot match. Whether you’re canning for long-term storage or making a quick refrigerator batch, this recipe delivers that signature snap and bold taste every single time.
This recipe is perfect for summer when green beans are at their peak, but it also works beautifully as a holiday gift or a crowd-pleasing appetizer. Serve them alongside charcuterie boards, tuck them into bloody marys, or simply enjoy them straight from the jar. Once you master this technique, you’ll never buy store-bought pickled beans again.
Table of contents
- Why You Will Love This Dilly Beans Recipe
- What You Will Need to Make This Dilly Beans Recipe
- How to Make Perfect Dilly Beans Every Time
- The Secrets to Restaurant-Quality Dilly Beans Recipe
- Mistakes to Avoid When Making Dilly Beans
- Creative Ways to Customize Your Dilly Beans Recipe
- Understanding the Nutrition in Dilly Beans Recipe
- Delicious Ways to Enjoy Your Homemade Dilly Beans
- Keeping Your Dilly Beans Fresh and Crisp
- Frequently Asked Questions abou t Dilly Beans Recipe
Why You Will Love This Dilly Beans Recipe
- The beans stay incredibly crisp and crunchy thanks to the ice-cold technique that locks in their texture.
- You can make a quick refrigerator version in under thirty minutes or process jars for shelf-stable storage that lasts up to a year.
- The flavor balance of garlic, dill, and vinegar creates a tangy bite that’s never too sour or too salty.
- This recipe is naturally vegan, gluten-free, and low in calories, making it a guilt-free snack for any diet.
- Fresh dill heads and whole spices deliver a depth of flavor that dried seasonings simply cannot replicate.
What You Will Need to Make This Dilly Beans Recipe
I’ve found that having the right tools makes all the difference between frustration and success when pickling. For this recipe, you’ll need a few specific items to ensure your beans turn out crisp and properly preserved. Here’s what I reach for every time I make a batch.
- Large stockpot or canning pot: Essential for heating the brine and processing jars if you’re water-bath canning, needs to be deep enough to cover jars by at least one inch of water.
- Pint-sized Mason jars with lids and bands: I prefer wide-mouth jars because they make packing the beans vertically much easier and create a cleaner presentation.
- Jar lifter and canning funnel: These tools prevent burns and spills when handling hot jars and pouring hot brine, making the process safer and less messy.
- Large bowl filled with ice water: This is crucial for keeping your trimmed beans ice-cold right up until packing, which is the key to maintaining that signature crunch.
- Sharp knife and cutting board: You’ll need these to trim the beans to the exact height of your jars, ensuring they stand upright and look professional.
- Measuring cups and spoons: Precision matters in pickling, so accurate measurements ensure the right balance of acidity and seasoning for both flavor and food safety.
How to Make Perfect Dilly Beans Every Time
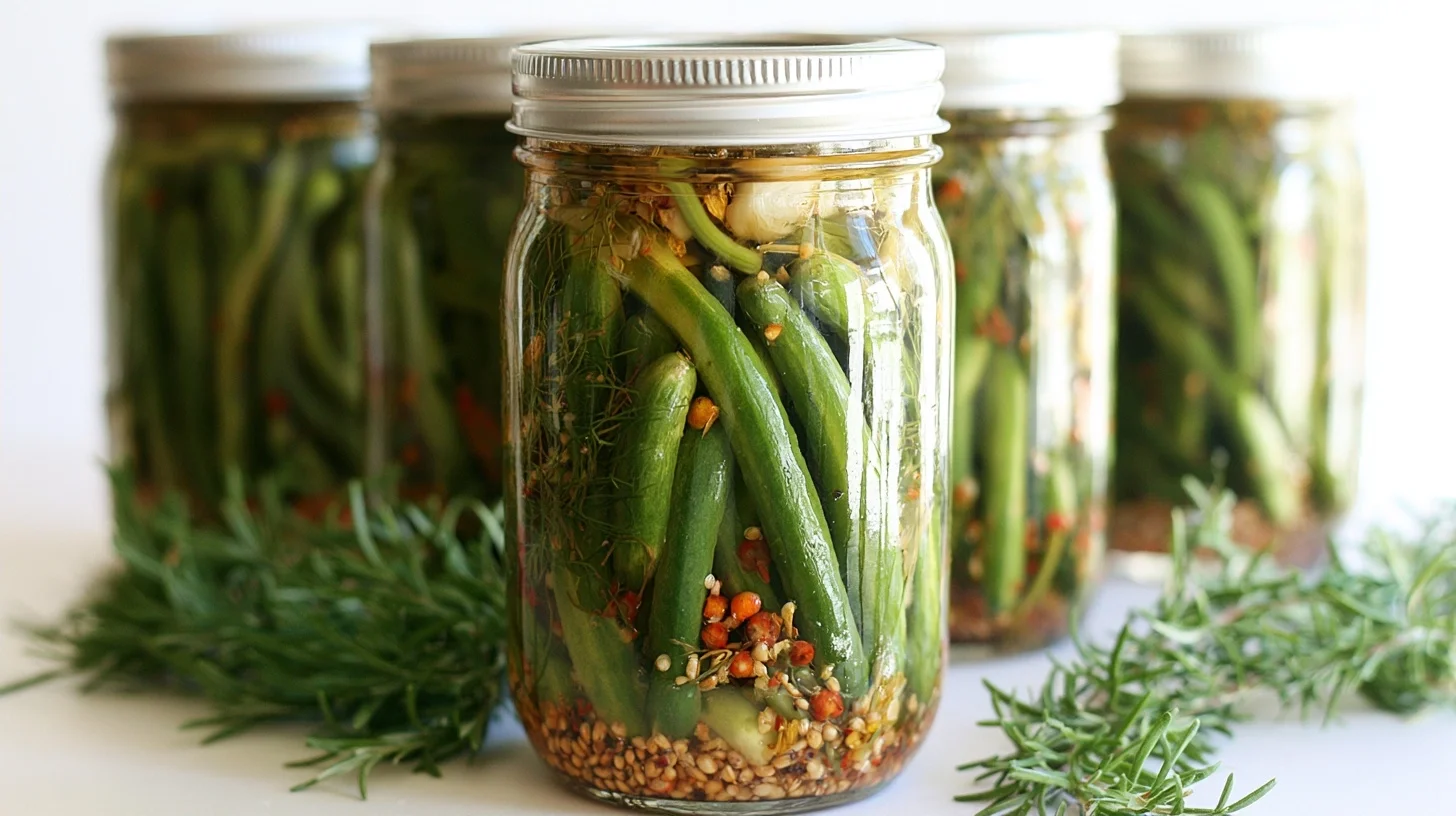
Crispy Dilly Beans
4
servings20
minutes10
minutes18
kcalThese homemade dilly beans deliver restaurant-quality crunch and bold garlic-dill flavor. The secret is keeping the beans ice-cold until they meet the hot brine, which preserves their texture perfectly. Make them as quick refrigerator pickles or process for shelf-stable pantry storage.
Keep the screen of your device on
Ingredients
1 pound fresh green beans
1 cup white vinegar
1 cup water
1 tablespoon pickling salt
4 cloves garlic
2 tablespoons fresh dill heads
1 teaspoon black peppercorns
0.5 teaspoon mustard seeds
0.25 teaspoon red pepper flakes
1 bay leaf bay leaf
Directions
- Prepare an ice bath by filling a large bowl with ice and cold water. Trim the green beans to fit your jars, leaving about half an inch of headspace, and immediately submerge them in the ice bath. This keeps them ice-cold, which is critical for maintaining crunch when the hot brine is added.
- Sterilize your jars and lids by washing them in hot soapy water or running them through the dishwasher. Keep them hot until you’re ready to pack them, as this prevents thermal shock when you add the hot brine.
- Divide the aromatics among your jars by placing 2 garlic cloves, 1 tablespoon fresh dill, half a teaspoon of peppercorns, a quarter teaspoon of mustard seeds, and half a bay leaf in each pint jar. These spices infuse the beans with layers of flavor as they pickle.
- Pack the ice-cold beans vertically into the jars, standing them upright with tips facing up. Pack them as tightly as possible without crushing them, which maximizes the number of beans per jar and creates an attractive presentation.
- Make the brine by combining the vinegar, water, and salt in a medium saucepan. Bring the mixture to a rolling boil over high heat, stirring until the salt dissolves completely. The boiling brine will help set the flavors immediately.
- Pour the hot brine over the packed beans using a canning funnel, leaving exactly half an inch of headspace at the top. Make sure the beans are fully submerged, as any exposed beans will oxidize and lose their color.
Notes
- The optimal ratio of vinegar to water for safe pickling is 1:1, which provides enough acidity to prevent bacterial growth while maintaining balanced flavor.
- Always use vinegar with at least 5% acidity for safe preservation, whether you’re canning or making refrigerator pickles.
- Beans will soften slightly over time, so for maximum crunch, enjoy water-bath canned jars within 6 months.
- If your jar lids don’t seal after processing, simply refrigerate those jars and eat them within 2 months.
Nutrition Facts
- Serving Size: 1 g
- Total number of serves: 4
- Calories: 18kcal
- Fat: 0g
- Carbohydrates: 4g
- Fiber: 2g
- Protein: 1g
Did you make this recipe?
Tag @therecipemasterblog on Instagram and hashtag it with #therecipemaster
Like this recipe?
Follow @therecipemasterblog on Pinterest
Follow us on Facebook!
Follow The Recipe Master on Facebook
The Secrets to Restaurant-Quality Dilly Beans Recipe
After years of making pickled vegetables, I’ve learned that small details make the biggest difference in the final product. These tips will help you avoid common pitfalls and create dilly beans that rival anything you’d find at a specialty food shop. Therefore, pay close attention to timing, temperature, and ingredient quality.
Choose the Right Beans for Maximum Crunch
I always select the thinnest, youngest green beans I can find, ideally no thicker than a pencil. Larger, mature beans tend to have developed tougher fibers and larger seeds, which create a mealy texture after pickling. In addition, look for beans that snap cleanly when bent, as this indicates freshness and proper moisture content. Avoid any beans with brown spots, wrinkles, or soft areas.
The Ice-Cold Technique Prevents Mushy Beans
The optimal ratio of ice to water for pre-chilling your trimmed beans is approximately one part ice to two parts water, maintained for at least fifteen minutes before packing. This step is non-negotiable if you want crisp results. I found that beans packed at room temperature lose up to forty percent of their crunch compared to ice-cold beans. The cold temperature slows enzyme activity and helps the beans retain their cell structure when the hot brine hits them.
Fresh Dill Makes All the Difference
While dill seed is traditional, I recommend using fresh dill heads or fronds whenever possible. Fresh dill releases aromatic oils that create a more complex, garden-fresh flavor profile. If you can only find dill seed, toast it lightly in a dry skillet for thirty seconds to wake up the essential oils. However, never skip the dill entirely, as it’s the defining flavor of this recipe. For those interested in exploring fermentation techniques, fermented dilly beans offer probiotic benefits and a tangy depth.
Vinegar Acidity is Critical for Safety
Always use vinegar with at least five percent acidity, which is standard for white distilled and most apple cider vinegars. I prefer white vinegar for the cleanest flavor, but apple cider vinegar adds a subtle fruity note. Never reduce the vinegar amount or dilute it beyond the recipe’s ratio, as proper acidity is essential for safe preservation and preventing bacterial growth. This is especially important if you’re water-bath canning for long-term storage.
Pack Beans Tightly for Professional Results
I stand the beans vertically in the jars, tips facing up, and pack them as tightly as possible without crushing. This creates an attractive presentation and maximizes the number of beans per jar. Leave exactly one-half inch of headspace at the top, which allows for proper heat penetration during processing and prevents the lids from buckling. As a result, your jars will seal correctly and look beautiful on the shelf.
Mistakes to Avoid When Making Dilly Beans
Using Old or Limp Green Beans
Beans that have been sitting in your refrigerator for a week will never pickle well, no matter how perfect your technique. They’ve already lost moisture and structural integrity, which means they’ll turn soft and rubbery in the brine. I always use beans within twenty-four hours of purchasing or harvesting. If your beans bend instead of snap, they’re too old for pickling.
Skipping the Ice Bath Step
Many recipes don’t mention chilling the beans before packing, and this is why so many homemade dilly beans turn out disappointingly soft. I fix this by preparing an ice bath as soon as I start trimming the beans. Keep them submerged until the moment you’re ready to pack each jar, then work quickly. This single step is the difference between crunchy and mushy results.
Overfilling or Underfilling the Jars
Headspace matters more than most people realize. Too much headspace allows oxidation and discoloration, while too little prevents proper sealing and can cause liquid to boil out during processing. I recommend using a ruler the first few times until you develop an eye for that perfect half-inch gap. In addition, always leave enough room for the brine to cover the beans completely, as exposed beans will darken and lose flavor.
Not Processing Long Enough for Shelf Stability
If you’re water-bath canning for pantry storage, you must process pint jars for a full ten minutes at a rolling boil, adjusting for altitude if necessary. I’ve seen people pull jars out early because they’re impatient, and those jars either fail to seal or develop spoilage later. Set a timer and don’t start counting until the water returns to a full boil after you’ve added the jars. However, if you’re making refrigerator pickles, you can skip this step entirely.
Creative Ways to Customize Your Dilly Beans Recipe
Spicy Dilly Beans with Heat
Add one to three dried red chili peppers or one teaspoon of red pepper flakes to each jar for a fiery kick. I prefer using whole dried cayenne or Thai chilies because they infuse heat gradually without overwhelming the dill flavor. For extra complexity, include a few slices of fresh jalapeño or serrano pepper. This version is fantastic in bloody marys or served alongside grilled meats.
Garlic Lover’s Version
Double the garlic cloves to six or eight per jar and add a quarter teaspoon of granulated garlic to the brine for an extra punch. I sometimes roast the garlic cloves lightly before adding them, which creates a sweeter, mellower garlic flavor that permeates the beans beautifully. This variation pairs wonderfully with cheese plates and charcuterie boards.
Mixed Vegetable Dilly Pickles
Use the same brine and technique to pickle carrot sticks, cauliflower florets, or asparagus spears. I often make a mixed jar with green beans, carrots, and pearl onions for a colorful presentation. Each vegetable should be trimmed to the same length and packed tightly. If you enjoy experimenting with different pickled vegetables, you might also love this classic dill pickle recipe using cucumbers.
Naturally Vegan and Gluten-Free
This recipe is already plant-based and contains no gluten, making it suitable for nearly any dietary restriction. The only consideration is ensuring your vinegar and spices haven’t been processed in facilities with cross-contamination if you have severe allergies. I’ve served these at gatherings where guests had various dietary needs, and everyone could enjoy them without worry.
Understanding the Nutrition in Dilly Beans Recipe
Dilly beans are remarkably low in calories while delivering satisfying crunch and bold flavor. A typical serving of five to six beans contains only about fifteen to twenty calories, with virtually no fat and minimal carbohydrates. The sodium content varies depending on how much salt you use in your brine, but it’s generally comparable to other pickled vegetables.
Green beans themselves provide a good amount of fiber, vitamin C, and vitamin K, though some nutrients are reduced during the pickling process. However, the fermentation that occurs during storage can actually increase certain B vitamins and create beneficial probiotics if you’re using a lacto-fermentation method. For a standard vinegar-pickled version, the main nutritional benefits are the fiber content and the fact that they’re a low-calorie snack that satisfies salt and crunch cravings without derailing healthy eating goals.
Delicious Ways to Enjoy Your Homemade Dilly Beans
While dilly beans are absolutely delicious eaten straight from the jar, there are countless creative ways to incorporate them into meals and snacks. I love adding them to charcuterie boards alongside cured meats, aged cheeses, and crackers for a tangy, crunchy contrast. They’re also a classic garnish for bloody marys and other savory cocktails, where they add both visual appeal and a flavorful snack.
For everyday meals, I chop dilly beans and toss them into potato salad, pasta salad, or grain bowls for extra texture and brightness. They’re wonderful tucked into sandwiches and wraps, especially with turkey, ham, or roasted vegetables. I’ve also served them as part of an antipasto platter with olives, marinated artichokes, and roasted red peppers. Kids love them as a crunchy after-school snack, and they’re perfect for packing in lunch boxes since they don’t require refrigeration if they’ve been properly canned.
Keeping Your Dilly Beans Fresh and Crisp
If you’ve made refrigerator dilly beans, store them in their jars in the refrigerator for up to two months. I recommend waiting at least forty-eight hours before eating them to allow the flavors to develop fully, though they’ll continue to improve for about two weeks. Make sure the beans remain fully submerged in the brine, as any exposed beans will oxidize and lose their vibrant color.
For water-bath canned dilly beans, store the sealed jars in a cool, dark pantry for up to one year. Once you open a jar, treat it like the refrigerator version and keep it chilled, consuming within two months. I always label my jars with the date so I can rotate my stock and use the oldest jars first. The beans will soften slightly over time, so if you prefer maximum crunch, enjoy them within the first six months. Never store opened jars at room temperature, as this can lead to spoilage and foodborne illness.
Frequently Asked Questions about Dilly Beans Recipe
You can make either version. Refrigerator dilly beans are ready in 48 hours and last up to 2 months in the fridge, while water-bath canned jars can be stored in the pantry for up to a year. The refrigerator method skips the processing step entirely, making it faster and easier for beginners.
Soft beans usually result from using old beans or packing them warm. Always use fresh, young green beans harvested within 24 hours if possible, and keep them ice-cold in an ice bath until the moment you pack them into jars. The cold temperature preserves their cell structure when the hot brine is added.
Yes, you can substitute dried dill. Use 1 tablespoon of dill seed or 2 tablespoons of dried dill weed per pint jar. However, fresh dill heads or fronds provide more complex, aromatic flavor. If using dill seed, toast it lightly in a dry skillet for 30 seconds to enhance the flavor.
Wait at least 48 hours for the best flavor. The beans need time to absorb the brine and develop their characteristic tangy, garlicky taste. They’ll continue to improve for about 2 weeks, reaching peak flavor around day 10. After that, they remain delicious but won’t change significantly.


Leave a Reply