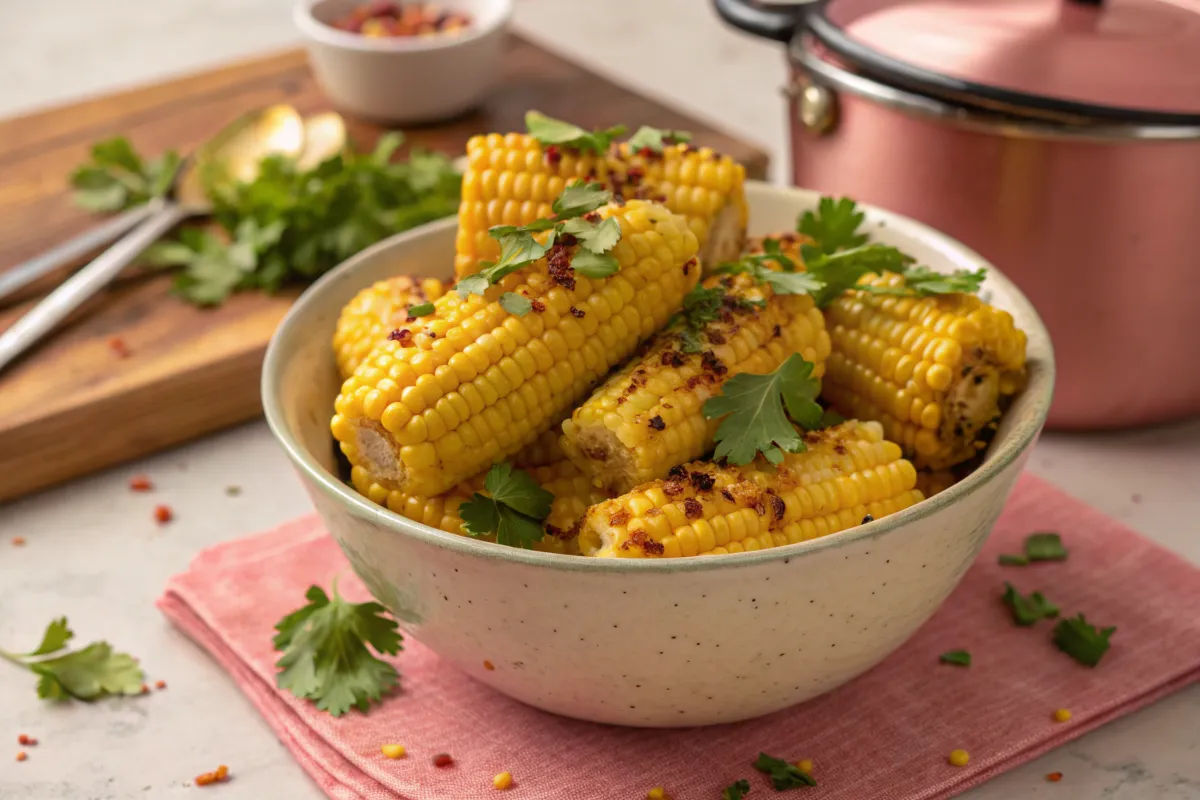
If you’ve never made a fried corn recipe from scratch, you’re seriously missing out, it’s one of those simple, feel-good dishes that always hits the spot. I grew up watching my grandma toss fresh corn into a hot skillet with butter, garlic, and onions, and let me tell you, the smell alone was enough to make everyone come running to the kitchen. It’s one of those nostalgic, no-fuss recipes that somehow feels like a warm hug on a plate.
What I love most is how it fits into just about any meal. Whether it’s a weeknight dinner when you’re short on time, or a summer BBQ when corn is practically everywhere, this dish delivers big on flavor without a ton of effort. It’s buttery, slightly crispy, sweet, savory, basically everything you want from a skillet-fried side. Let’s get into it, shall we?
Table of contents
- Why I Keep Coming Back to This Fried Corn Recipe
- How to Make it
- A Few Things to Prep Ahead (So You’re Not Rushing Later)
- Steps to shuck Corn and remove the silks
- The Tiny Tweaks That Take This Fried Corn from Good to WOW
- If You’re Feeling Adventurous, Try These Variations
- Serving Ideas That Make This Corn Even More Crave-Worthy
- How to Store and Reheat Without Losing the Magic
- Frequently Asked Questions
- Let’s Wrap It Up
Why I Keep Coming Back to This Fried Corn Recipe
This fried corn recipe is one of those dishes that proves simple can be sensational. It’s got just the right balance of sweet and savory, and you only need a few pantry staples to make it shine. I keep it in my regular rotation because it works with just about any meal, from Sunday fried chicken dinners to a quick Thursday night taco spread.
Here’s what makes this recipe so good:
- One-skillet magic: Everything happens in one pan, which means less mess and more flavor.
- Sweet, toasty corn flavor: Browning the corn just enough brings out its natural sugars.
- Simple ingredients, big payoff: You probably already have most of what you need in your kitchen.
- Totally customizable: Add spices, swap out herbs, or throw in a little bacon, go wild.
- Perfect texture: That mix of soft sautéed onions, crispy edges, and juicy corn pops in every bite.
Want to make it work for different diets? Easy:
- Low-sugar option: Skip the sugar entirely if your corn is sweet enough on its own.
- Vegan version: Use plant-based butter and a splash of neutral oil.
- Gluten-free: Naturally gluten-free, no swaps needed!
How to Make it
Fried corn recipe
4
servings5
minutes10
minutes150
kcalA simple and flavorful fried corn recipe, perfect as a side dish to any meal. Sweet corn is sautéed with butter and seasonings to create a crispy, savory, and slightly caramelized treat.
Keep the screen of your device on
Ingredients
4 cups fresh corn kernels (about 6 ears of corn) or frozen corn
2 tablespoons butter
1 tablespoon olive oil
1 small onion, finely diced
2 cloves garlic, minced
Salt and pepper, to taste
Optional: 1 teaspoon sugar (if corn isn’t sweet)
Optional: 1/4 cup chopped parsley or chives, for garnish
Directions
- Start by heating up a large skillet, if you’ve got a cast iron one, even better. Melt your butter and olive oil together over medium heat. While that’s happening, take a minute to enjoy the smell. It’s about to get even better.
- Add your diced onion and sauté for a few minutes until soft and translucent. Then toss in the minced garlic and stir until fragrant, don’t let it burn!
- Now it’s corn time. Pour the kernels into the pan and stir everything together. Let the corn fry, undisturbed, for a couple of minutes at a time to get those toasty brown edges. You’ll want to cook it for about 8–10 minutes total.
- Season it with salt, pepper, and a touch of sugar if your corn could use a sweetness boost. Stir well, garnish with parsley or chives, and serve warm.
Notes
- If you prefer a creamier texture, stir in a tablespoon of heavy cream at the end.
- For a spicier version, add red pepper flakes or a chopped jalapeño.
- Fresh corn works best for this recipe, but frozen corn is a great substitute in a pinch.
- You can use bacon grease instead of butter for a richer, smokier flavor.
Nutrition Facts
- Total number of serves: 4
- Calories: 150kcal
- Fat: 10g
- Sodium: 120mg
- Carbohydrates: 22g
- Fiber: 2g
- Sugar: 5g
- Protein: 3g
Did you make this recipe?
Tag @therecipemasterblog on Instagram and hashtag it with #therecipemaster
Like this recipe?
Follow @therecipemasterblog on Pinterest
Follow us on Facebook!
Follow The Recipe Master on Facebook
A Few Things to Prep Ahead (So You’re Not Rushing Later)
Let’s be real, no one wants to be chopping onions while the skillet is already hot. A tiny bit of prep goes a long way here, and it’ll make the whole process feel smoother (and more fun).
Here’s what you can do in advance:
- Shuck and cut the corn kernels off the cob if using fresh ears.
- Dice the onion and store it in an airtight container in the fridge.
- Mince the garlic and keep it sealed (or use pre-minced garlic to save time).
- Chop your herbs (if using) and keep them ready for garnish.
Steps to shuck Corn and remove the silks
- Start by removing the outer husks: Grab the top of the husk where it meets the corn and pull it down toward the base in one smooth motion. Continue peeling away all the layers of husk until the cob is fully exposed.
- Break off the stem: Once the husks are peeled down, twist and snap off the husk and stem at the base of the corn.
- Remove the silks: Rub the corn with your hands or a damp paper towel to loosen and pull off the fine silks that are stuck to the kernels.
- Brush off any stubborn silks: Use a soft-bristled vegetable brush or your fingers to remove any remaining silks.
- Rinse the corn: If necessary, rinse the cob under cold water to remove any leftover silks or debris.
The Tiny Tweaks That Take This Fried Corn from Good to WOW
I’ve made this recipe many times, and trust me, these little tricks make all the difference! Whether it’s getting that golden edge just right or adding a flavor boost, here’s how I make sure this dish turns out perfect every single time:
- Use a large skillet (cast iron if possible): This helps the corn brown instead of steam.
- Don’t crowd the pan: Let the corn sit still in the skillet for a couple of minutes to develop that caramelized edge.
- Taste your corn first: If it’s sweet, you might not need any sugar at all. If it’s bland, that teaspoon of sugar brings everything to life.
- Add garlic after the onion is translucent: It keeps the garlic from burning, which can turn bitter.
- Finish with fresh herbs: A little chopped parsley or chives brightens up the dish beautifully.
If You’re Feeling Adventurous, Try These Variations
If you’re like me, you love playing around with ingredients based on what’s in the fridge or what your cravings demand, so here are a few ideas to switch things up!
- Smoky Southern Style: Add diced bell pepper and a pinch of smoked paprika for that down-home BBQ flavor.
- Cheesy Twist: Stir in a handful of shredded cheddar or crumbled cotija cheese at the end, melty, salty perfection.
- Creamy Kick: Add a splash of heavy cream or a dollop of sour cream for a richer version.
- Spicy Corn Kick: Toss in some diced jalapeños or a sprinkle of chili flakes for heat lovers.
- Bacon & Corn Combo: Sauté chopped bacon first, then use the rendered fat in place of butter, game-changer.
Speaking of Southern comfort food, if you’re on a roll, don’t miss these fried apples, they’re sweet, sticky, and pair beautifully with both savory and sweet dishes.
Serving Ideas That Make This Corn Even More Crave-Worthy
This fried corn is one of those sides that fits in just about anywhere. Whether you’re serving up a summer BBQ or a cozy indoor dinner, it brings buttery, golden goodness to the table.
- With Southern mains: Like fried chicken, pork chops, or fried green tomatoes.
- Beside tacos or bowls: Especially tasty with chipotle corn salsa on the side.
- Part of a brunch plate: Eggs, biscuits, and maybe some fried apples.
- Alongside cozy soups: Like this flavor-packed corn chowder.
How to Store and Reheat Without Losing the Magic
Got leftovers? Lucky you. This fried corn stores beautifully and reheats like a champ. For storing, let it cool to room temp, then pop it into an airtight container. It’ll keep in the fridge for up to 3 days.
Frequently Asked Questions
Yes, frozen corn works well. Just be sure to thaw and drain it before frying.
Simply swap the butter for a plant-based butter or use all olive oil.
It lasts for about 3 days in the fridge when stored properly.
Yes! You can make it ahead and reheat it when ready to serve.
A cast iron skillet is ideal for getting those crispy bits, but any large heavy-bottomed skillet will work.
You can cook it a day ahead and reheat in a skillet to keep that fried texture. Great for meal prep or feeding a crowd!
Let’s Wrap It Up
I hope you give this fried corn recipe a try, it’s one of those simple sides that never fails to bring big flavor with barely any fuss. I’ve made it for weeknight dinners, summer cookouts, and even lazy brunches, and it always disappears fast. It’s buttery, a little crispy, and just feels like comfort in every bite.
If you’re in the mood for more corn goodness, you’ve got to try my fried corn on the cob next, it’s crunchy, golden, and a total showstopper.
Thanks for cooking with me, can’t wait to hear how it turns out!


Leave a Reply