

- Get mirror glaze to 90°F to 95°F and correct consistency for a smooth, opaque, reflective finish
- Freeze the fully frosted cake at least 30 minutes so the glaze sets quickly and does not slide or patch
- Use gel or paste food coloring for vibrant jewel tones; avoid liquid coloring that dilutes and thins the glaze
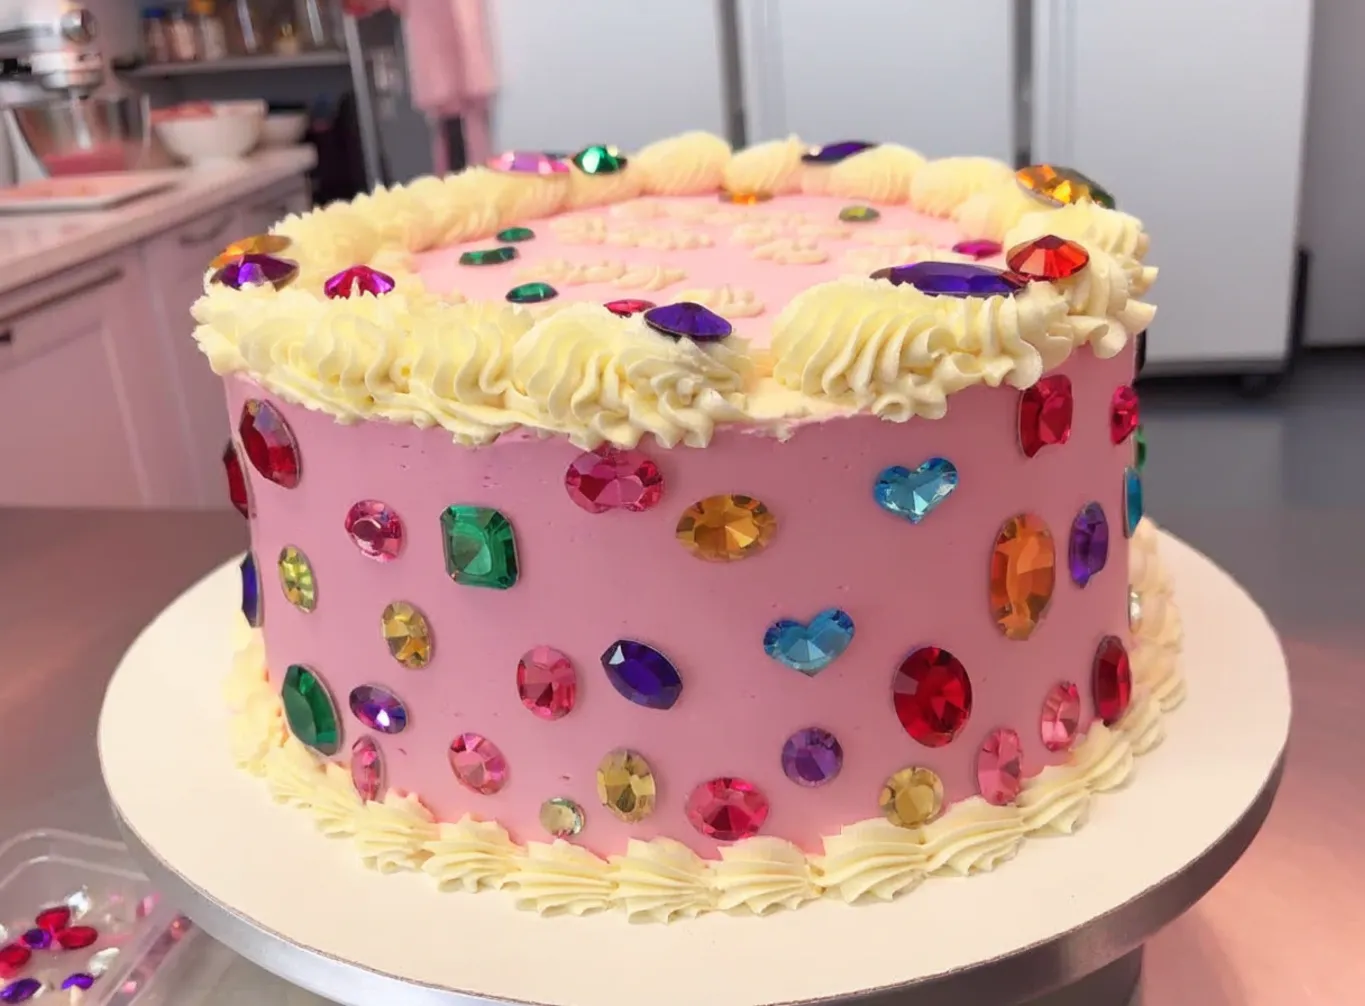
- Arrange edible or decorative gems in clusters rather than scattered to create intentional focal points and enhance the gem effect
If you’ve been scrolling through social media lately, you’ve probably seen the stunning gem cake trend taking over feeds everywhere. These eye-catching cakes feature glossy, jewel-toned surfaces that look like polished gemstones, created using colorful mirror glazes or hard candy decorations. While they look like they belong in a high-end bakery, gem cakes are surprisingly approachable to make at home once you understand the technique. The secret lies in achieving that smooth, reflective finish and arranging the edible or decorative gem pieces in a way that creates visual impact without overwhelming the design.
What makes gem cakes so appealing is their versatility. You can customize the colors to match any occasion, from deep emerald and sapphire tones for an elegant celebration to pastel pinks and purples for a birthday party. The base cake itself can be any flavor you prefer, since the real star of the show is the glossy exterior and gem decorations. This recipe walks you through creating a moist vanilla cake topped with a mirror glaze and decorative gem accents that deliver that signature jewel-box look.
The most important step is achieving the right glaze consistency. Too thick and it won’t flow smoothly over the cake, leaving visible brush marks or uneven patches. Too thin and it will run off completely, failing to create that opaque, reflective surface. Getting the temperature and texture just right makes all the difference between a professional-looking gem cake and one that looks homemade in the wrong way.
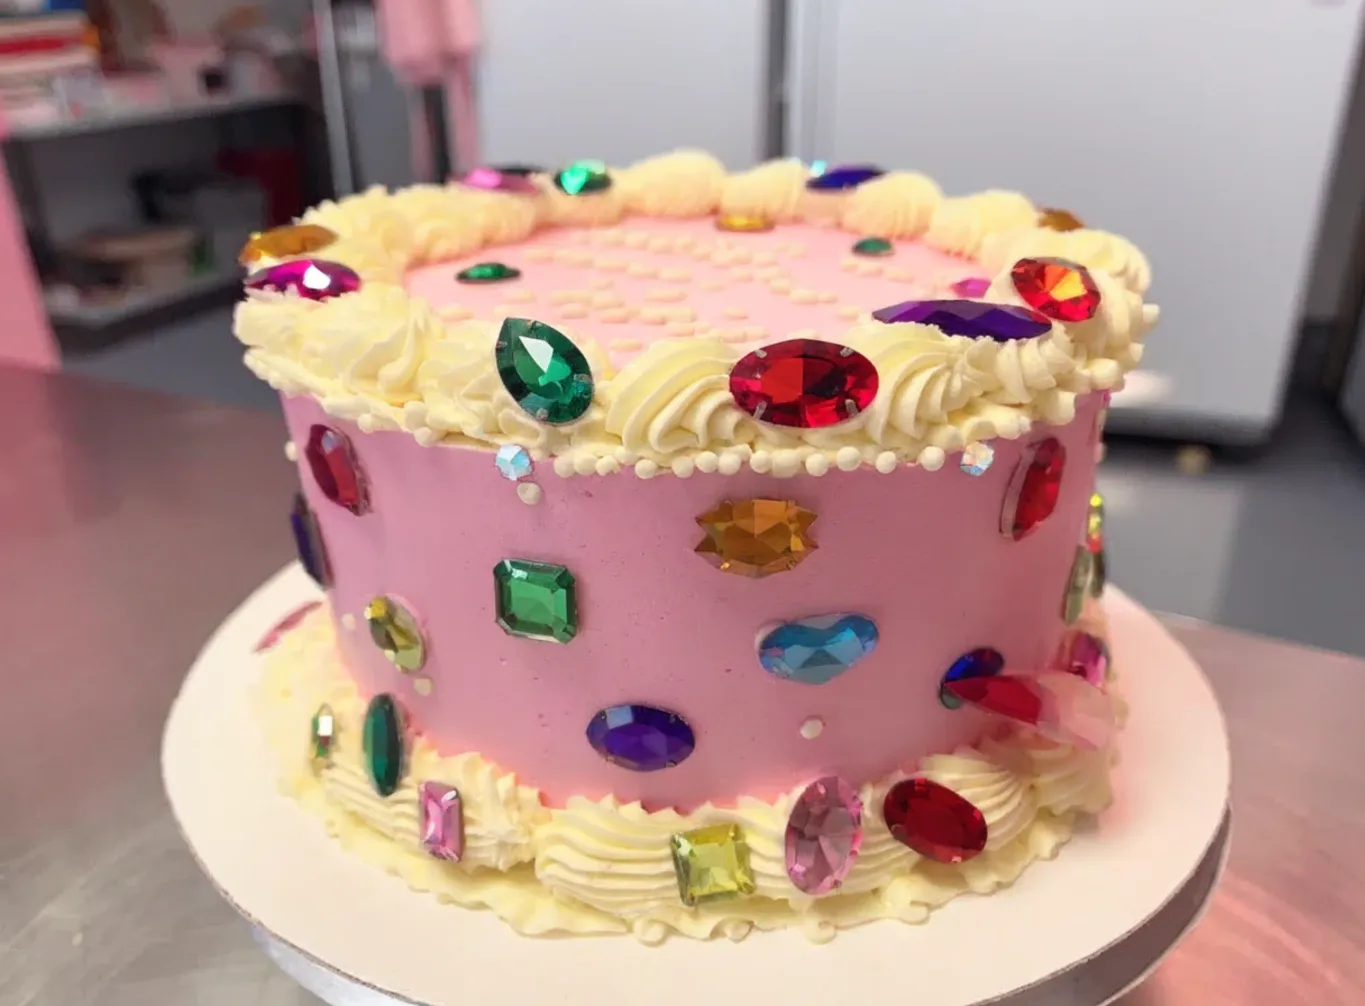
Table of contents
- Why You Will Love This Gem Cake
- Essential Equipment for Making Gem Cakes
- How to Make Gem Cake with Perfect Mirror Glaze
- How to Get That Glossy Gem Cake Finish Every Time
- Common Gem Cake Mistakes and How to Fix Them
- Gem Cake Flavor and Design Variations
- Nutrition Information for Gem Cake
- How to Serve Gem Cake for Maximum Impact
- How to Store Gem Cake and Keep the Glaze Intact
- Frequently Asked Questions
Why You Will Love This Gem Cake
- Creates a show-stopping centerpiece that looks far more difficult than it actually is to make.
- Allows complete color customization so you can match any party theme or personal preference.
- Uses a reliable vanilla cake base that stays moist for days, making it perfect for advance preparation.
- Delivers that glossy mirror finish without specialized pastry equipment or professional training.
Essential Equipment for Making Gem Cakes
The right tools make achieving that professional gem cake finish significantly easier. You don’t need a fully stocked pastry kitchen, but a few specific items will help you get clean edges and that signature glossy surface.
- Round cake pans (8-inch): Standard size that creates the right height and proportion for decorating with gem accents.
- Offset spatula: Essential for spreading frosting smoothly and creating a level surface before glazing.
- Wire cooling rack set over a baking sheet: Allows excess glaze to drip off cleanly while keeping your work surface manageable.
- Digital thermometer: The glaze must hit a specific temperature range to flow properly without being too runny.
- Squeeze bottles or piping bags: Gives you control when applying colored glaze in specific patterns or sections.
- Cake turntable: Makes rotating the cake while glazing much easier and helps achieve even coverage.
How to Make Gem Cake with Perfect Mirror Glaze
Gem Cake with Mirror Glaze
4
servings30
minutes40
minutes300
kcalThis stunning gem cake features a moist vanilla base topped with a glossy mirror glaze that creates a jewel-like finish. The key to success is chilling the cake completely before pouring the glaze at the correct temperature, which ensures a smooth, reflective surface that sets beautifully.
Keep the screen of your device on
Ingredients
2.5 cups all-purpose flour
2 cups granulated sugar
1 cup unsalted butter
4 large eggs
1 cup whole milk
2 teaspoons vanilla extract
2.5 teaspoons baking powder
0.5 teaspoon salt
3 cups buttercream frosting
1 cup white chocolate chips
1 cup sweetened condensed milk
2 tablespoons unflavored gelatin
Directions
- Preheat your oven to 350°F and grease two 8-inch round cake pans, then line the bottoms with parchment paper. This prevents sticking and makes removing the cakes much easier once they’re baked.
- Cream the softened butter and sugar together in a large mixing bowl using an electric mixer on medium speed until the mixture is light and fluffy, about 3 to 4 minutes. This incorporates air into the batter, which helps create a tender cake texture.
- Add the eggs one at a time, beating well after each addition, then mix in the vanilla extract. Make sure each egg is fully incorporated before adding the next to prevent the batter from curdling.
- Whisk together the flour, baking powder, and salt in a separate bowl. Add the dry ingredients to the butter mixture in three additions, alternating with the milk, beginning and ending with the flour mixture. Mix on low speed just until combined after each addition to avoid overmixing, which can make the cake tough.
- Divide the batter evenly between the prepared pans and smooth the tops with a spatula. Bake for 28 to 32 minutes, or until a toothpick inserted into the center comes out clean. The cakes should spring back lightly when touched.
- Cool the cakes in the pans for 10 minutes, then turn them out onto a wire rack to cool completely. The cakes must be completely cool before frosting, or the buttercream will melt and slide off.
Notes
- The mirror glaze must be between 90°F and 95°F when poured to achieve a smooth, glossy finish without melting the buttercream underneath.
- If the glaze is too thick and won’t flow smoothly, gently reheat it in short microwave bursts until it returns to the proper pouring temperature.
- Store gem cake in the refrigerator for up to three days in an airtight container, though the glaze will be most reflective within the first 24 hours.
Nutrition Facts
- Serving Size: 1g
- Total number of serves: 12
- Calories: 420kcal
- Fat: 18g
- Carbohydrates: 58g
- Fiber: 1g
- Protein: 5g
Did you make this recipe?
Tag @therecipemasterblog on Instagram and hashtag it with #therecipemaster
Like this recipe?
Follow @therecipemasterblog on Pinterest
Follow us on Facebook!
Follow The Recipe Master on Facebook
How to Get That Glossy Gem Cake Finish Every Time
The mirror glaze is what transforms an ordinary cake into a gem cake. The glaze needs to reach between 90°F and 95°F before pouring. At this temperature, it flows smoothly over the cake surface without melting the buttercream underneath or setting too quickly and leaving streaks.
Chill Your Cake Completely Before Glazing
Place your frosted cake in the freezer for at least 30 minutes before applying the glaze. A cold, firm surface allows the glaze to set quickly on contact, creating that smooth, glass-like finish. If the cake is even slightly warm, the glaze will slide off or create a patchy appearance. The buttercream layer underneath should feel solid to the touch before you begin pouring.
Pour from the Center and Work Outward
Start pouring the glaze directly onto the center top of the cake, then let gravity do most of the work. The glaze will naturally flow down the sides if it’s at the correct temperature. Use an offset spatula only if you have bare spots, and work quickly with minimal touching. Overworking the glaze creates visible marks and disrupts that reflective surface.
Add Gel Food Coloring for Vibrant Gem Tones
Liquid food coloring dilutes the glaze too much and affects the final texture. Gel or paste food coloring provides intense color without adding extra liquid. For the most realistic gem effect, use jewel tones like deep purple, emerald green, sapphire blue, or ruby red. You can also create a marbled effect by pouring two colors simultaneously and gently swirling with a toothpick before the glaze sets.
Use Edible or Decorative Gems Strategically
Once the glaze has set, you can add decorative elements. Edible gems made from isomalt or hard candy can be placed directly on the surface, or you can use non-edible acrylic gems for purely decorative purposes. Arrange them in clusters rather than scattering them randomly across the entire cake. This creates focal points and makes the design look intentional rather than chaotic.
Common Gem Cake Mistakes and How to Fix Them
Glaze Is Too Thick and Won’t Flow Smoothly
This happens when the glaze cools below 90°F before you pour it. The gelatin in the mixture begins to set, making it thick and difficult to spread. Gently reheat the glaze in short bursts in the microwave, stirring between each interval, until it returns to the proper pouring temperature. Avoid overheating, which can create bubbles that ruin the glossy finish.
Glaze Runs Off Completely and Doesn’t Stick
If your glaze is too hot or too thin, it will slide right off the cake without creating coverage. The cake must be frozen solid, and the glaze must be between 90°F and 95°F. If the glaze is too thin, let it cool a bit longer before pouring. If you’ve already poured it and it ran off, let the cake chill again and prepare a second batch of glaze at the correct temperature.
Buttercream Shows Through the Glaze
This usually means your buttercream layer wasn’t smooth enough before glazing. Any bumps, crumbs, or uneven patches will show through the transparent glaze. Always apply a crumb coat first, chill it, then apply a final smooth layer of buttercream. Use a bench scraper or offset spatula to get the surface as flat as possible. The smoother your base, the more flawless your gem cake will look.
Glaze Has Bubbles or a Dull Finish
Bubbles form when the glaze is stirred too vigorously or heated too quickly. Mix gently and avoid incorporating air. If bubbles appear, let the glaze sit for a few minutes and skim the surface with a spoon before pouring. A dull finish often results from the cake being too warm or the glaze being applied unevenly. Make sure the cake is fully chilled and pour in one smooth, continuous motion.
Gem Cake Flavor and Design Variations
Chocolate Gem Cake
Swap the vanilla cake base for a rich chocolate cake and use a chocolate buttercream underneath the glaze. Dark jewel tones like deep purple, burgundy, or black work beautifully with chocolate. The glaze recipe remains the same, but the darker cake base creates a more dramatic contrast with the glossy finish.
Lemon or Citrus Gem Cake
Add lemon zest to the cake batter and use a lemon buttercream filling. Pair this with bright, cheerful glaze colors like yellow, orange, or lime green. The tangy citrus flavor contrasts nicely with the sweet glaze and makes the cake feel lighter and more refreshing, perfect for spring or summer celebrations.
Ombre or Gradient Gem Cake
Create a gradient effect by pouring multiple shades of the same color family over different sections of the cake. Start with the darkest shade at the bottom and work toward the lightest at the top. This technique requires working quickly since the glaze sets fast, but the result is a stunning color transition that enhances the gemstone illusion.
Gluten-Free Gem Cake
Use a 1:1 gluten-free baking flour blend in place of all-purpose flour. The texture will be slightly denser, but the glaze technique remains identical. Make sure your gluten-free flour contains xanthan gum or add it separately to help the cake hold its structure. This substitution works well for anyone with gluten sensitivities without sacrificing the visual impact.
Nutrition Information for Gem Cake
Gem cake is an indulgent dessert, with most of the calories coming from the butter, sugar, and cream in both the cake and buttercream layers. Each serving contains approximately 420 calories, with 18 grams of fat and 58 grams of carbohydrates. The glaze adds additional sugar but contributes minimal fat since it’s primarily made from sweetened condensed milk, white chocolate, and gelatin.
If you’re looking to reduce the calorie count, consider making a smaller cake or cutting thinner slices. You can also reduce the buttercream layer slightly, though this may affect how well the glaze adheres. The cake itself provides a small amount of protein from the eggs and milk, but this is primarily a celebratory dessert rather than a nutritionally dense option. For a lighter version, try using a sponge cake base instead of a butter-based cake, which will reduce the overall fat content.
How to Serve Gem Cake for Maximum Impact
Gem cakes are designed to be the centerpiece of your dessert table, so presentation matters. Serve the cake on a white or mirrored cake stand to enhance the reflective quality of the glaze. Use a sharp knife dipped in hot water and wiped dry between each slice to get clean cuts through the glaze without cracking or chipping the surface.
Pair each slice with a small dollop of whipped cream or a scoop of vanilla ice cream to balance the sweetness of the glaze. Fresh berries also work well, adding a pop of color and a tart contrast to the rich cake. If you’re serving this at a party, consider placing small LED lights underneath a glass cake stand to make the gem decorations sparkle even more.
How to Store Gem Cake and Keep the Glaze Intact
Store gem cake in the refrigerator in an airtight container or covered with plastic wrap. The glaze will stay glossy for up to three days, though it may lose some of its mirror-like shine after the first day. Avoid stacking anything on top of the cake, as this will damage the delicate glaze surface.
If you need to freeze the cake, do so before adding the glaze. Wrap the frosted cake tightly in plastic wrap and aluminum foil, then freeze for up to two months. Thaw the cake in the refrigerator overnight, then apply the glaze once it’s fully defrosted. The glaze itself does not freeze well, as it can become cloudy and lose its reflective quality when thawed.
Bring the cake to room temperature about 30 minutes before serving for the best flavor and texture. Cold cake can taste dense and muted, while room temperature cake allows the vanilla and butter flavors to come through more clearly. The glaze will soften slightly at room temperature, which actually makes slicing easier.
Frequently Asked Questions
A gem cake is a decorated cake featuring a glossy, mirror-like glaze and decorative gem accents that resemble polished gemstones. The effect is created using a mirror glaze made from sweetened condensed milk, white chocolate, gelatin, and food coloring, poured over a chilled cake to create a smooth, reflective surface.
No, liquid food coloring is not recommended for mirror glaze. Gel or paste food coloring works best because it provides vibrant color without adding extra liquid that would dilute the glaze and affect its texture. Liquid coloring can make the glaze too thin, preventing it from setting properly and creating that signature glossy finish.
Gem cake lasts up to three days in the refrigerator when stored in an airtight container. The glaze will stay glossy for the first day or two, though it may lose some of its mirror-like shine after that. The cake itself remains moist and flavorful throughout this period.
Yes, freezing the cake for at least 30 minutes before glazing is essential. A frozen, solid surface allows the glaze to set quickly on contact, creating that smooth, glass-like finish. If the cake is warm or even just chilled, the glaze will slide off or create a patchy, uneven appearance.


Leave a Reply