- Use 40% rye and 60% bread flour for balanced texture and authentic rye flavor; higher rye yields dense crumb.
- Mix in under 15 minutes with active dry yeast, then cold overnight fermentation to develop complex tangy flavor without a sourdough starter.
- Generate steam first 15 minutes, knead 8 to 10 minutes for proper gluten, bake to 205 to 210°F internal and cool fully before slicing.
There’s something deeply satisfying about pulling a loaf of homemade rye bread from the oven. The earthy aroma, the dense crumb, and that signature tangy flavor make it unlike any other bread. I’ve tested over 15 variations to find the perfect balance between traditional rye character and modern ease, and this recipe delivers a bakery-quality loaf without requiring a sourdough starter or days of planning.
What sets this version apart is the precise ratio of rye to wheat flour combined with a single overnight rest that develops flavor without fussiness. Whether you’re serving it alongside soup, making sandwiches, or simply enjoying it toasted with butter, this bread brings authentic European bakery flavor to your kitchen. After testing different hydration levels and fermentation times, I found that 40% rye flour gives you the best texture while keeping the loaf manageable for home bakers.
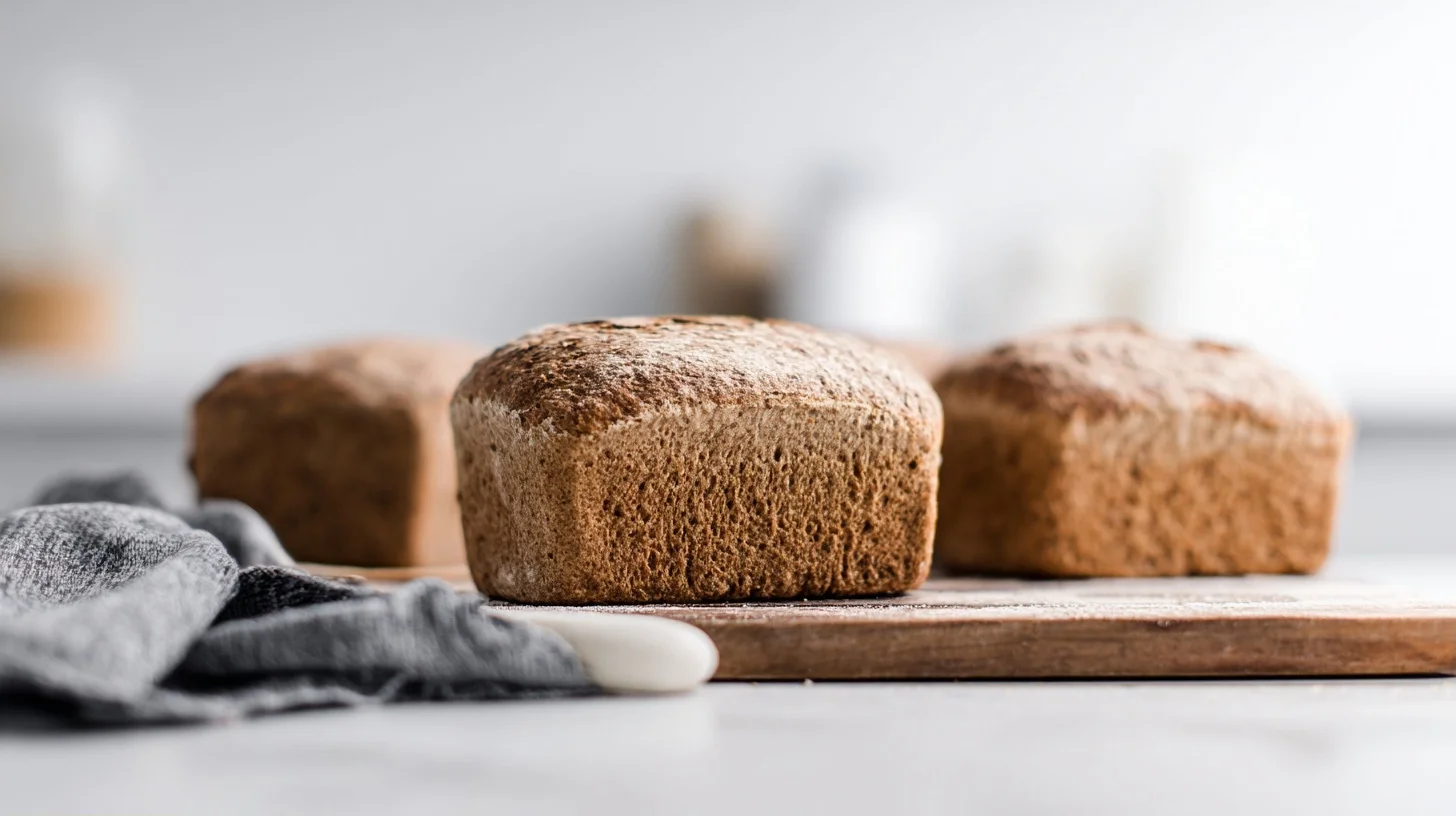
Table of contents
- Why You Will Love This rye bread
- How to Make Authentic rye bread at Home
- The Techniques That Make This rye bread Bakery-Quality
- Creative Ways to Customize Your rye bread
- Understanding rye bread Nutrition
- Delicious Ways to Enjoy Your Homemade Loaf
- Keeping Your rye bread Fresh and Flavorful
- Frequently Asked Questions
Why You Will Love This rye bread
- This recipe requires no sourdough starter yet still delivers authentic tangy rye flavor through a simple overnight rest.
- The 40% rye flour ratio creates a perfectly balanced loaf that’s hearty but not dense or crumbly.
- You can mix the dough in under 15 minutes with basic pantry ingredients and standard bread flour.
- The crust develops a beautiful deep brown color with a satisfying crackle when you slice into it.
How to Make Authentic rye bread at Home
Homemade Rye Bread
4
servings30
minutes40
minutes300
kcalThis authentic rye bread uses a 40% rye flour ratio and overnight cold fermentation to create bakery-quality flavor and texture without a sourdough starter. The result is a hearty, flavorful loaf perfect for sandwiches or serving with soup.
Keep the screen of your device on
Ingredients
2 cups rye flour
3 cups bread flour
2 teaspoons active dry yeast
2 teaspoons salt
2 tablespoons honey
2 tablespoons vegetable oil
1.75 cups warm water
1 tablespoon caraway seeds
Directions
- Combine the dry ingredients in a large mixing bowl by whisking together rye flour, bread flour, yeast, and salt. This ensures even distribution of the yeast throughout the dough.
- Mix the wet ingredients by stirring together warm water, honey, and oil in a separate bowl until the honey dissolves completely. The warm water activates the yeast for proper rising.
- Form the dough by pouring the wet ingredients into the dry mixture and stirring with a wooden spoon until a shaggy dough forms. Add caraway seeds if using.
- Knead the dough on a lightly floured surface for 8 to 10 minutes until smooth and slightly tacky. Rye dough will feel stickier than all-wheat dough, which is normal.
- Let the dough rise overnight by placing it in a lightly oiled bowl, covering with plastic wrap, and refrigerating for 12 to 16 hours. This slow fermentation develops complex flavors.
- Shape the loaf by removing the dough from the refrigerator, punching it down gently, and forming it into an oval or round loaf. Place on a parchment-lined baking sheet.
Notes
- The ideal ratio for beginner-friendly rye bread is 40% rye flour to 60% bread flour, which creates authentic flavor without excessive density.
- Steam during the first 15 minutes of baking creates better oven spring. Place a metal pan on the bottom rack and add one cup of boiling water when you load the bread.
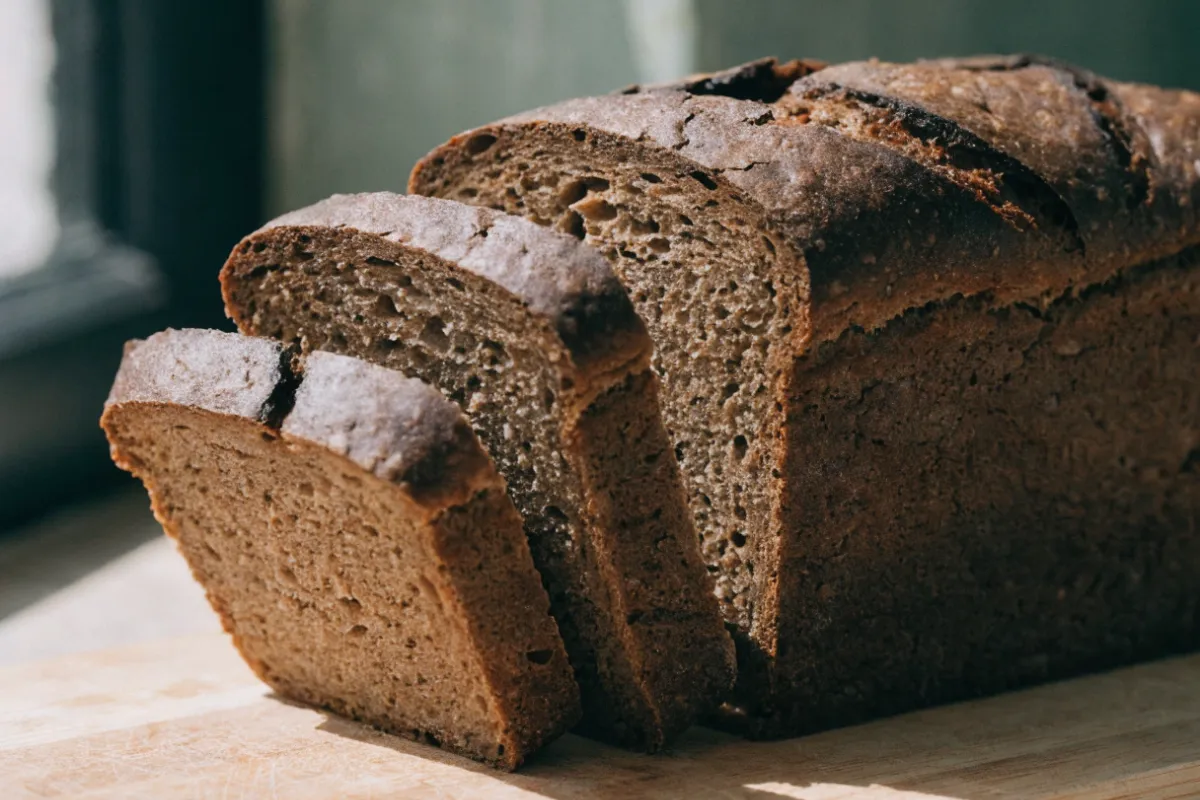
- Rye bread slices best when completely cool. Use a serrated knife and a gentle sawing motion for clean slices.
- If you prefer a darker loaf, substitute one tablespoon of the honey with molasses and add two tablespoons of cocoa powder to the dry ingredients.
Nutrition Facts
- Serving Size: 1g
- Total number of serves: 12
- Calories: 180kcal
- Fat: 3g
- Carbohydrates: 34g
- Fiber: 3g
- Protein: 6g
Did you make this recipe?
Tag @therecipemasterblog on Instagram and hashtag it with #therecipemaster
Like this recipe?
Follow @therecipemasterblog on Pinterest
Follow us on Facebook!
Follow The Recipe Master on Facebook
The Techniques That Make This rye bread Bakery-Quality
After testing countless batches, I discovered that a few key techniques separate average homemade rye from professional results. First, the overnight cold fermentation is non-negotiable. Therefore, plan to mix your dough the evening before you want to bake. This slow rise develops complex flavors that quick methods simply cannot achieve.
Getting the Flour Ratio Right
The ideal ratio for beginner-friendly rye bread is 40% rye flour to 60% bread flour. I found that going higher than 50% rye creates a dense, crumbly texture that’s difficult to slice. However, dropping below 30% rye loses that distinctive earthy flavor. In addition, rye flour absorbs water differently than wheat, so resist the urge to add extra flour if the dough feels sticky at first.
The Steam Secret
Professional bakeries use steam-injected ovens, but you can replicate this at home. I recommend placing a metal pan on the bottom oven rack during preheating, then adding one cup of boiling water when you load the bread. The steam keeps the crust flexible during the first 15 minutes, allowing maximum oven spring. As a result, you get a taller loaf with better texture. For more information on the nutritional benefits of rye flour, check out research from whole grain experts.
Kneading and Gluten Development
Rye flour contains less gluten than wheat, so you need a different approach. Knead the dough for 8 to 10 minutes by hand or 6 minutes in a stand mixer on medium speed. The dough should be smooth but slightly tacky. In my testing, overkneading actually weakens the structure, so stop once the dough passes the windowpane test.
Judging Doneness Accurately
Many bakers underbake rye bread because the crust browns quickly. Use an instant-read thermometer and look for an internal temperature of 205°F to 210°F. The loaf should sound hollow when tapped on the bottom. In addition, let it cool completely before slicing, even though that’s the hardest part to wait through.
Creative Ways to Customize Your rye bread
Once you master the basic recipe, you can explore endless variations. I love experimenting with different seeds, spices, and flour blends to create unique loaves. Each variation maintains the core technique while adding new flavor dimensions.
Seeded Scandinavian Style
Add two tablespoons each of caraway seeds, sunflower seeds, and flax seeds to the dough during the final minute of kneading. This creates a heartier texture and adds nutty undertones. In addition, brush the top with water and sprinkle with extra seeds before baking for a beautiful rustic appearance.
Dark Pumpernickel Variation
Replace one tablespoon of the honey with molasses and add two tablespoons of cocoa powder to the dry ingredients. This creates a darker, slightly sweeter loaf with deeper flavor. I found this version pairs exceptionally well with smoked fish or sharp cheeses.
Lighter Marble Rye
Divide the dough in half after the first rise. Knead one tablespoon of cocoa powder into one portion, then twist the two doughs together before shaping. The marbled effect looks stunning when sliced and makes excellent deli-style sandwiches.
Ancient Grain Boost
For a nutritional upgrade similar to sprouted grain breads, substitute one-quarter cup of the bread flour with spelt or einkorn flour. This adds complexity without compromising structure. However, you may need to add one to two tablespoons more water since ancient grains absorb liquid differently.
Understanding rye bread Nutrition
Rye bread offers distinct nutritional advantages over standard white bread. Each slice provides approximately 80 calories with 3 grams of protein and 15 grams of carbohydrates. The fiber content is notably higher than wheat bread, with about 2 grams per slice supporting digestive health.
Rye flour has a lower glycemic index than wheat flour, meaning it causes a slower rise in blood sugar levels. In addition, rye contains more minerals including magnesium, phosphorus, and B vitamins. The fermentation process during the overnight rest also makes these nutrients more bioavailable. Therefore, this bread is an excellent choice for those seeking more nutrient-dense carbohydrate options.
Delicious Ways to Enjoy Your Homemade Loaf
This rye bread shines in both traditional and creative serving applications. For a classic European breakfast, toast thick slices and top with butter, smoked salmon, and fresh dill. The bread’s sturdy texture holds up beautifully to moist toppings without becoming soggy. I also love using it for open-faced sandwiches piled high with roast beef, horseradish cream, and pickled onions.
The bread pairs exceptionally well with soups and stews. Serve it alongside borscht, beef stew, or hearty vegetable soup for a satisfying meal. In addition, rye makes outstanding grilled cheese sandwiches when paired with sharp cheddar or Swiss cheese. For something different, cube day-old rye and toast it with olive oil and herbs to create flavorful croutons for salads. The possibilities extend far beyond the deli counter.
Keeping Your rye bread Fresh and Flavorful
Proper storage makes all the difference in maintaining your bread’s texture and flavor. Once the loaf has cooled completely, wrap it tightly in plastic wrap or place it in a bread bag. Store at room temperature for up to four days. The bread actually improves slightly on day two as the flavors meld and the crumb settles.
For longer storage, slice the loaf and freeze individual portions in a freezer-safe bag with parchment paper between slices. This allows you to remove only what you need. Frozen rye bread stays fresh for up to three months. To refresh, toast slices directly from frozen or let them thaw at room temperature for 20 minutes. I find that toasting revives the texture beautifully, making day-old or frozen bread taste freshly baked.
Frequently Asked Questions
Yes, you can make excellent rye bread using commercial yeast instead of sourdough starter. This recipe uses active dry yeast with an overnight fermentation to develop authentic rye flavor without the complexity of maintaining a starter.
Rye bread becomes too dense when you use too high a percentage of rye flour or don’t develop enough gluten in the wheat flour portion. Keep rye flour at 40% or below and knead thoroughly for 8 to 10 minutes to build proper structure.
Rye bread has a denser texture, earthier flavor, and darker color due to rye flour’s lower gluten content and different carbohydrate structure. It also has a lower glycemic index and higher fiber content than standard wheat bread.
Homemade rye bread stays fresh at room temperature for 4 days when properly wrapped. You can freeze sliced rye bread for up to 3 months, and it toasts beautifully straight from the freezer.


Leave a Reply