- Apple Pie Biscuits combine comforting flavors of apple pie with buttery, flaky biscuits for a quick and satisfying treat.
- Flexible options: Use canned or homemade biscuits based on time and desired flavor profile.
- Prep tips help streamline the process, allowing for stress-free assembly and baking.
- Experiment with various fillings and toppings to customize the dish according to personal taste.
- Best served warm with ice cream, caramel drizzle, or as part of a brunch spread.
If you love apple pie but don’t always have the time to make one from scratch, this Apple Pie Biscuits Recipe is going to be your new go-to. It packs all the warm, cozy flavors of classic apple pie into buttery, flaky biscuits, and the best part is, it comes together fast.
I started making these on busy fall mornings when I craved something sweet and comforting but didn’t want to fuss with pie dough. Sometimes I use canned biscuits for a quick shortcut, and other times I go the homemade route when I’m feeling extra cozy. Either way, you end up with tender biscuits bursting with cinnamon-spiced apples that taste just like autumn on a plate.
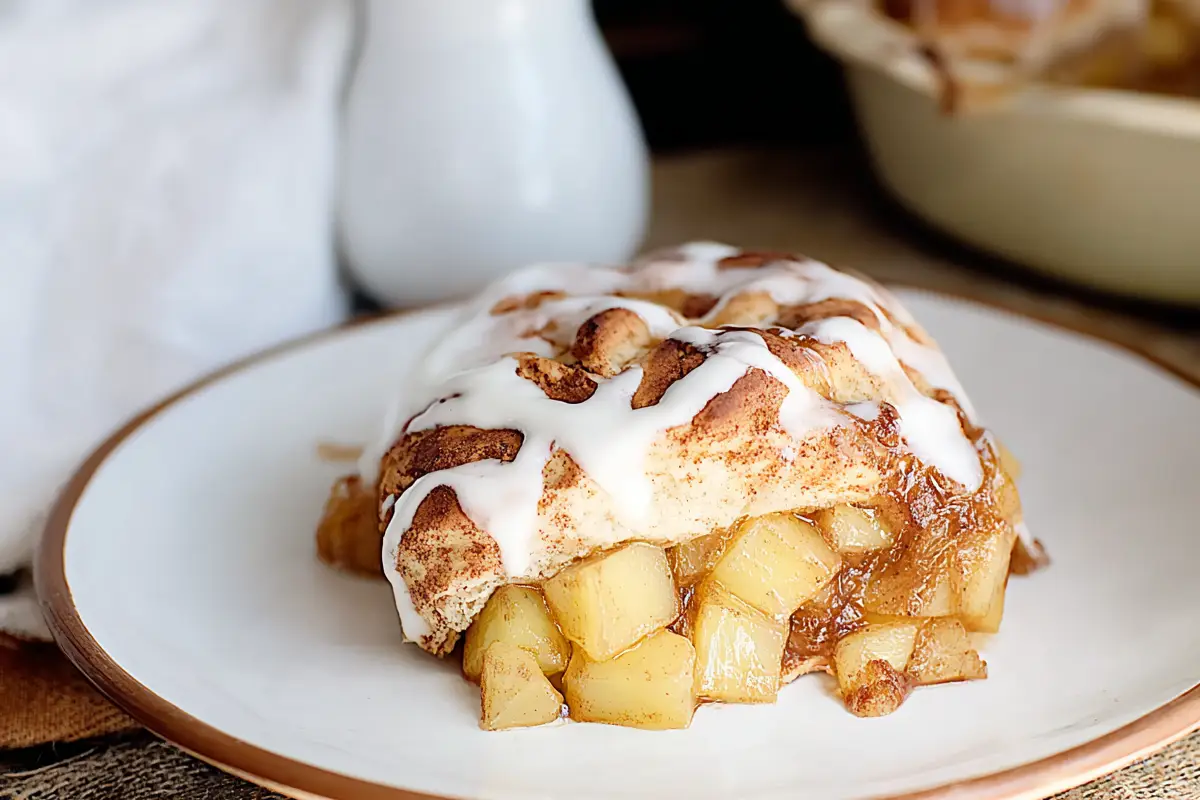
Table of contents
- How To Make It
- Why You’ll Love These Apple Pie Biscuits
- Get Ahead of the Game (Prep Tips You’ll Thank Yourself For)
- Little Secrets for the Best Apple Pie Biscuits
- Biscuit Showdown: Which Type Works Best?
- Fun Variations You’ll Love
- How to Serve These Apple Pie Biscuits
- Storing and Reheating Apple Pie Biscuits
- Best Apples for Apple Pie Biscuits
- Apple Pie Biscuit Troubleshooting & FAQs
- Wrapping Up: Why You Need These Biscuits in Your Life
How To Make It
Apple Pie Biscuits
8
servings15
minutes25
minutes280
kcalThese apple pie biscuits are buttery, flaky, and filled with warm cinnamon-spiced apples. Whether you use canned biscuits for convenience or make everything from scratch, you’ll have a treat that tastes like a cozy slice of fall.
Keep the screen of your device on
Ingredients
1 can (16 oz) refrigerated biscuits (like Pillsbury Grands) OR homemade biscuit dough (see optional section)
2 cups apples, peeled and diced (Granny Smith or Honeycrisp work best)
2 tbsp butter
0.25 cup brown sugar
2 tbsp granulated sugar
1 tsp cinnamon
0.25 tsp nutmeg
1 tbsp cornstarch (optional, for thicker filling)
2 tbsp water
1 egg (for egg wash)
- For the glaze (optional)
0.5 cup powdered sugar
2 tbsp milk
0.5 tsp vanilla extract
Directions
- Start by making the filling. In a skillet, melt butter over medium heat, then toss in the diced apples. Sprinkle with brown sugar, granulated sugar, cinnamon, and nutmeg. Cook until the apples soften and release their juices. If you like a thicker filling, stir in a little cornstarch mixed with water. Set the mixture aside to cool slightly.
- Next, prep your biscuits. If you’re using canned biscuits, just separate them and flatten each one a little with your hands. If you’re making homemade dough, roll it out and cut into rounds. Place a spoonful of apple filling in the center of each biscuit round, then fold the dough over and pinch to seal.
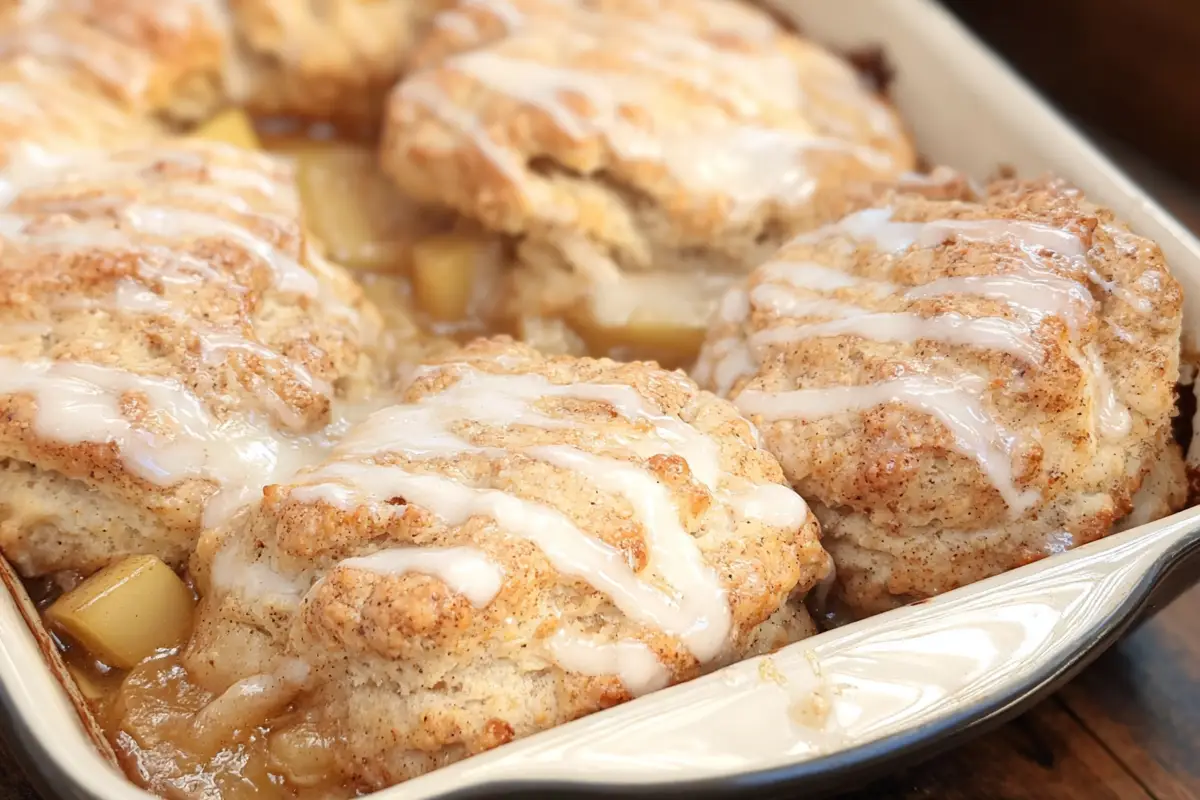
- Arrange the filled biscuits in a greased cast iron skillet or baking dish. Brush the tops with a quick egg wash for extra golden color. Pop them into a preheated 375°F oven and bake until golden brown, about 20–25 minutes.
- Once baked, you can drizzle with a simple glaze made by whisking together powdered sugar, milk, and vanilla, or just dust them with cinnamon sugar for a rustic finish. Serve warm, ideally with coffee or a scoop of vanilla ice cream if you’re going dessert-style.
Notes
- For the best flavor, use tart apples like Granny Smith or sweet-tart varieties like Honeycrisp.
- Don’t overfill the biscuits or they’ll pop open while baking.
- If your dough feels sticky, dust lightly with flour before sealing.
- These biscuits are best eaten warm, but leftovers reheat nicely in the oven.
- For a richer glaze, add a pinch of cinnamon or maple syrup.
Nutrition Facts
- Total number of serves: 8
- Calories: 280kcal
- Fat: 11g
- Carbohydrates: 42g
- Sugar: 18g
- Protein: 4g
Did you make this recipe?
Tag @therecipemasterblog on Instagram and hashtag it with #therecipemaster
Like this recipe?
Follow @therecipemasterblog on Pinterest
Follow us on Facebook!
Follow The Recipe Master on Facebook
Why You’ll Love These Apple Pie Biscuits
When I first made these, I realized they weren’t just a quick dessert, they were a total crowd-pleaser. What makes this recipe special is that it takes the comfort of apple pie and pairs it with the flakiness of biscuits. Here’s why it works so well:
- Two options in one: Use canned biscuits for speed or homemade biscuits when you want that from-scratch flavor.
- Customizable filling: You can go with a shortcut using canned apple pie filling or make a simple homemade version for fresher flavor.
- Perfect texture combo: Flaky, buttery biscuits meet gooey, spiced apples. It’s a bite of warm comfort in every piece.
- Versatile treat: Works for breakfast, dessert, or even as a fun holiday side dish.
- Beginner-friendly: Even if you’ve never baked a pie before, this recipe is forgiving and easy to master.
And the best part? You can dress them up with a glaze, a dusting of cinnamon sugar, or even a scoop of vanilla ice cream.
Get Ahead of the Game (Prep Tips You’ll Thank Yourself For)
One thing I’ve learned in the kitchen is that a little prep makes all the difference. If you want these biscuits to come together without stress, here’s what you can do ahead of time:
- Make the filling: Cook the apples with cinnamon and sugar up to 2 days in advance and store them in the fridge.
- Prep the biscuits: If using homemade dough, mix it up and chill it a day ahead.
- Set up your bakeware: A greased cast iron skillet or baking dish makes assembly faster.
- Mix the glaze: Whisk powdered sugar and milk ahead of time, cover, and refrigerate. Give it a stir before drizzling.
This way, when it’s time to bake, you can just assemble and pop them in the oven.
Little Secrets for the Best Apple Pie Biscuits
Okay, let’s talk insider tricks. Apple pie biscuits are simple enough, but a few small tweaks can make them bakery-worthy. Whenever I bake these, I keep these tips in mind, and they always deliver the best results:
- Use cold biscuit dough for the flakiest layers. If it warms up too much, pop it in the fridge for a few minutes before filling.
- Don’t overstuff the biscuits. A spoonful of filling is plenty; too much and they’ll burst open.
- Bake in a cast iron skillet if you can, it gives the bottoms that golden, crisp finish that’s hard to beat.
- Brush with egg wash for extra shine and color.
- Want the easiest homemade dough option? Try this 3-ingredient biscuit recipe, it works beautifully here.
Biscuit Showdown: Which Type Works Best?
I’ve tested these biscuits with just about every option, and here’s the breakdown so you can choose what works for you:
- Refrigerated Canned Biscuits (like Pillsbury Grands)
- Pros: Fast, convenient, consistent results.
- Cons: Less “homemade” flavor.
- Frozen Biscuits
- Pros: Better texture than canned, slightly more homemade feel.
- Cons: Requires thawing in advance.
- Homemade Biscuits
- Pros: Best flavor and texture, flakiest layers.
- Cons: Most time-consuming, but worth it if you enjoy baking.
If you want a simple homemade option, try my favorite 3-ingredient biscuit recipe.
Fun Variations You’ll Love
One of the best things about this recipe is how flexible it is. You can switch things up depending on your mood, dietary needs, or whatever’s in your pantry. Here are a few of my favorite twists:
- Gluten-Free Apple Pie Biscuits: Swap the dough for a gluten-free biscuit recipe. The texture is still flaky, and the filling shines through.
- Caramel Drizzle Version: Instead of glaze, drizzle warm caramel sauce over the biscuits for a gooier, richer dessert.
- Cinnamon Roll Twist: Use refrigerated cinnamon roll dough instead of biscuits. You’ll get a sweeter, spiced base that pairs beautifully with the apples.
- Apple-Pear Mix: Add diced pears with your apples for a slightly floral, juicy flavor. Bake as usual.
- Savory-Sweet Breakfast Biscuits: Leave off the glaze and serve these alongside eggs and bacon for a sweet-and-savory brunch spread. They’re surprisingly good with a drizzle of tomato gravy on the side!
- Extra Apple Lovers’ Version: Double the filling and bake the biscuits slightly apart so the juices bubble around them. Serve with ice cream for a cobbler-like dessert.
How to Serve These Apple Pie Biscuits
These biscuits are one of those recipes that can work in so many ways. Fresh out of the oven, they’re perfect as-is, but you can dress them up or pair them with other treats to make them shine.
- For dessert, serve warm with a scoop of vanilla ice cream or a drizzle of caramel.
- At brunch, pair them with scrambled eggs and bacon for a sweet-and-savory balance.
- For a fall-inspired spread, serve them alongside a slice of apple bread and a hot cup of coffee.
- Keep it simple with just a dusting of powdered sugar and a side of fried apples for double the apple flavor.
Storing and Reheating Apple Pie Biscuits
If you happen to have leftovers (a big “if” in my house), here’s how to keep them tasting fresh:
- At room temp: Store in an airtight container for up to 2 days.
- In the fridge: They’ll last up to 4 days. Just make sure they’re cooled before storing.
- Reheating: Warm in the oven at 325°F for about 8 minutes, or use an air fryer for a few minutes to bring back the crisp edges. Avoid the microwave if possible, it makes the biscuits a little soggy.
For more details on keeping your baked goods safe, check out the USDA’s guide to safe leftover storage.
Best Apples for Apple Pie Biscuits
Not all apples are created equal when it comes to baking. The type you choose makes a huge difference in flavor and texture.
- Granny Smith: Tart and firm, they balance the sweetness and hold their shape.
- Honeycrisp: Crisp, juicy, and slightly sweet, perfect for a fresh apple flavor that doesn’t get mushy.
- Braeburn: Great balance of sweet and tart, with a firm texture that holds up in baking.
- Fuji: Sweeter and softer, works best when mixed with a tart apple like Granny Smith.
Pro tip: Use a mix of apples for the best depth of flavor. Granny Smith + Honeycrisp is my personal go-to combo.
Beyond flavor and texture, apples also bring health benefits thanks to their fiber and antioxidants, you can read more about the nutritional value of apples here. Fun fact: studies even show a link between apples and heart health, making these biscuits a treat that feels a little better-for-you.
Apple Pie Biscuit Troubleshooting & FAQs
This usually happens when the filling has too much liquid. Make sure to cook down the apples until the juices thicken. If needed, stir in a cornstarch slurry (cornstarch + water) to help tighten it up before filling the biscuits. Also, avoid overfilling, just one spoonful per biscuit is enough.
If using homemade dough, it may just need a little extra flour. Lightly dust your work surface and hands with flour while shaping. For canned dough, a sticky texture is normal, but chilling it for 5 minutes in the fridge makes it easier to work with.
Yes! You can assemble the biscuits, cover the pan tightly with plastic wrap, and refrigerate up to 24 hours before baking. If baking straight from the fridge, add 2–3 extra minutes to the baking time.
No worries. A greased 9×13-inch baking dish or even a parchment-lined baking sheet works just fine. The skillet just adds that extra crispy bottom.
Absolutely. It’s the ultimate shortcut method. Just spoon it into the biscuit dough as directed. If you’d like a fresher taste, consider mixing in a handful of diced fresh apples with the canned filling.
If Granny Smith feels too sharp for you, go with Honeycrisp or Fuji for a sweeter, juicier filling. You can also mix varieties for the best balance.
Yes! Bake them as usual, let them cool, then freeze in an airtight bag or container for up to 2 months. Reheat in a 325°F oven until warmed through.
Seal the edges of the dough really well by pinching firmly. You can also lightly wet the edge of the dough before sealing, it helps them stay closed while baking.
Wrapping Up: Why You Need These Biscuits in Your Life
Apple pie is a classic for a reason, but these apple pie biscuits take that comfort to a whole new (and much easier) level. They’re buttery, flaky, and filled with warm spiced apples that make every bite feel like fall. Whether you whip them up with canned biscuits on a busy weeknight or go all out with homemade dough on a cozy weekend, you’ll end up with a treat that tastes way more impressive than the effort it takes.
And if you’re feeling indulgent, try serving them with a drizzle of warm caramel or even alongside this silky caramel dip for apples, it’s the perfect pairing.
So next time you’re craving apple pie but don’t want to fuss with rolling out dough, give these apple pie biscuits a try. Trust me, you’ll be making them on repeat, and everyone at the table will be asking for seconds.


Leave a Reply