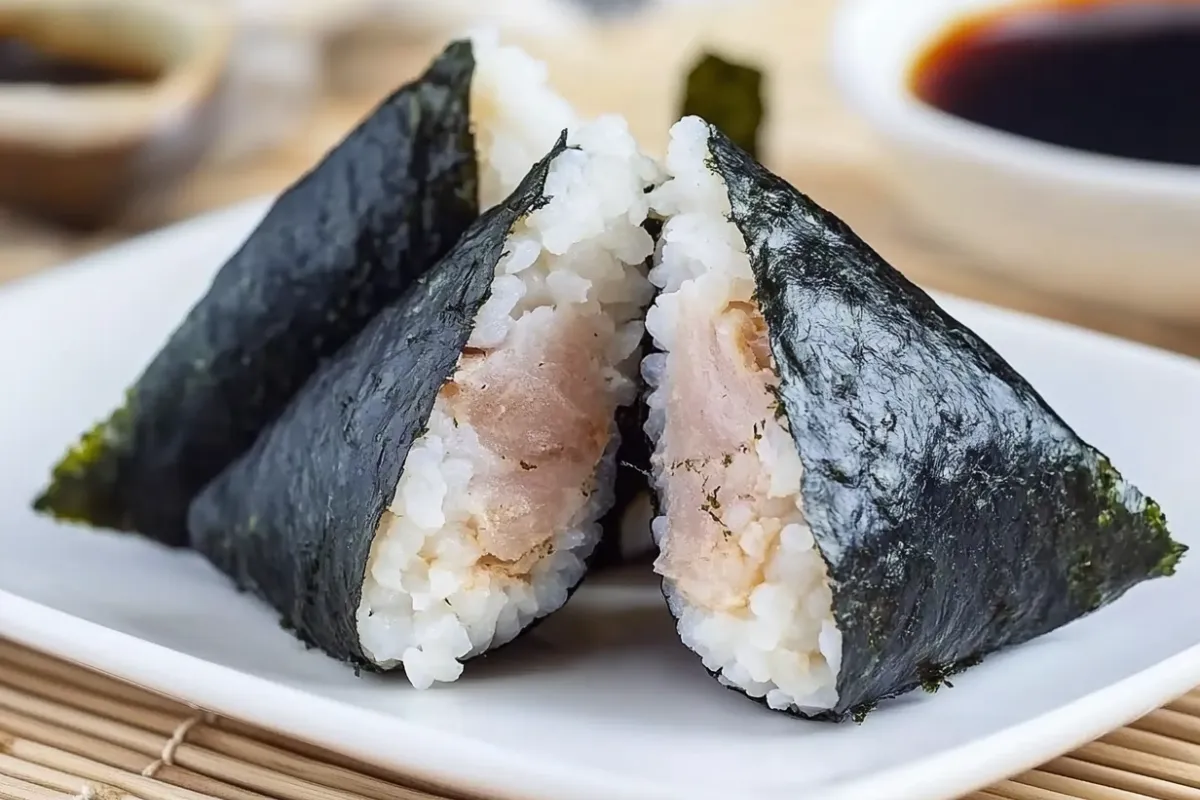
If you’ve ever opened a Japanese bento box or visited a konbini (Japanese convenience store), chances are you’ve spotted tuna onigiri. These humble triangular rice balls are more than just a quick bite, they’re a comforting staple of Japanese home cooking. The first time I had a tuna onigiri recipe prepared by a friend’s grandmother in Kyoto, I was instantly hooked. Soft, perfectly seasoned rice wrapped in crisp nori, with a creamy, umami-rich tuna filling, it was simple, but unforgettable.
This tuna onigiri recipe is ideal for quick lunches, road trip snacks, picnics, or adding a flavorful twist to your meal prep routine. It’s easy to make, kid-friendly, and surprisingly filling. And the best part? You don’t need to be a sushi master or have fancy equipment to pull it off. With just a few pantry staples, think canned tuna, Japanese mayo, rice, and nori, you can make this satisfying Japanese classic at home. Once you try it, I guarantee it’ll find a permanent spot in your snack rotation.
Table of contents
Why This Tuna Onigiri Recipe Just Works
What makes this tuna onigiri recipe stand out from others? It all starts with the balance of flavor and texture. The creamy, savory tuna-mayo mixture (called ツナマヨ or tuna mayo in Japan) pairs beautifully with fluffy short-grain rice and the subtle crunch of roasted seaweed. It’s the kind of snack that satisfies your cravings without weighing you down.
Unlike sushi, onigiri doesn’t require rice vinegar or rolling skills. You simply shape the rice by hand (or with a mold), add your filling, and wrap it up. It’s rustic, charming, and endlessly versatile.
You can also customize this recipe based on your dietary needs. Prefer spicy? Add a dash of sriracha or shichimi togarashi to the filling. Going dairy-free? Swap Japanese mayo for a vegan alternative. Gluten-free? Just double-check your nori and seasonings.
This version of the tuna onigiri recipe leans into convenience without sacrificing authenticity. It uses canned tuna (packed in oil or water) and store-bought nori sheets while staying true to the traditional flavor profile. I’ve also included optional ingredients, like sesame seeds or furikake, for those who want to take it up a notch.
What I love most is how hands-on this dish is. Making onigiri feels therapeutic, shaping the warm rice, folding in the filling, wrapping it gently with nori. It’s a tactile, soulful cooking experience that delivers comfort in every bite.
Recipe Card
Tuna Onigiri Recipe
5
servings15
minutes25
minutes180
kcalThis tuna onigiri recipe combines savory tuna with perfectly seasoned rice, wrapped in nori for an authentic Japanese treat. A must-try for fans of Japanese recipe ideas!
Keep the screen of your device on
Ingredients
- For the Rice
2 cups Japanese short-grain rice
2 1/2 cups water
2 tbsp rice vinegar
1 tsp salt
1 tbsp sugar
- For the Tuna Filling
1 can (5 oz) tuna, drained
2 tbsp Japanese mayonnaise
1 tsp soy sauce
1/2 tsp sesame oil
- For Assembly
6 sheets of nori (seaweed), cut into strips
Sesame seeds (optional)
Directions
- Cook the Rice:
Rinse the rice in cold water until the water runs clear. Combine with water in a rice cooker or pot. Cook until tender, then let it rest for 10 minutes. - Season the Rice:
Mix rice vinegar, sugar, and salt in a small bowl until dissolved. Gently fold the mixture into the warm rice. - Prepare the Tuna Filling:
In a bowl, mix tuna, Japanese mayonnaise, soy sauce, and sesame oil until well combined. - Shape the Onigiri:
Wet your hands to prevent sticking. Take a handful of rice and flatten it slightly in your palm. Add 1-2 teaspoons of the tuna filling to the center. - Seal the Filling:
Encase the filling with rice and shape it into a triangle or ball. Repeat with the remaining rice and filling. - Wrap with Nori:
Wrap a strip of nori around the onigiri. Sprinkle with sesame seeds if desired. - Serve and Enjoy:
Serve immediately or store in a sealed container for up to 4 hours.
Notes
- Rice Matters: Use Japanese short-grain rice for authentic texture and stickiness.
- Mayonnaise Substitute: If you can’t find Japanese mayonnaise, regular mayo with a pinch of sugar works.
- Storage Tip: Wrap onigiri in plastic wrap to prevent drying out.
Did you make this recipe?
Tag @therecipemasterblog on Instagram and hashtag it with #therecipemaster
Like this recipe?
Follow @therecipemasterblog on Pinterest
Follow us on Facebook!
Follow The Recipe Master on Facebook
My Top Tips for Tuna Onigiri Success
- Keep Your Hands Wet: Wet hands prevent rice from sticking during shaping. Add a pinch of salt to the water for extra seasoning.
- Don’t Overfill: Use just enough filling to prevent the onigiri from breaking apart.
- Cool Rice Slightly: Warm rice is easier to shape, but avoid using piping hot rice.
- Fresh Nori: Add nori right before serving to maintain its crisp texture.
- Don’t Overfill: A little goes a long way! Too much filling makes the onigiri difficult to shape and more likely to fall apart. A heaping teaspoon of tuna filling is just right for palm-sized rice balls.
- Experiment with Shapes: While triangular onigiri is traditional, round or cylindrical shapes work just as well.
Fun and Tasty Variations of the Recipe
1. Spicy Tuna Onigiri
Love a little heat? This one’s for you. Just mix your canned tuna with Japanese mayo and a squirt (or two) of sriracha or a dash of gochujang for a spicy Korean-Japanese twist. Add a few slices of cucumber inside for crunch and freshness. This variation is a hit at picnics and potlucks because it adds that little kick everyone loves.
2. Tuna Kimchi Onigiri
This Korean-inspired variation is bold and flavorful. Combine tuna with chopped, well-drained kimchi and a little sesame oil. The tangy kick of kimchi pairs beautifully with the soft rice. Wrap it in nori and sprinkle toasted sesame seeds on top. This is also a great option if you like fermented foods or want to add gut-friendly probiotics to your meal.
3. Avocado Tuna Onigiri
Creamy avocado mashed into the tuna-mayo mixture gives the filling a rich, buttery texture. Add a squeeze of lime juice and a pinch of salt, and you have a fusion version that’s incredibly satisfying and even a bit healthy. This one’s great for a quick lunch or a fresh take on tuna onigiri during warmer months.
4. Grilled Tuna Onigiri (Yaki Onigiri Style)
If you’re feeling adventurous, try grilling your onigiri! After shaping the rice balls with your tuna filling, lightly brush the outside with soy sauce or a mix of soy sauce and mirin. Then grill or pan-sear until golden brown and crispy on both sides. The result is a smoky, crispy crust and warm, melty filling, a real treat!
FAQs
Yes, onigiri can be made a few hours in advance. Wrap them tightly in plastic wrap and store at room temperature for up to 4 hours.
If you’re not a fan of seaweed, wrap the onigiri in lettuce or simply leave them unwrapped.
It’s best to freeze plain rice balls and add fillings fresh. Wrapped onigiri doesn’t freeze well as the texture of nori changes
Ensure you’re using sticky, short-grain rice and pressing firmly when shaping the onigiri.
Why Tuna Onigiri Deserves a Spot in Your Kitchen
There’s something incredibly comforting about holding a warm, freshly made tuna onigiri in your hands. It’s humble, hearty, and filled with nostalgic charm, yet so adaptable to your lifestyle. Whether you’re meal prepping for the week, packing lunch for a picnic, or simply craving a healthy snack that satisfies, this little triangle of joy delivers.
I hope this guide gave you the confidence to make your own tuna onigiri recipe at home. Once you get the hang of it, you’ll see how it can easily become a go-to snack or quick lunch. It’s endlessly customizable, budget-friendly, and just plain fun to make.
If you enjoyed this recipe, explore our Spinach Garlic Stuffed Flatbread Recipe for another unique and satisfying dish.

Leave a Reply