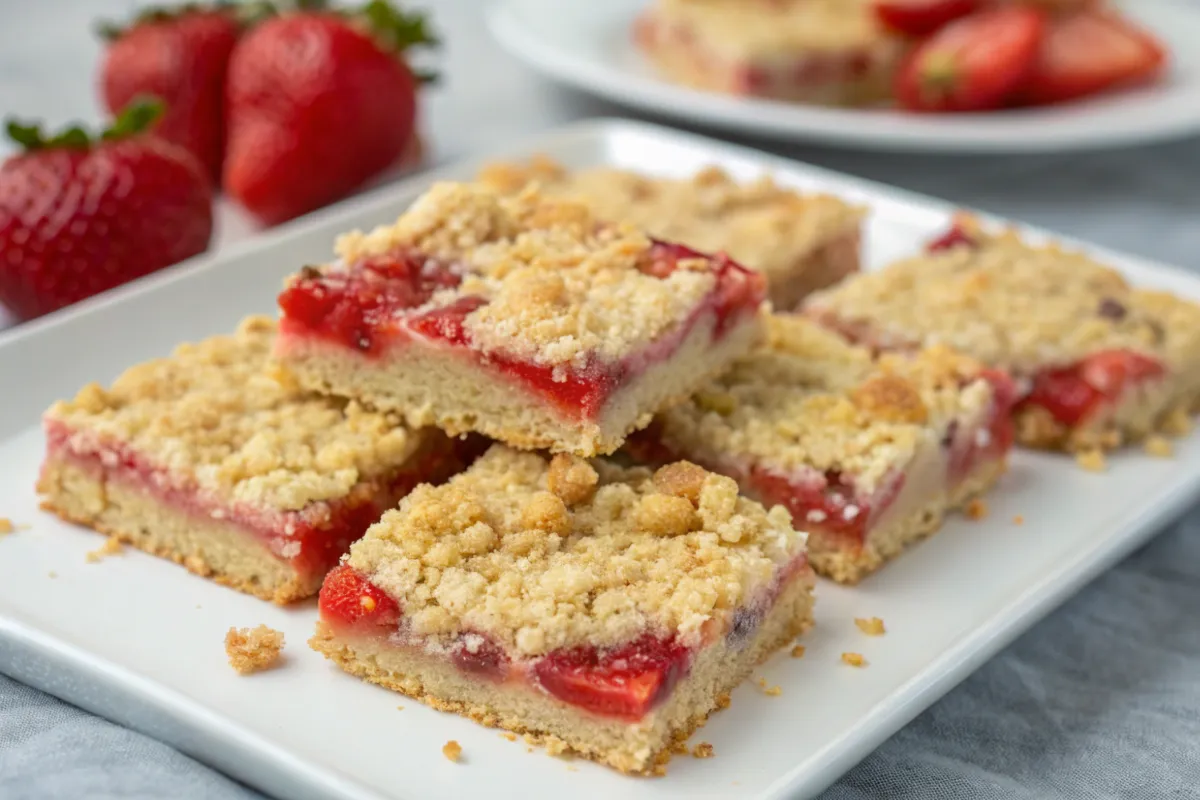
- Par-bake the shortbread base to prevent sogginess and achieve a crisp, hand-holdable crust.
- Use fresh, well-drained strawberries plus the right cornstarch ratio so the fruit layer sets, not weeps.
- Cool fully (or chill) before slicing; room temperature then refrigeration yields clean slices and firmer bars.
After eight years of testing, I finally found the secret to a strawberry crumb bars recipe that balances a crisp base with a jammy, fruit-forward center. This dish is my “Monday Repentance” for the sweet tooth, a treat that feels lighter and more vibrant than a heavy cake.
I made this three times in one week just to get the crumb texture right. My grandmother used to make these every June during the peak of strawberry season, and while hers were iconic, they often got soggy by day two. I was determined to fix that. The verdict? You must par-bake the base and use a specific starch ratio to keep the fruit layer from weeping. This strawberry crumb bars recipe is the result of rigorous kitchen trials and a deep respect for seasonal produce.

The Anatomy of Perfect Strawberry Crumb Bars
- Buttery Shortbread Base: The foundation is sturdy enough to hold by hand but melts in your mouth.
- Intense Fruit Flavor: We use fresh berries and a hint of lemon to make the strawberry flavor pop.
- Family-Favorite Status: This is a guaranteed crowd-pleaser for potlucks, picnics, or school events.
- Perfect for Batch Cooking: You can easily double the recipe and freeze half for later.
Looking for more summer bakes? Check out my Soft Strawberry Shortcake Cookies!
Choosing the Best Ingredients
The Best Strawberries to Use
For a successful strawberry crumb bars recipe, the science of the fruit is paramount. I recommend fresh, firm strawberries. Unlike a fork-tender potato where starch matters, here we focus on water content. If you use frozen berries, Don’t Skip! You must thaw and pat dry them thoroughly, or the excess liquid will turn your shortbread into a mushy mess.
Key Flavor Enhancers
- Lemon Zest: The oils in the zest provide a floral brightness that extract can’t mimic.
- Kosher Salt: I use this to “pop” the flavor of the butter.
- Old Fashioned Oats: These provide more structural integrity than quick oats.
- Cornstarch: This acts as the binder for the fruit layer, ensuring it sets into a sliceable jam.
The Step-by-Step Guide to Strawberry Crumb Bars Success
Phase 1: Prep and Hydrating the Crumble
First, whisk your dry ingredients in a large bowl. Use a pastry cutter to work in cold, cubed butter until the mixture looks like coarse sand. Pulse half of the mixture in a food processor if you want a finer base, but I prefer a rustic, hand-mixed feel. Let the dry bits Hydrate with the butter in the fridge for 10 minutes before the first bake.
Phase 2: Technical Execution: The Pre-Bake and Filling
Press half the mixture into a parchment-lined pan in a single layer. Bake this for 12 minutes. This “blind bake” prevents the fruit from making the bottom soggy. While that bakes, toss your sliced berries with sugar, lemon, and cornstarch. Whisk until a roux forms-like slurry at the bottom of the fruit bowl.
Phase 3: Finishing Touches
Spread the fruit over the hot crust. Sprinkle the remaining crumble over the top. Bake until the fruit is bubbling and the top is golden brown. Ensure the internal temperature of the fruit center reaches 200°F to ensure the cornstarch has fully thickened the juices.
Expert Troubleshooting
- Precision Cooling: You must let these bars reach room temperature before slicing. If you cut them while warm, the jam layer will run. For the cleanest lines, chill the pan in the fridge for one hour before using a bench scraper to slice.
- Mechanical Tools: I recommend using a 9×9 square metal baking pan rather than glass. Metal conducts heat more evenly, resulting in a crispier bottom crust.
- Do Not Overmix: When combining the butter and flour, stop once you have pea-sized lumps. If you overwork the dough, it becomes tough and bready rather than crumbly.
- The “Don’t Skip” Rule: Line your pan with parchment paper, leaving an “overhang” on two sides. This allows you to lift the entire block of bars out at once for easy slicing.
Strawberry Crumb Bars Recipe Card
Strawberry Crumb Bars Recipe
16
servings20
minutes45
minutes245
kcalThese bars feature a buttery, oat-filled shortbread crust and a vibrant fresh strawberry filling. They are the perfect balance of tart and sweet.
Keep the screen of your device on
Ingredients
- The Crust & Topping
1.5 cups (190g) All-purpose flour
1 cup (90g) Old fashioned rolled oats
1 cup (200g) Light brown sugar, packed
1 tsp Baking powder
0.25 tsp Kosher salt
1 cup (225g) Unsalted butter, cold and cubed
- The Strawberry Layer
3 cups (450g) Fresh strawberries, hulled and sliced
0.75 cup (65g) Granulated sugar
1 tbsp Cornstarch
1 tsp Lemon zest
1 tbsp Fresh lemon juice
Directions
- Preparation: Preheat your oven to 375°F (190°C). Line a 9×9 inch baking pan with parchment paper.
- Make the Crumble: In a large bowl, whisk together the flour, oats, brown sugar, baking powder, and salt. Add the cold, cubed butter. Use a pastry cutter or two forks to work the butter into the dry ingredients until clumps form.
- The Pre-Bake: Press exactly half of the crumble mixture into the bottom of the prepared pan. Press firmly to create a single layer. Bake for 12-15 minutes until just starting to brown.
- Prepare the Fruit: While the crust bakes, toss the sliced strawberries with granulated sugar, cornstarch, lemon zest, and lemon juice.
- Assembly: Spread the strawberry mixture over the hot, pre-baked crust. Sprinkle the remaining crumble mixture evenly over the top.
- The Final Bake: Return the pan to the oven and bake for 30-35 minutes. You are looking for a golden-brown topping and bubbling fruit juices.
- Cooling: Remove from the oven. Don’t Skip! Let the bars cool completely in the pan on a wire rack before lifting them out to slice.
Notes
- If/Then: If you want a more “dessert-like” bar, add 1/2 cup of white chocolate chips to the topping mixture.
- Fruit Variations: This recipe works perfectly with blueberries or raspberries using the same measurements.
- Clean Slicing: Wipe your knife with a warm, damp cloth between every single cut for professional-looking squares.
Nutrition Facts
- Fat: 11g
- Sodium: 140mg
- Carbohydrates: 34g
- Protein: 3g
- Vitamin C: 30mg
Did you make this recipe?
Tag @therecipemasterblog on Instagram and hashtag it with #therecipemaster
Like this recipe?
Follow @therecipemasterblog on Pinterest
Follow us on Facebook!
Follow The Recipe Master on Facebook
Strawberry Crumb Bars Troubleshooting
Yes. These are actually better the second day! Store them in an Airtight container to keep the crust from softening.
Absolutely. These bars freeze beautifully. Wrap individual squares in plastic wrap and store in a freezer bag for up to 3 months.
Then you may have measured your flour by “packing” the cup. Always fluff your flour or use a kitchen scale for accuracy.
Best Way to Reheat
Keep your bars in an Airtight container on the counter for 2 days or in the fridge for up to 5 days. To regain that bakery-fresh “crispy texture,” do not use a microwave. Instead, pop them in an air fryer at 300°F for 3 minutes. This dries out any moisture the fruit has released into the topping.
Learn more here:
- For more on the science of fruit thickeners, visit King Arthur Baking.
- Learn about strawberry peak seasons and storage at California Strawberries.

Leave a Reply