

- Transform leftover pumpkin pie into easy, no-bake cake pops that capture cozy pumpkin spice flavors.
- Mix pie filling with graham cracker crumbs and a binder until the mixture holds when squeezed.
- Refrigerate formed balls at least 30 minutes before dipping to prevent cracking and maintain shape.
- Thin candy melts with a bit of coconut oil, tap off excess coating, and add decorations while wet.
- Store airtight at room temperature up to 3 days, refrigerate one week, or freeze up to two months.
If you’re looking for a fun, festive treat that combines the warm spices of autumn with the playful charm of cake pops, pumpkin pie cake pops are exactly what you need. These bite-sized desserts capture all the cozy flavor of traditional pumpkin pie—think cinnamon, nutmeg, and creamy pumpkin—wrapped in a convenient, shareable form. Unlike traditional cake pops that start from scratch, this recipe uses leftover pumpkin pie as the base, transforming yesterday’s dessert into today’s party favorite.
The real genius here is the texture: moist, spiced pumpkin filling mixed with just enough graham cracker crumbs to hold its shape, then coated in smooth chocolate or white candy melts. The result is a two-bite treat that’s rich without being heavy, sweet without being cloying, and festive enough for Thanksgiving potlucks or holiday cookie swaps.
What makes this recipe particularly useful is how forgiving it is. You don’t need perfect pie leftovers or professional candy-making skills. The mixture comes together in minutes, and even if your coating isn’t flawless, the flavor more than makes up for it.
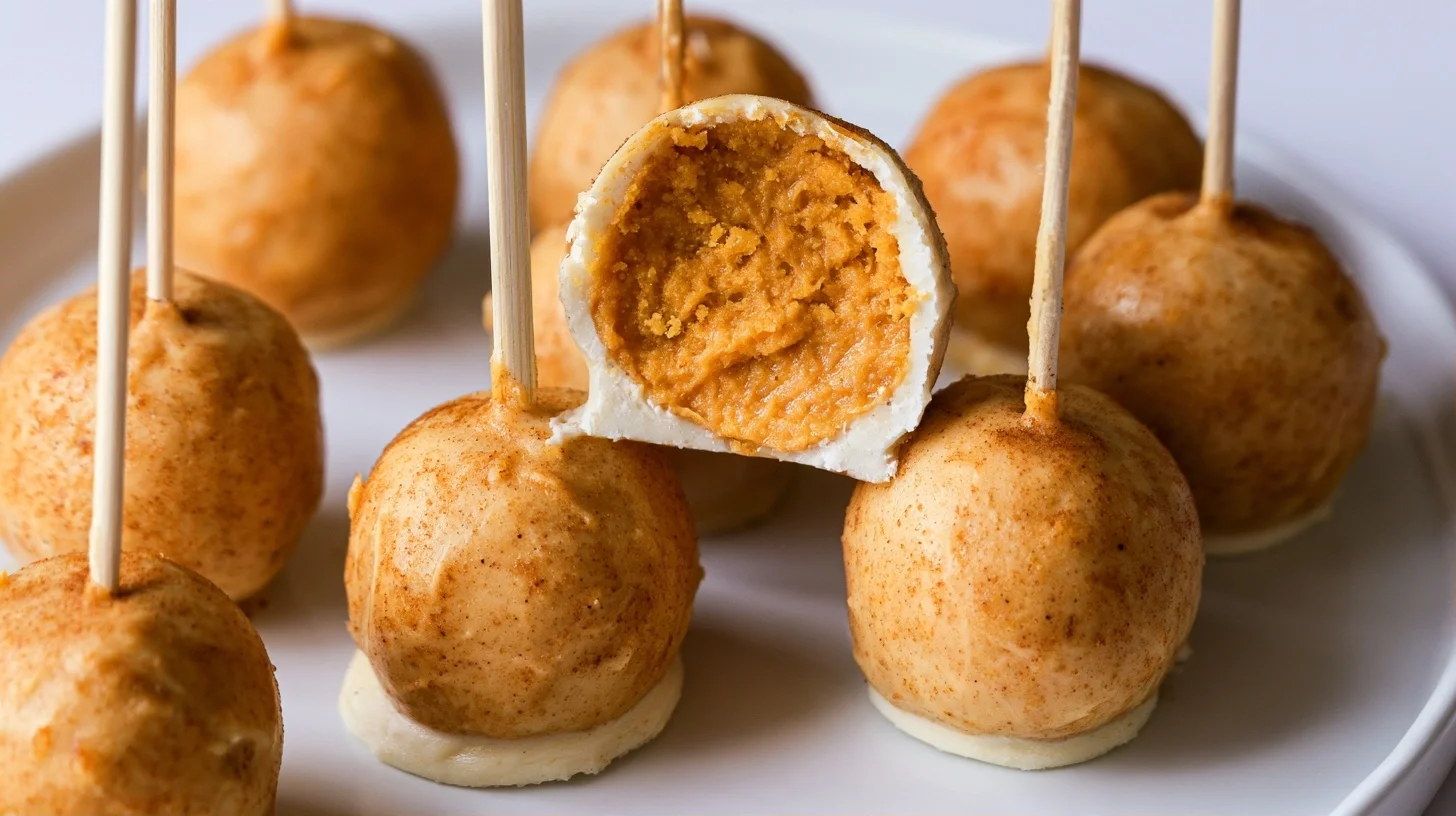
Table of contents
- Why You Will Love This Pumpkin Pie Cake Pops Recipe
- Essential Tools for Making Pumpkin Pie Cake Pops
- How to Make Perfect Pumpkin Pie Cake Pops
- Expert Tips for the Best Pumpkin Pie Cake Pops
- Common Mistakes That Ruin Pumpkin Pie Cake Pops
- Creative Variations for Pumpkin Pie Cake Pops Recipe
- Nutrition Information for Pumpkin Pie Cake Pops
- How to Serve Pumpkin Pie Cake Pops
- How to Store Pumpkin Pie Cake Pops
- Frequently Asked Questions about Pumpkin Pie Cake Pops Recipe
Why You Will Love This Pumpkin Pie Cake Pops Recipe
- Transforms leftover pumpkin pie into a completely new dessert instead of wasting it.
- Requires no baking, making it a quick project for busy holiday schedules.
- Portable and mess-free, perfect for potlucks, parties, or gifting.
- Customizable coating options let you match any theme or flavor preference.
Essential Tools for Making Pumpkin Pie Cake Pops
You don’t need specialized equipment to make these cake pops, but a few key tools will make the process smoother and help you achieve cleaner results.
- Large mixing bowl: Gives you enough room to thoroughly combine the pie filling, crust, and binders without making a mess.
- Cookie scoop or tablespoon: Ensures each cake pop is the same size, which helps with even coating and consistent appearance.
- Lollipop sticks or paper straws: Sturdy sticks hold the pops securely and make dipping much easier than using your hands.
- Microwave-safe bowl or double boiler: Melts the candy coating gently without scorching, which keeps the texture smooth.
- Styrofoam block or tall glass: Holds the pops upright while the coating sets, preventing smudges and flat spots.
- Parchment-lined baking sheet: Provides a clean surface for chilling the formed balls before dipping.
How to Make Perfect Pumpkin Pie Cake Pops
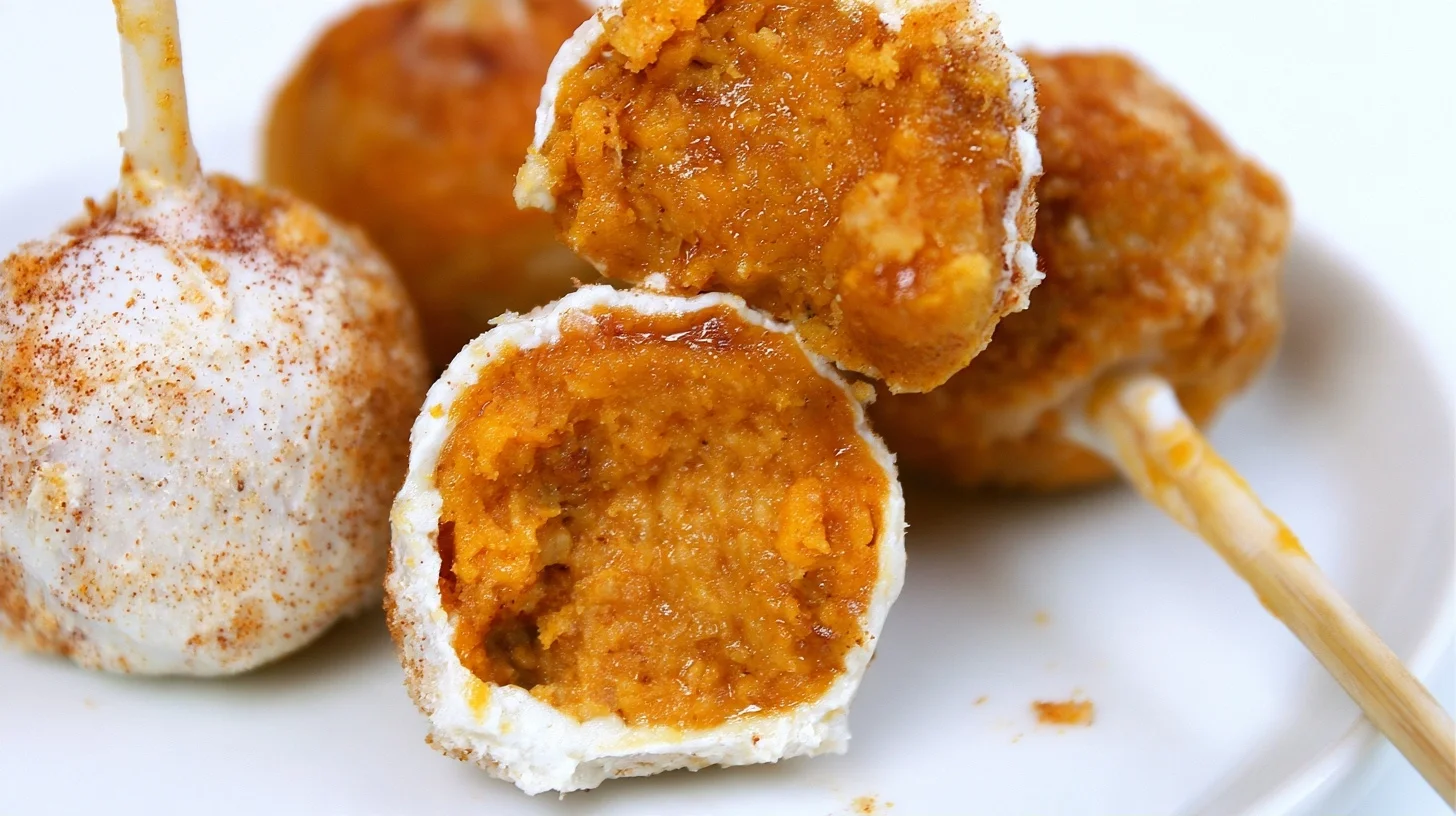
Pumpkin Pie Cake Pops
20
servings30
minutes0
minutes150
kcalThese pumpkin pie cake pops transform leftover pumpkin pie into bite-sized treats with a smooth candy coating. The mixture combines pie filling, crust, and graham crackers for structure, then gets dipped in melted chocolate or white candy melts. No baking required, and they’re ready in under an hour.
Keep the screen of your device on
Ingredients
2 cups leftover pumpkin pie
0.5 cup graham cracker crumbs
0.25 cup cream cheese frosting
2 cups candy melts
2 teaspoons coconut oil
20 lollipop sticks
0.5 teaspoon pumpkin pie spice
2 tablespoons powdered sugar
Directions
- Crumble the leftover pumpkin pie into a large mixing bowl, breaking apart both the filling and the crust into small pieces. Use a fork or your hands to ensure no large chunks remain.
- Add the graham cracker crumbs and cream cheese frosting to the bowl, then mix thoroughly until the mixture holds together when squeezed. If it feels too wet or sticky, add more graham cracker crumbs one tablespoon at a time until it firms up.
- Roll the mixture into 20 evenly sized balls, about 1.5 tablespoons each, using a cookie scoop for consistency. Place them on a parchment-lined baking sheet.
- Chill the balls in the refrigerator for 30 minutes to firm them up, which prevents them from falling apart during dipping. This step is essential for clean coating.
- Melt the candy melts in a microwave-safe bowl in 20-second intervals at 50% power, stirring between each burst, until smooth. Stir in the coconut oil to thin the coating slightly.
- Dip the tip of each lollipop stick into the melted coating, then insert it about halfway into a chilled cake ball. Let the coating set for 2 to 3 minutes to secure the stick.
Notes
- Chilling the formed balls for at least 30 minutes before dipping reduces temperature shock and prevents cracks in the candy coating.
- If your leftover pie is very moist, start with less frosting and add more graham cracker crumbs to achieve a firm, rollable consistency.
- Store finished cake pops in an airtight container at room temperature for up to three days, or refrigerate for up to one week. Bring to room temperature before serving to prevent condensation on the coating.
Nutrition Facts
- Serving Size: 1 g
- Total number of serves: 20
- Calories: 150kcal
- Fat: 7g
- Carbohydrates: 20g
- Fiber: 1g
- Protein: 2g
Did you make this recipe?
Tag @therecipemasterblog on Instagram and hashtag it with #therecipemaster
Like this recipe?
Follow @therecipemasterblog on Pinterest
Follow us on Facebook!
Follow The Recipe Master on Facebook
Expert Tips for the Best Pumpkin Pie Cake Pops
The key to success with pumpkin pie cake pops is getting the mixture to the right consistency and keeping the coating smooth. These tips address the most common challenges and help you achieve professional-looking results.
Getting the Right Mixture Consistency
The mixture should hold together when squeezed but not feel wet or sticky. If your leftover pie has a lot of moisture, add graham cracker crumbs one tablespoon at a time until the mixture is firm enough to roll. Too much liquid will cause the balls to fall apart or slide off the sticks during dipping. Conversely, if the mixture is too dry and crumbly, add a small amount of cream cheese or frosting to bind it.
Chilling Before Dipping Prevents Cracking
Refrigerating the formed balls for at least 30 minutes before dipping is essential. Cold cake pops hold their shape better and create less temperature shock when they meet the warm coating, which reduces the chance of cracks forming in the chocolate. If you’re in a hurry, 15 minutes in the freezer works, but don’t leave them frozen or condensation will form when you dip them.
Thin Your Candy Melts for Smoother Coating
Candy melts straight from the bag are often too thick, which leads to uneven coating and visible drip marks. Adding one to two teaspoons of coconut oil or vegetable shortening per cup of melts thins the coating just enough to create a smooth, even shell. Avoid using butter or regular oil, as they can cause the coating to seize or separate.
Tap, Don’t Swirl, to Remove Excess Coating
After dipping each pop, gently tap the stick against the edge of the bowl to let excess coating drip off. Swirling or shaking creates air bubbles and uneven thickness. A few light taps will give you a clean, professional finish. For more creative ideas with cake pops, try experimenting with different coatings like those used in pink lemonade cake pops.
Add Decorations While the Coating Is Still Wet
Sprinkles, crushed graham crackers, or drizzled chocolate need to go on immediately after dipping, before the coating hardens. Once the shell sets, decorations won’t stick without additional melted chocolate as glue. Work quickly and have your toppings ready before you start dipping.
Common Mistakes That Ruin Pumpkin Pie Cake Pops
Using Too Much Pie Filling and Not Enough Binder
If your mixture is too wet, the balls will be soft and won’t hold their shape on the stick. This happens when there’s too much pumpkin filling relative to the crust and binders. The fix is to add more graham cracker crumbs or a small amount of powdered sugar to absorb excess moisture. To prevent this, start with equal parts pie filling and crust, then adjust as needed.
Skipping the Stick-Securing Step
Pushing a dry stick into a cake ball and then dipping it often results in the pop sliding off into the coating. The solution is to dip the tip of each stick into melted candy coating before inserting it into the ball, then let it set for a few minutes. This creates a strong bond that holds the pop securely during dipping and serving.
Overheating the Candy Melts
Microwaving candy melts at full power or for too long causes them to scorch, seize, or become grainy. Instead, heat them in 20-second intervals at 50% power, stirring between each burst. The coating should be smooth and fluid, not thick or lumpy. If it does seize, try adding a teaspoon of coconut oil and stirring vigorously to bring it back together.
Not Letting the Coating Set Completely Before Storing
Stacking or covering cake pops before the coating is fully hardened will smudge the finish and ruin the appearance. Let them stand upright for at least 20 minutes at room temperature, or 10 minutes in the refrigerator, before handling or packaging. If you’re in a hurry, place them in the fridge, but bring them back to room temperature before serving to avoid condensation.
Creative Variations for Pumpkin Pie Cake Pops Recipe
White Chocolate Coating with Cinnamon Drizzle
Dip the pops in white candy melts, then drizzle them with cinnamon-flavored melts or dust them with ground cinnamon mixed with a tiny bit of cocoa powder for contrast. This combination highlights the spiced pumpkin flavor and gives the pops an elegant, bakery-style appearance.
Crushed Gingersnap Coating
After dipping in chocolate or white coating, immediately roll the wet pops in finely crushed gingersnap cookies. The spicy, crunchy exterior pairs beautifully with the creamy pumpkin interior and adds textural contrast.
Dairy-Free Version
Use dairy-free candy melts or dark chocolate for coating, and substitute the cream cheese or frosting binder with dairy-free cream cheese or coconut cream. The texture and flavor remain nearly identical, making this a suitable option for guests with lactose intolerance.
Mini Pumpkin Pie Cake Pops Recipe
Roll the mixture into smaller, marble-sized balls and use shorter sticks or toothpicks. These mini versions are perfect for large gatherings where guests want to sample multiple desserts without committing to a full-sized treat.
Nutrition Information for Pumpkin Pie Cake Pops
Each pumpkin pie cake pop contains approximately 150 calories, with most of the energy coming from carbohydrates and fats. The pumpkin filling contributes some fiber and vitamin A, while the candy coating adds sugar and fat. Protein content is minimal, usually around 2 grams per pop, primarily from the cream cheese or frosting used as a binder.
These treats are best enjoyed as an occasional indulgence rather than a daily snack. If you’re looking to reduce sugar, consider using sugar-free candy melts or dark chocolate with a higher cacao percentage, which will lower the overall sweetness without sacrificing the coating’s structure.
How to Serve Pumpkin Pie Cake Pops
Pumpkin pie cake pops work beautifully as part of a dessert table, arranged upright in a decorative foam block or tall vase filled with dried beans or floral foam. They’re also ideal for individual packaging—wrap each pop in a clear cellophane bag tied with a ribbon for party favors or bake sale items.
Pair them with hot apple cider, spiced chai, or a strong cup of coffee to balance the sweetness. For a more elaborate presentation, serve them alongside other autumn desserts like pecan tarts or cinnamon rolls. The history of cake pops as a dessert trend is fascinating, and you can learn more about their evolution in this detailed history of cake pops.
How to Store Pumpkin Pie Cake Pops
Store pumpkin pie cake pops in an airtight container at room temperature for up to three days, or in the refrigerator for up to one week. If refrigerating, let them come to room temperature for 15 minutes before serving to prevent the coating from sweating or becoming dull.
For longer storage, freeze the pops in a single layer on a baking sheet until solid, then transfer them to a freezer-safe container separated by parchment paper. They’ll keep for up to two months. Thaw in the refrigerator overnight, then bring to room temperature before serving. Avoid refreezing once thawed, as this can cause the coating to crack and the texture to become grainy.
Frequently Asked Questions about Pumpkin Pie Cake Pops Recipe
Yes, you can make them from scratch by mixing canned pumpkin puree with graham cracker crumbs, cream cheese, pumpkin pie spice, and powdered sugar until the mixture holds together.
This happens when the stick isn’t secured properly. Dip the tip of each stick in melted candy coating before inserting it into the cake ball, then let it set for a few minutes before dipping the entire pop.
Cracks usually form when there’s a large temperature difference between the cold cake ball and warm coating. Chill the formed balls for 30 minutes, not longer, and make sure your candy melts are warm but not hot.
Yes, but you’ll need to temper the chocolate or add a small amount of coconut oil to keep it smooth and workable. Candy melts are easier because they don’t require tempering.





Leave a Reply