- Onigiri is a simple, comforting Japanese rice ball—portable, customizable, and an everyday staple that transformed the author’s view of rice.
- Perfect onigiri relies on seasoned short-grain rice, proper texture, and simple hands-on shaping for a satisfying bite.
- Crispy nori is achieved by wrapping rice separately using plastic wrap and wax paper, adding seaweed just before eating.
- Prep tips: cook and cool rice, prepare fillings ahead, keep onigiri wrapped for same-day eating, avoid microwaving when possible.
Onigiri was one of the first dishes I learned to make during a cooking class in Tokyo at the start of 2025, and honestly, it changed how I look at rice forever. In that cozy little kitchen, surrounded by the gentle scent of steamed rice and crisp nori, I discovered that these Japanese rice balls are much more than a snack, they’re a piece of everyday comfort.
Now back home in New York, I’ve been perfecting this Onigiri recipe, and it’s quickly become one of my favorite go-to meals. Whether filled with salmon, tuna mayo, or just seasoned with a touch of salt, Onigiri is simple, satisfying, and endlessly versatile. You don’t need special tools or fancy skills, just your hands, warm rice, and a bit of love.

Table of contents
- How To Make It
- A Little Bite of History
- The Secret to Perfect Onigiri (And Why It Totally Works)
- A Little Prep Goes a Long Way: Getting Ready for Onigiri Success
- The Secret to Crispy Nori: Convenience Store Wrapping DIY
- Variations to Try (Because One Kind of Onigiri Is Never Enough)
- How to Keep Your Onigiri Fresh (and Still Delicious Later)
- FAQs: Your Onigiri Questions, Answered
- Ready to Roll? Let’s Make Onigiri Together
How To Make It
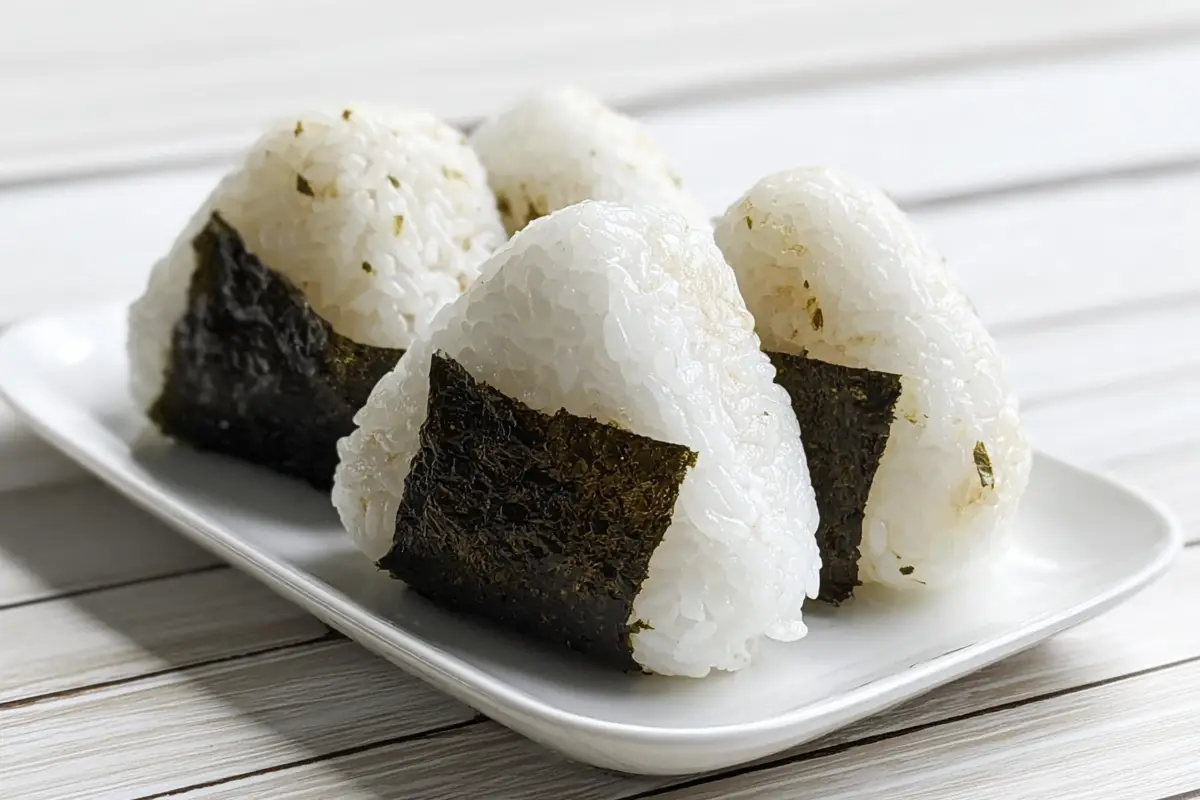
Shio Onigiri (Japanese Salted Rice Balls)
6
servings15
minutes25
minutes185
kcalAfter my cooking class in Tokyo, this simple Shio Onigiri recipe became my favorite way to reconnect with Japan from my New York kitchen. With just rice, salt, and nori, you can create something that feels comforting, clean, and deeply satisfying. These are the purest form of Onigiri, no fillings, just perfectly seasoned rice shaped by hand.
Keep the screen of your device on
Ingredients
2 cups Japanese short-grain rice
2.5 cups water (for cooking)
1 tsp salt (plus extra for hands)
1 sheet nori, cut into 6 strips
Optional: sesame seeds for garnish
Directions
- Start by rinsing your short-grain rice several times until the water runs clear. This step helps remove excess starch, giving your Onigiri that perfect, glossy texture. Then cook the rice as usual, either in a rice cooker or on the stovetop with 2 ½ cups of water.
- Once the rice is done, let it rest for about 10 minutes so it firms up slightly. You want it warm, not hot, when you start shaping.
- Set up a small bowl of water and a tiny dish of salt. Wet your hands lightly, then rub a pinch of salt between your palms, this not only seasons the Onigiri but also helps prevent sticking.
- Scoop a handful of rice (about ⅓ cup) and gently shape it into a triangle or round ball. Don’t press too hard, just enough to hold its shape. Repeat with the remaining rice.
- Once shaped, wrap a strip of nori around each Onigiri or cover one side for a classic look. The warmth of the rice will slightly soften the seaweed, making it tender and flavorful.
- That’s it, you’ve made Shio Onigiri! Simple, pure, and absolutely delicious.
Notes
- Rice type matters: Always use Japanese short-grain rice. Other types won’t hold their shape properly.
- Warm, not hot: The rice should be just warm enough to handle hot rice breaks apart easily.
- Shape with care: Don’t press too firmly, or your Onigiri will turn dense. Think gentle pressure, like molding snow.
- Nori timing: For crisp nori, wrap right before eating. For soft nori, wrap while the rice is warm.
- Add a touch of flair: Sprinkle sesame seeds or furikake over the top for extra flavor.
Nutrition Facts
- Total number of serves: 6
- Calories: 185kcal
- Fat: 0.4g
- Sodium: 250mg
- Carbohydrates: 38g
- Protein: 3.5g
Did you make this recipe?
Tag @therecipemasterblog on Instagram and hashtag it with #therecipemaster
Like this recipe?
Follow @therecipemasterblog on Pinterest
Follow us on Facebook!
Follow The Recipe Master on Facebook
A Little Bite of History
Onigiri has been a Japanese staple for over a thousand years. Originally made as a simple, portable meal for travelers and warriors, these rice balls date back to the Heian period. Over time, wrapping them in nori became popular, and Onigiri evolved into the beloved comfort food it is today, a small triangle of rice that carries centuries of tradition in every bite.
The Secret to Perfect Onigiri (And Why It Totally Works)
There’s something almost meditative about making Onigiri, shaping each rice ball by hand, feeling the warmth of the rice, and wrapping it neatly in a crisp sheet of nori. It’s simple, yet so full of flavor and comfort. After learning how to make it in Japan, I realized why everyone there adores it, it’s portable, customizable, and beautifully humble.
Here’s why this recipe works so well:
- Perfectly seasoned rice: The slightly salty, vinegared rice gives Onigiri its signature balance of flavor and texture.
- Endless fillings: Whether you love classic tuna mayo (like in this tuna onigiri recipe) or something bold like grilled salmon, there’s a version for everyone.
- Ideal texture: Using short-grain Japanese rice gives the perfect stickiness, soft but not mushy.
- Quick and portable: Great for lunchboxes, picnics, or a grab-and-go breakfast.
- Adaptable to any diet: You can make vegetarian Onigiri with pickled plum or miso, or try a protein-packed version with fish or tofu.
It’s honestly one of those recipes that feels therapeutic to make and comforting to eat, no matter how your day’s going.
A Little Prep Goes a Long Way: Getting Ready for Onigiri Success
One thing I learned during that Tokyo cooking class: good Onigiri starts with a little planning. The rice needs time to cool slightly before shaping, and the fillings are best when prepped ahead.
Here’s what you can do in advance:
- Cook and season the rice a few hours ahead, just keep it covered with a damp cloth to stay moist. Pro tip: letting the cooked rice cool before shaping can increase resistant starch and help smooth your glycemic response.
- Prepare fillings like salted salmon or tuna mayo early (similar to the one in this salmon and rice recipe) and store them in the fridge.
- Cut the nori sheets into halves or thirds ahead of time for easier wrapping.
- Set up a small salt bowl for seasoning your hands before shaping the rice balls, it prevents sticking and adds flavor.
- Have a bowl of water ready for dipping your hands between each Onigiri to keep the rice from clinging.
Once everything’s ready, assembling becomes quick, easy, and honestly kind of relaxing.
The Secret to Crispy Nori: Convenience Store Wrapping DIY
One of the first things I noticed when I bought Onigiri in Japan was how crispy the nori always stayed, even hours after sitting on a store shelf. That satisfying crunch when you bite in? Total magic. The secret lies in a clever wrapping method that keeps the rice and seaweed separate until the very last moment. And the best part? You can recreate it right at home with just plastic wrap and a bit of wax paper.
Time needed: 10 minutes
Here’s how to do it:
- Lay down your wrap
Place a square of plastic wrap on your counter. Make sure it’s large enough to wrap around your Onigiri completely.
- Add a strip of wax paper
Cut a thin piece of wax paper, just slightly smaller than your nori strip, and lay it in the center of the plastic wrap. This will be your moisture barrier.
- Position your nori
Place the nori strip on top of the wax paper. This layer will stay nice and dry, waiting for its big moment.
- Set your Onigiri
Place your freshly shaped rice ball on top of the plastic wrap, but make sure it doesn’t touch the nori yet, the wax paper keeps them separate.
- Wrap it up
Gently fold the plastic wrap around your Onigiri, tucking in the sides like a small parcel. Press lightly to seal.
- Seal for later
Store your wrapped Onigiri at room temperature (if eating within a few hours) or refrigerate it if you’ll enjoy it later.
- The fun part, wrapping at the moment of eating
When you’re ready to eat, unwrap and slide the wax paper out, letting the nori fall directly onto the rice. The seaweed will stick perfectly and stay crisp.
It’s the same clever system used in Japanese convenience stores, no fancy gadgets needed. Just a little kitchen creativity, and your Onigiri will have that satisfying, paper-thin crunch every single time.
Variations to Try (Because One Kind of Onigiri Is Never Enough)
Once you’ve mastered the simplicity of Shio Onigiri, you’re officially ready to have some fun. In my Tokyo class, once we nailed the basic shape, our instructor encouraged us to “dress up the rice.” And she was right, from furikake sprinkles to flavorful fillings, Onigiri can be as creative or classic as you like. Here’s how to take yours to the next level.
Rice Seasoning (Furikake Style)
If you don’t want to stuff your Onigiri, mixing in furikake is the way to go. It adds pops of color and flavor right through the rice.
- Marumiya Ume Goma Shio: A blend of plum and sesame salt that adds a tangy kick.
- Gomashio: Toasted black sesame seeds mixed with salt, simple, nutty, and perfect with plain rice.
- Katsuo Fumi: Bonito flakes, seaweed, and spices for a deep umami hit.
- Mix evenly through the rice before shaping to get a balanced flavor in every bite.
Filling Ideas (Inside the Onigiri)
Now for the fun part, fillings! Each one completely changes the vibe of your Onigiri, from tangy and refreshing to rich and savory.
- Umeboshi (Japanese Pickled Plum): Salty, sour, and refreshing. Just tuck one plum in the center for a bold traditional taste.
- Shake (Salted Salmon): Flaky, rich, and classic, grill salmon, flake it, and place a spoonful inside. For another rice-and-fish combo, check out my salmon and rice recipe.
- Okaka (Bonito Flakes with Soy Sauce): Smoky and savory, mix bonito flakes with soy sauce for a simple umami filling.
- Kombu (Simmered Seaweed): Slightly sweet, earthy, and chewy; a vegetarian favorite.
- Tuna Mayo: A creamy crowd-pleaser made with Japanese Kewpie mayo, similar to what I use in this tuna onigiri recipe.
- Mentaiko or Tarako (Spicy Pollock/Cod Roe): Salty and spicy, this one adds heat and depth to your rice ball.
- Shredded Chicken or Karaage with Mayo: Great for protein lovers, think tender chicken mixed with a touch of mayo.
- Pickled Vegetables: Try takuan (pickled daikon) or kimchi for crunch and brightness.
- Creative Fillings: Leftovers like vegan cheese, walnut meat, or even small bits of tempura make delicious surprises.
And if you want to get playful, try a fusion-style twist inspired by Okinawa’s flavors, like my taco rice recipe. It’s proof that rice can be endlessly adaptable.
How to Keep Your Onigiri Fresh (and Still Delicious Later)
In Japan, Onigiri isn’t meant to be reheated, it’s enjoyed at room temperature, just as it is. The goal is to keep the rice soft and slightly sticky without drying out. With the right storage, your Onigiri will taste just as lovely hours later as when you made it.
For same-day eating, wrap each Onigiri tightly in plastic wrap and keep them at room temperature for up to 6 hours. If you’re using the crispy nori wrap method, store the seaweed separately and only add it when you’re ready to eat, that’s how you keep that signature crunch.
If you’ve made them ahead for the next day, store them in the fridge (still wrapped) and let them come back to room temperature before eating. The rice will soften naturally without reheating.
Avoid microwaving if possible, Onigiri tastes best when the rice holds its gentle chew and natural flavor, just the way it’s meant to be enjoyed.
FAQs: Your Onigiri Questions, Answered
Always use Japanese short-grain rice or sushi rice. It has just the right stickiness to hold its shape without turning mushy. Long-grain rice (like basmati or jasmine) won’t stick together properly.
You can, but it’s not ideal. Freshly cooked, slightly warm rice shapes much better and has a softer texture. If you use cold rice, sprinkle a few drops of water and warm it slightly before shaping.
Keep a small bowl of water nearby and wet your hands before handling the rice. Rub a pinch of salt between your palms too, it adds flavor and keeps the rice from clinging.
Nope! While both use rice and sometimes nori, Onigiri uses plain salted rice, not vinegared sushi rice. It’s more of a comfort food or quick snack than a delicacy.
Because the rice releases moisture over time. The trick is to wrap your Onigiri in plastic first, then add the nori just before eating, exactly how Japanese convenience stores do it.
Yes! Wrap them tightly in plastic, add the nori later, and store them in a lunchbox at room temperature. They’re one of the most travel-friendly foods you can make.
Ready to Roll? Let’s Make Onigiri Together
Every time I shape a batch of Onigiri, I’m reminded of that little cooking class in Tokyo, the laughter, the steam rising from freshly cooked rice, and the quiet joy of creating something simple but meaningful. It’s amazing how a handful of rice and a sprinkle of salt can carry so much comfort and tradition.
If you’ve never made Onigiri before, I hope this guide gives you the confidence to try. Once you get the feel for shaping the rice, it becomes second nature, and maybe even a bit therapeutic. Whether you keep it plain like Shio Onigiri or stuff it with your favorite filling, there’s truly no wrong way to make one.
So grab your rice, your nori, and your curiosity. You might just fall in love with the process as much as the flavor.


Leave a Reply