Let me tell you, making a sourdough starter recipe from scratch feels like unlocking an ancient secret. The first time I grew my own wild yeast in a jar, I was both nervous and excited, it felt a bit like keeping a tiny, bubbly pet on my kitchen counter. But here’s the truth: starting a sourdough culture at home is way easier (and way more satisfying) than it sounds.
This recipe is perfect whether you’re dreaming of fresh sourdough bread, pillowy focaccia, or even sweet cinnamon rolls. With just two ingredients, flour and water, you’ll cultivate a lively, active sourdough starter that can power all your homemade bakes. It’s a cozy little ritual that quickly becomes second nature, and it opens the door to a world of delicious possibilities.
Ready to get started? Let’s make your kitchen smell like a bakery in just a few days.
Table of contents
- What Is A Sourdough Starter?
- How to Make it
- Why You’ll Love This Starter: It’s Alive! (Literally)
- Get Set Before You Stir: What to Prep Ahead
- My Best Pro Tips for a Healthy Starter
- If You’re Feeling Adventurous: Variations to Try
- Frequently asked questions about Sourdough Starter Recipe
- Let’s Get That Starter Bubbling!
What Is A Sourdough Starter?
Think of a sourdough starter as your homemade yeast, just flour, water, and a little patience. It’s a living, bubbly mix that captures wild yeast from the air and turns it into a natural way to make bread rise. Once it’s active, you can use it to bake everything from crusty loaves to sweet treats, all with that classic sourdough flavor we love.
How to Make it
Sourdough Starter Recipe
5 – 7
days5
minutes per day6
kcal (per small amount used in bread)A homemade sourdough starter is a simple, two-ingredient recipe that captures wild yeast, providing natural leavening for your sourdough bread. It takes about 5-7 days to develop, but it is well worth the effort for perfect bread results.
Keep the screen of your device on
Ingredients
- Day 1
60 g whole wheat or rye flour
60 g filtered water (room temperature)
- Days 2–7
60 g all-purpose flour (daily)
60 g filtered water (room temperature, daily)
Step-by-Step Directions
- Day 1: Start the Fermentation
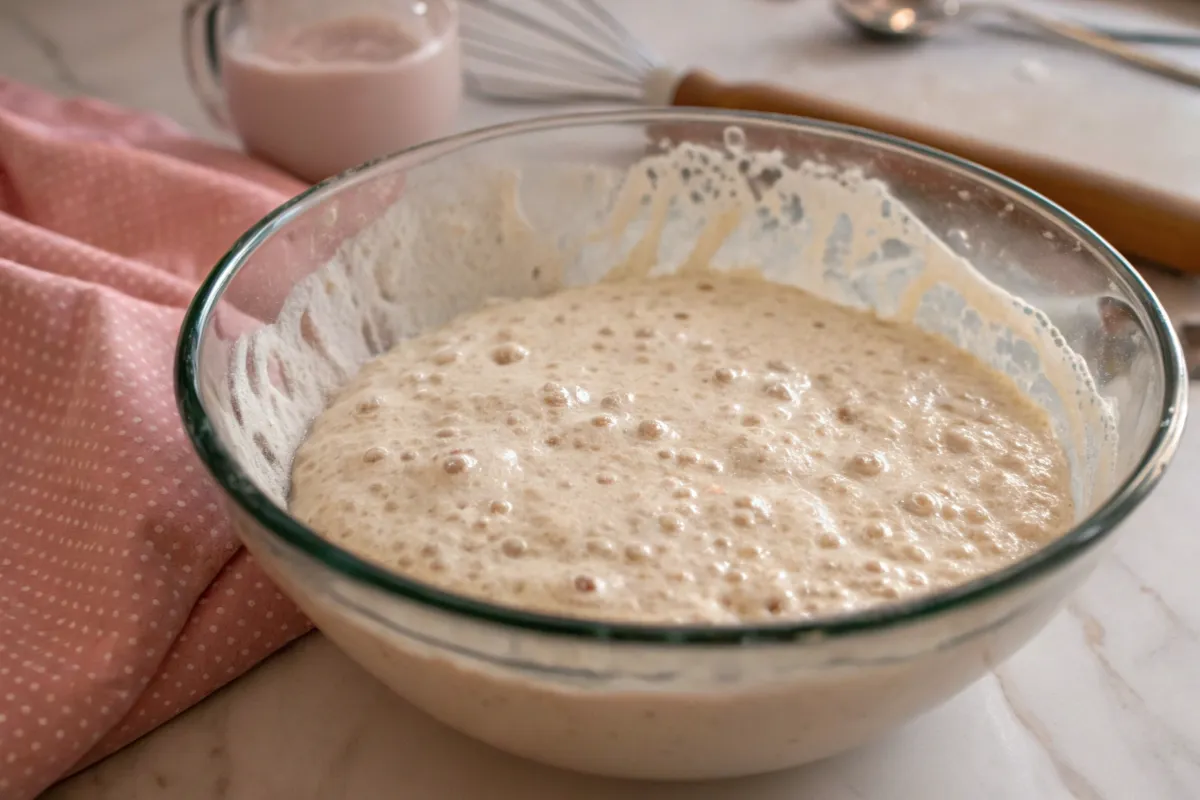
- In a clean glass jar, combine 60g of whole wheat or rye flour with 60g of filtered water. Stir well until no dry bits of flour remain.
- The mixture will look like thick pancake batter. Scrape down the sides of the jar and loosely cover with a cloth or lid to allow air to circulate.
- Place the jar in a warm spot, ideally between 70-75°F (21-24°C). Too cold, and fermentation will slow; too hot, and it may spoil. Leave the jar undisturbed for 24 hours.
- Day 2: Start Feeding
- After 24 hours, check the mixture for small bubbles, which indicate fermentation has started. If you see no bubbles, don’t worry; this can take longer in cooler environments.
- Discard half of the mixture (about 60g). Add 60g of all-purpose flour and 60g of filtered water to the jar. Stir thoroughly to combine.
- Cover loosely and return the jar to the warm spot. The ideal temperature remains 70-75°F (21-24°C). Wait another 24 hours.
- Day 3: Increase Activity
- The starter should now show more noticeable bubbles, and a slight tangy aroma may develop. Discard half of the starter (60g), and add 60g all-purpose flour and 60g filtered water.
- Stir until fully combined. The texture should still resemble thick batter.
- Keep the jar in the same warm spot, maintaining consistent room temperature. Wait 24 hours.
- Day 4: Strengthening the Culture
- By now, the starter should have more bubbles, and the aroma will be stronger. Discard half of the starter (60g), and feed it with 60g all-purpose flour and 60g filtered water.
- Stir well to incorporate air and stimulate yeast growth. The starter should rise and fall as the day progresses.
- Cover and leave in a warm spot. Maintain 70-75°F (21-24°C). If it’s cooler, fermentation may slow down, but try not to move the jar to keep conditions consistent.
- Day 5: Test for Readiness
- Discard half of the starter again. Feed the remaining 60g with 60g all-purpose flour and 60g water. Stir to fully combine.
- The starter should now rise and fall predictably, doubling in size within 4-6 hours after feeding.
- Perform the “float test” to check readiness: drop a small spoonful of starter into a glass of water. If it floats, it’s ready for baking. If not, continue feeding for another day or two.
- Day 6-7: Maintaining & Strengthening
- Continue the same process of discarding half and feeding with 60g flour and 60g water daily. By now, the starter should consistently double in size after each feeding.
- Once it passes the float test, it’s ready to bake with!
Notes
- Don’t worry if it smells weird at first. A tangy or even funky smell early on is totally normal.
- Always use filtered or non-chlorinated water.
- Whole wheat or rye flour is ideal for starting the fermentation due to its higher mineral content, which helps yeast thrive.
Did you make this recipe?
Tag @therecipemasterblog on Instagram and hashtag it with #therecipemaster
Like this recipe?
Follow @therecipemasterblog on Pinterest
Follow us on Facebook!
Follow The Recipe Master on Facebook
Why You’ll Love This Starter: It’s Alive! (Literally)
Creating a sourdough starter at home feels a bit like a science experiment, but the delicious kind. What makes this sourdough starter recipe truly special is that it uses just two ingredients and a little patience to grow something powerful enough to rise bread without any commercial yeast.
Here’s why it works like magic:
- Whole wheat or rye flour jumpstarts fermentation. These flours are rich in natural wild yeast and bacteria, giving your starter a strong head start.
- Room temperature encourages optimal yeast activity. The sweet spot between 70–75°F is where wild yeast and beneficial bacteria thrive.
- Daily feedings build strength. Like any living thing, your starter needs regular food (flour and water) to stay active and reliable.
- Discarding helps balance. It might feel wasteful at first, but discarding keeps your starter from becoming too acidic and helps it stay strong.
Customization Tips:
- No rye or whole wheat? You can use all-purpose flour from day one, it’ll just take a bit longer to get going.
- Gluten-Free: Sub all flours with gluten-free alternatives like sorghum flour or brown rice flour. Try it out in this gluten-free sourdough bread recipe.
- Organic: Use organic flours and filtered water to avoid any interference from additives.
Get Set Before You Stir: What to Prep Ahead
Before you dive in, a few quick things will make this week-long journey way smoother. Trust me, having these on hand will save you from any mid-process scrambling.
- Clean glass jar (at least 500ml)
- Digital kitchen scale
- 60g whole wheat or rye flour (Day 1)
- About 400g all-purpose flour (Days 2–7)
- Filtered or dechlorinated water
- Warm spot in your kitchen (70–75°F)
My Best Pro Tips for a Healthy Starter
I’ve made this starter more times than I can count, and trust me, these little tricks make all the difference! Whether you’re on your first jar or your fifth, these tips will help you build a strong, active culture that makes amazing bread.
- Name your starter. It’s silly, but it helps you connect with it, and remember to feed it!
- Use a rubber band or marker. Mark the starter’s height after feeding to track how much it rises.
- If it’s sluggish, switch flours. A day or two with whole wheat or rye can jumpstart fermentation.
- Weigh your discard. Stick to removing about 60g to keep ratios consistent.
- Feed at the same time daily. Starters love consistency just like we do!
- Keep it warm but not hot. An oven with the light on or above your fridge works wonders.
- Stir vigorously. Mixing in air helps yeast and bacteria grow strong and happy.
For even more sourdough inspiration and tips, I highly recommend checking out King Arthur Baking’s Sourdough Guide, it’s packed with advice for beginners and seasoned bakers alike.
If You’re Feeling Adventurous: Variations to Try
If you’re like me, you love playing around with ingredients based on what’s in the fridge or what your cravings demand. So here are a few fun and practical ways to tweak your starter journey.
- Gluten-Free Starter: Use brown rice flour or sorghum flour instead of wheat. It may take longer to activate, but it works great for gluten-free bakes like gluten-free sourdough bread.
- Rye Starter: Feed your starter exclusively with rye flour. It ferments faster and adds a rich, earthy flavor—perfect for dense, chewy loaves or bold sourdough focaccia like this one.
- Whole Wheat Starter: Gives your starter a more robust, nutty flavor and boosts the nutritional profile. It’s ideal for hearty breads or sandwich loaves like this homemade sandwich bread.
- Sweet Starter Base: Once mature, feed it with a touch of honey or maple syrup to build sweetness for pastries or cinnamon treats like this ultimate cinnamon sourdough.
- Discard-Friendly Starter: Use your daily discard to make sourdough pancakes, crackers, or soft sourdough rolls while building your starter, no waste here!
Frequently asked questions about Sourdough Starter Recipe
It’s best to use filtered water. Tap water may contain chlorine, which can slow down or stop fermentation.
A sour, tangy smell is normal. However, if it smells like mold, throw it away and start over.
During the creation process, and even after your starter has been established, a dark liquid called “hooch” might appear. It indicates that your starter needs to be fed. It also has a very stinky smell, similar to rubbing alcohol or gym socks. This is normal. Don’t freak out. Any time you see this liquid, it’s best to pour it off, along with a small amount of any discolored starter present.
When it doubles in size within 4-6 hours of feeding and passes the float test (a small spoonful floats in water), it’s ready to bake!
Discarding controls the acidity, keeps the size manageable, and ensures a healthy ratio of fresh flour and water to growing yeast.
During the first 7 days, consistency is key. Skipping a day may slow fermentation or weaken the culture. After it’s mature, you can refrigerate it and feed it once a week.
Let’s Get That Starter Bubbling!
I hope this sourdough starter recipe gives you the confidence to take the plunge into wild yeast baking. It’s such a rewarding process, and once you see your starter bubbling away on your counter, you’ll feel like a total kitchen rockstar. Whether you’re dreaming of crusty loaves, soft rolls, or fluffy pancakes, it all begins here. Give it a go, and soon you’ll be baking bread that tastes as amazing as it smells.
If you enjoyed this guide, you might also love diving into more homemade baking adventures next!


Leave a Reply