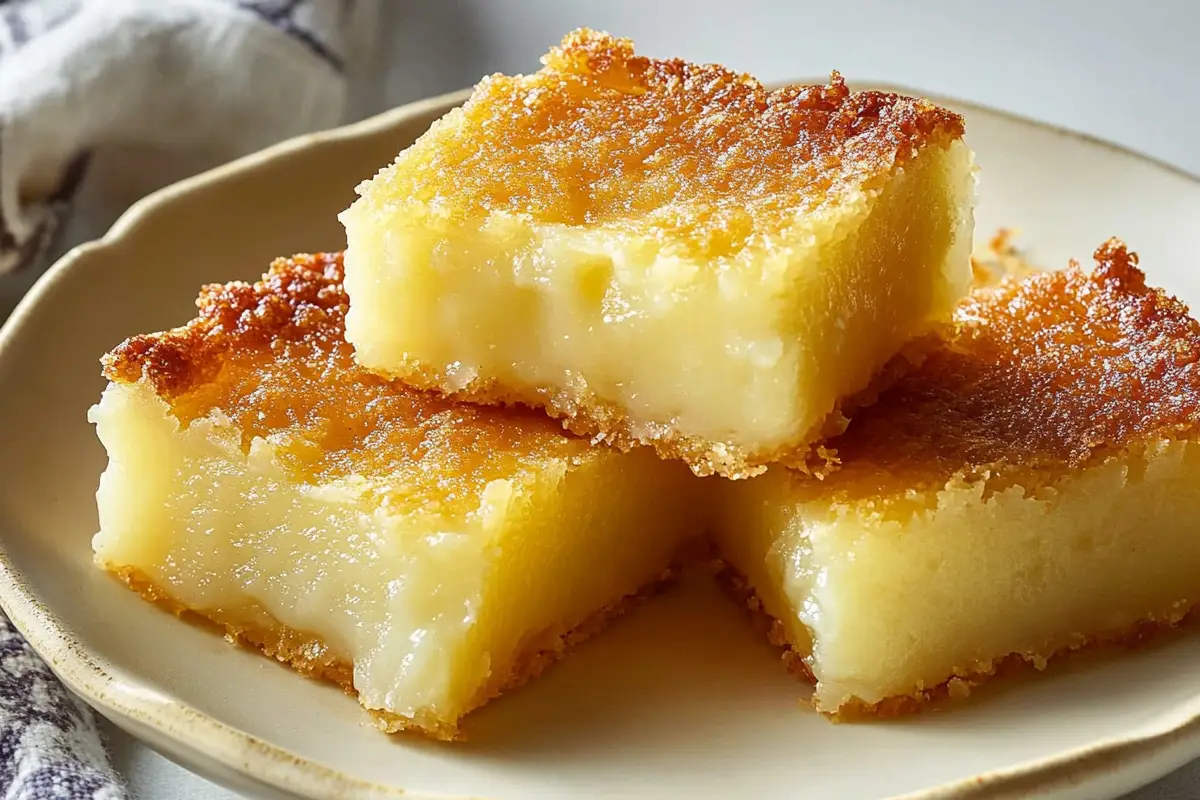
If you’ve never tried Butter Mochi, you’re in for a treat! This chewy, buttery, and slightly sweet Hawaiian dessert is a cross between Japanese mochi and a rich butter cake, making it utterly irresistible. Imagine biting into a slice that’s crispy on the edges, yet soft and chewy in the center, with a rich coconut flavor that melts in your mouth. Whether you’re looking for an easy-to-make dessert for a family gathering or a nostalgic taste of Hawaii, this Butter Mochi recipe is sure to satisfy your cravings.
Butter Mochi originated in Hawaii and remains a favorite at bake sales, family parties, and local gatherings. Unlike Japanese mochi, which uses only glutinous rice flour and water, butter mochi blends in butter, eggs, and coconut milk for a rich texture and deep flavor. It’s naturally gluten-free, making it a fantastic option for those with dietary restrictions.
What makes this Butter Mochi recipe truly special is its simplicity—just mix everything in one bowl, pour it into a pan, and bake! It requires minimal effort but delivers maximum flavor. Whether you enjoy it warm, at room temperature, or even chilled, every bite is a delightful combination of sweet, buttery, and coconut goodness.
Table of contents
Recipe Card
Why This Butter Mochi Recipe Works
1. Perfect Balance of Texture
The best part of Butter Mochi is its unique texture—crispy on the outside while staying soft and chewy inside. This is achieved by using glutinous rice flour (also known as mochiko flour), which creates that signature chewiness. The addition of butter and eggs gives it a rich, cake-like consistency, making it a fusion of mochi and a butter cake.
2. Easy One-Bowl Recipe
No need for fancy kitchen tools! This recipe is as simple as whisking the ingredients together in a single bowl, pouring it into a pan, and baking until golden brown. It’s perfect for beginners and experienced bakers alike.
3. Naturally Gluten-Free
Since Butter Mochi is made with glutinous rice flour, it contains no wheat, making it a delicious gluten-free dessert. It’s a great option for those who have gluten sensitivities but still crave a rich and satisfying treat.
4. Customizable to Your Taste
One of the best things about Butter Mochi is how easily you can customize it. Here are some popular variations:
- Coconut Lover’s Butter Mochi: Add shredded coconut for extra texture.
- Chocolate Butter Mochi: Mix in cocoa powder or melted chocolate for a chocolatey twist.
- Mango Butter Mochi: Fold in diced mango for a tropical burst of flavor.
- Matcha Butter Mochi: Add matcha powder for a slight bitterness that balances the sweetness.
- Ube Butter Mochi: Use ube extract or mashed ube for a stunning purple color and earthy sweetness.
5. Stays Fresh for Days
Unlike some baked goods that dry out quickly, Butter Mochi stays moist and delicious for several days. It can be stored at room temperature or in the fridge and still tastes amazing when reheated.
Additional Tips for the best Butter Mochi Recipe
- Use Room Temperature Ingredients: Ensure all ingredients are at room temperature for a smoother batter.
- Mix Thoroughly: Mochiko flour can be tricky to mix, so make sure to whisk until the batter is completely smooth.
- Avoid Overbaking: Keep an eye on the mochi towards the end of the baking time to prevent it from drying out.
- Customize Toppings: Add a sprinkle of sesame seeds or a drizzle of condensed milk for extra flavor.
- Let It Cool: Allow the butter mochi to cool completely before cutting to ensure clean slices.
- Experiment with Flavors: Try adding matcha powder or cocoa powder to the batter for a different twist.
- Use a Metal Pan: A metal baking pan helps achieve a crispier crust compared to a glass pan.
- Check for Doneness: Insert a toothpick into the center; it should come out clean when the mochi is done.
- Serve Warm or Cold: Butter mochi can be enjoyed warm or chilled, depending on your preference.
- Store Properly: Keep leftovers in an airtight container to maintain freshness.
FAQs for Butter Mochi Recipe
Butter mochi is a Hawaiian dessert made with glutinous rice flour, butter, eggs, and coconut milk, creating a rich, chewy texture. In contrast, Japanese mochi, made with just glutinous rice and water, is soft, stretchy, and often filled with red bean paste or ice cream.
Yes! Substitute coconut milk with whole milk, evaporated milk, or a mix of milk and heavy cream, though this will make it taste more like butter cake.
Butter mochi may turn out dry if overbaked, made with low-fat ingredients, or lacks enough liquid. Use full-fat coconut milk, real butter, and bake just until set.
Butter mochi can be stored at room temperature for up to 2 days, but for longer storage, refrigerate it in an airtight container for up to 5 days. To keep it soft, warm the slices in the microwave for 10–15 seconds before eating.
Yes! Butter mochi freezes well. Wrap individual slices in plastic wrap and place them in an airtight container. Freeze for up to 2 months. When ready to eat, thaw at room temperature for about 30 minutes, or microwave for a few seconds to restore its chewy texture.
Let the butter mochi cool completely before slicing. Use a plastic knife or a well-greased sharp knife for cleaner cuts. You can also chill it in the refrigerator for about 30 minutes to make slicing easier.
Final Thoughts
Butter Mochi is the ultimate Hawaiian treat that brings together the best of both worlds—chewy, buttery, and infused with the rich flavors of coconut. This easy-to-make dessert is naturally gluten-free, incredibly satisfying, and perfect for any occasion. Whether you enjoy it plain, with a hint of chocolate, or infused with tropical flavors like mango or ube, it’s a dessert that never disappoints.
If you’re a fan of soft, sweet treats, you might also love trying this Bisquick Strawberry Shortcake Recipe for another delightful and simple dessert. For those who enjoy comforting and nostalgic flavors, the Cream of Wheat Recipe offers a warm and creamy option to explore.
Looking for more unique and chewy desserts? Try the Mochi Cake for a twist on the classic, or take inspiration from Mango Sticky Rice for another sticky, satisfying delight.
If you’re into fusion recipes, you might also appreciate the Hibachi Noodles Recipe for a taste of Japanese flavors at home.
No matter how you enjoy it, Butter Mochi is a must-try recipe that’s both delicious and easy to make. Give it a shot, share it with family and friends, and let the flavors transport you straight to the islands of Hawaii!


Leave a Reply