If you’ve never tried knafeh before, you’re seriously in for a treat, and if you have, then you know exactly why this Lebanese Knafeh recipe is worth mastering. I still remember the first time I made it at home. The smell of buttery kataifi dough crisping up in the oven, the rich cheese melting just right, and that sweet, floral syrup soaking through, honestly, it felt like a little celebration in my kitchen.
This is the kind of dessert that feels fancy but is surprisingly doable. It’s sweet, cheesy, and slightly crispy, with that signature Middle Eastern touch from orange blossom and rose water. Knafeh is one of those classic Lebanese desserts that makes an appearance during holidays, gatherings, or just when you want to spoil yourself (and your guests). Whether you’re new to this dish or grew up with it, this version hits all the right notes.
Table of contents
- How to Make it
- Why You’ll Fall in Love with This Lebanese Knafeh Recipe
- Get Ahead of the Game: What to Prep Early
- My Go-To Tricks for Nailing This Dessert
- Variations to Try (Because We All Like to Mix Things Up)
- Serving Ideas to Wow Your Guests (or Just Yourself)
- FAQs: Got Questions? I’ve Got You Covered!
- Give It a Try, You’re Going to Love It
How to Make it
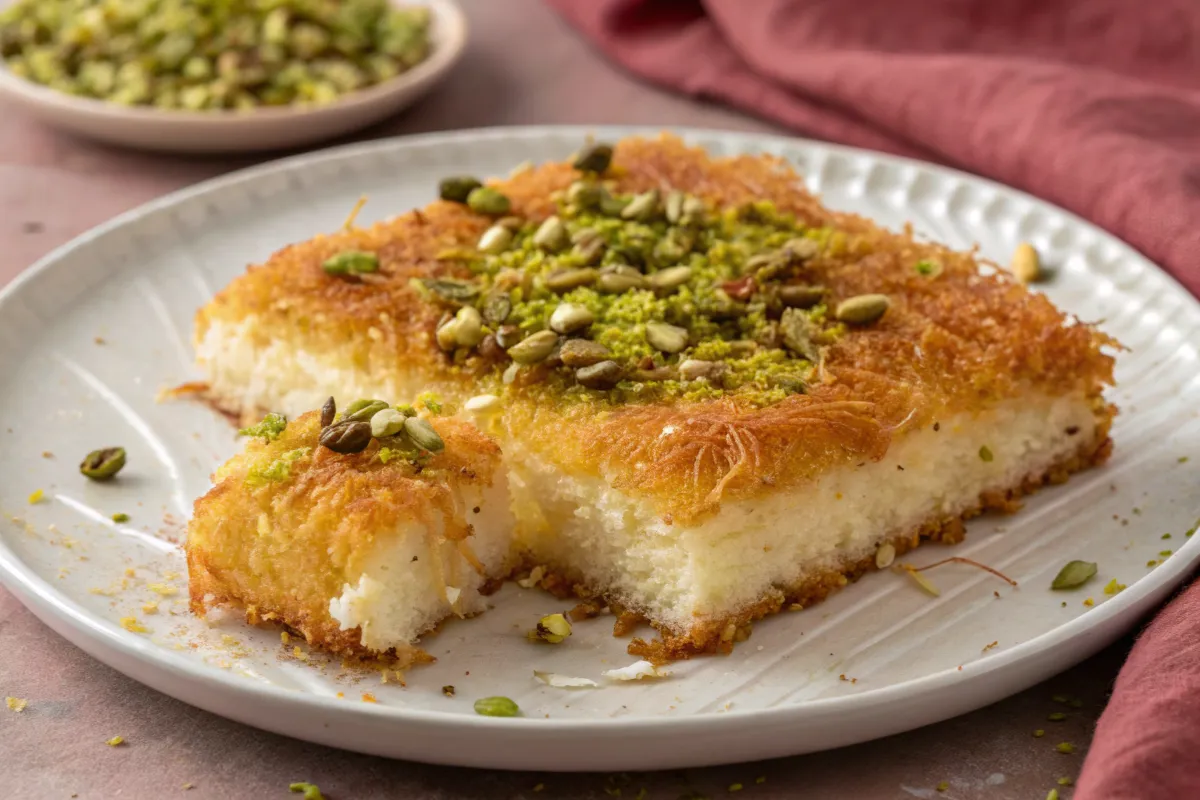
Lebanese Knafeh Recipe
8
servings20
minutes30
minutes348
kcalA beautifully layered Lebanese dessert with crispy kataifi dough and gooey cheese, topped with a fragrant orange blossom syrup for a taste of the Middle East.
Keep the screen of your device on
Ingredients
- For the Cheese Filling
2 cups Akkawi cheese (or low-moisture mozzarella), soaked and grated
1 cup ricotta cheese
- For the Crust
1 lb kataifi dough (shredded phyllo), thawed
1 cup unsalted butter, melted
- For the Syrup
1 cup sugar
0.5 cup water
1 tbsp lemon juice
1 tbsp orange blossom water
1 tbsp rose water
Directions
- Prepare the syrup: In a small saucepan, combine sugar, water, and lemon juice. Bring to a simmer over medium heat, stirring occasionally. Once the sugar has dissolved, let it simmer for 10 minutes until slightly thickened. Stir in the orange blossom water and rose water. Set aside to cool.
- Make the cheese filling: Drain the soaked Akkawi cheese well and mix it with ricotta cheese in a bowl until fully combined. You want a consistent, spreadable mixture.
- Prep the baking dish: Preheat your oven to 350°F (175°C). Grease a 12-inch round baking dish with some of the melted butter.
- Layer the dough: Take half of the kataifi dough and spread it evenly across the bottom of the baking dish. Press it down gently with your hands or the bottom of a measuring cup.
- Add the cheese filling: Evenly distribute the cheese mixture over the dough layer, smoothing it out with a spatula or the back of a spoon.
- Top with remaining dough: Cover the cheese filling with the rest of the kataifi dough. Again, press down gently to compact the layers without crushing them.
- Pour on the butter: Drizzle the remaining melted butter evenly over the top layer of dough, making sure it’s well coated.
- Bake: Place the dish in the oven and bake for 30 minutes, or until the top is golden brown and crisp.
- Add the syrup: Remove the knafeh from the oven and immediately pour the cooled syrup evenly over the hot dessert. Let it rest for 10 minutes to soak in all that flavor.
- Serve warm: Cut into slices and serve warm. It’s gooey, fragrant, and so satisfying.
Notes
- Don’t skip soaking the Akkawi cheese. It helps reduce the saltiness and gives a creamy, balanced taste.
- Traditional knafeh uses orange food coloring for the dough layer; however, this is optional.
- Use scissors to cut the kataifi dough. It makes layering easier and more uniform.
- Let the syrup cool completely before pouring it on. Hot syrup on hot pastry can make it soggy instead of crisp.
Nutrition Facts
- Total number of serves: 8
- Calories: 348kcal
- Fat: 26g
- Saturated Fat: 15g
- Sodium: 270mg
- Carbohydrates: 38g
- Fiber: 1g
- Sugar: 20g
- Protein: 11g
Did you make this recipe?
Tag @therecipemasterblog on Instagram and hashtag it with #therecipemaster
Like this recipe?
Follow @therecipemasterblog on Pinterest
Follow us on Facebook!
Follow The Recipe Master on Facebook
Why You’ll Fall in Love with This Lebanese Knafeh Recipe
Let me tell you, this isn’t just any dessert. This Lebanese Knafeh recipe hits that perfect balance of buttery crunch, gooey cheese, and sweet floral syrup that makes every bite unforgettable. Whether you’re making it for a holiday, a family gathering, or just a weekend treat, it never fails to impress.
Here’s why this version works so well:
- Simple, Authentic Ingredients: We’re using traditional components like kataifi dough, Akkawi (or mozzarella if needed), and a floral syrup for that classic Lebanese flavor.
- Golden Crispy Texture: The kataifi gets beautifully crisp while staying tender underneath, thanks to that melted butter drizzle.
- Melty, Mild Cheese: The blend of Akkawi and ricotta gives you that stretchy, creamy center without being overly salty.
- Sweet, Fragrant Syrup: A warm syrup scented with orange blossom and rose water soaks into the pastry, giving each bite a luxurious finish.
- Easy to Customize: You can tweak it to be less sweet, go fully vegetarian, or even use gluten-free phyllo alternatives.
Make it your way:
- Vegetarian? Great news, this recipe is already meat-free!
- Gluten-Free? Try a gluten-free shredded phyllo dough or crushed gluten-free cornflakes for a twist.
- No Akkawi? No problem. Use low-moisture mozzarella instead, it melts beautifully and is easy to find.
Get Ahead of the Game: What to Prep Early
Knafeh might look like a big project, but a little prep goes a long way. You’ll thank yourself later when all that’s left to do is layer and bake!
Here’s what you can prep ahead:
- Soak and grate the Akkawi cheese the night before (or early morning) to remove excess salt.
- Mix the cheese filling and store it in the fridge until ready to assemble.
- Thaw the kataifi dough in the fridge overnight or at least 4 hours ahead of time.
- Make the syrup in advance and keep it at room temperature or chilled, it lasts up to a week!
- Melt the butter and store it in a container if you want to save time during assembly.
My Go-To Tricks for Nailing This Dessert
I’ve made this knafeh recipe more times than I can count, and trust me, these little tips make all the difference between just okay and absolutely irresistible. If you’re aiming for that bakery-style perfection, here’s how to get there:
- Use fresh kataifi dough. If it’s been sitting in the freezer for too long, it can dry out and crumble. Let it thaw in the fridge overnight for best results.
- Squeeze the cheese dry. After soaking Akkawi, make sure to pat it dry well, excess moisture can ruin the texture.
- Press the layers gently but firmly. You want a tight pack so the knafeh holds together, but don’t press so hard that it becomes dense.
- Watch the bake time. You want golden brown, not dark brown. Every oven varies, so keep an eye on it in the last 5 minutes.
- Don’t skimp on the syrup. But also, don’t pour it all at once, go slow and let the pastry absorb gradually for even sweetness.
If you’re into Lebanese food, you’ll love pairing this with something savory like this authentic juicy Lebanese kafta recipe, it’s a flavor combo I swear by!
Variations to Try (Because We All Like to Mix Things Up)
If you’re like me, you love playing around with ingredients based on what’s in the fridge or what your cravings demand. So here are a few ideas to switch things up and make this Lebanese Knafeh recipe your own:
- Nutty Knafeh: Add a layer of crushed pistachios between the cheese and top dough layer. It adds a toasty crunch and a beautiful green pop. Toast the nuts beforehand for extra flavor.
- Creamy Custard Knafeh: Swap the cheese filling for a semolina-based milk custard (as found in Egyptian versions). Simmer milk, sugar, and semolina until thickened, then use that as your filling.
- Mini Knafeh Cups: Press small amounts of kataifi dough into muffin tins, add cheese, and bake into individual portions. These are great for parties!
- Orange Sugar Syrup Knafeh: For a simpler syrup, try this easy brown sugar syrup recipe. It gives a deeper, caramel-like note that’s deliciously unexpected.
- Savory Twist: If you’re feeling adventurous, go savory, skip the syrup, add a sprinkle of za’atar or dried mint to the cheese, and serve warm as a mezze!
Serving Ideas to Wow Your Guests (or Just Yourself)
There’s no wrong way to serve knafeh, but here are a few ideas to really make it shine.
- Top with crushed pistachios or almonds for that satisfying crunch and a pretty finish.
- Serve with Turkish or Lebanese coffee for a rich, balanced pairing.
- Add a dollop of clotted cream or whipped mascarpone on the side for extra decadence.
- Pair with a savory dish like this rich-flavored Lebanese kibbeh recipe to create a full-on Middle Eastern feast.
- For something refreshing, serve alongside cold seasonal fruits like figs or oranges.
FAQs: Got Questions? I’ve Got You Covered!
Traditionally, Akkawi cheese is used because it’s mild and melts beautifully. But if you can’t find it, low-moisture mozzarella is the best substitute. Just make sure to soak and drain it well to remove excess salt.
Yes! While kataifi gives the classic texture, you can also use crushed phyllo sheets or even semolina dough (like in Palestinian versions). The texture will vary, but it’s still delicious.
Knafeh is best served warm, right after it’s been soaked in syrup. That’s when the cheese is melty, the crust is crisp, and the flavors are most vibrant.
You can prep the cheese filling, syrup, and kataifi dough ahead, and assemble it just before baking. You can even fully bake it, refrigerate, and reheat before serving. Just don’t pour the syrup until the final bake to preserve crispness.
Both use shredded dough and melty cheese, but Turkish künefe is usually cooked in individual metal pans and served with unsalted stringy cheese, while Lebanese knafeh often features ricotta or Akkawi and is baked in larger dishes with rose and orange blossom syrup.
You can, but it’s not ideal. The texture won’t be as crisp once thawed. If you must freeze it, wrap it tightly and reheat it in the oven to help restore the crunch.
Give It a Try, You’re Going to Love It
If you’ve made it this far, I hope you’re feeling excited and ready to dive into your own homemade Lebanese Knafeh recipe. Whether it’s your first time making this iconic dessert or your fiftieth, there’s just something so special about watching that syrup soak in and cutting into that cheesy, golden crust. It’s sweet, it’s nostalgic, and it’s absolutely worth every bite.
And if you’re in the mood for another simple and satisfying treat, you’ve got to check out this 3-ingredient biscuit recipe. It’s as easy as it sounds and perfect when you want something quick to whip up after a rich dessert like knafeh.
Thanks for hanging out in the kitchen with me today, if you give this recipe a try, I’d love to hear how it turned out!


Leave a Reply