The first time I used my Kitchenaid stand mixer with the ice cream attachment, I was skeptical. Could homemade ice cream really beat the smooth, dreamy texture of my favorite store-bought pint? The answer came in the form of a velvety vanilla scoop that was so luscious and flavorful, it didn’t even last 24 hours in my freezer. This Kitchenaid Ice Cream Recipe has since become my go-to whenever I need a cool treat with simple, pure ingredients and no preservatives.
Perfect for hot summer afternoons, birthdays, or just when that dessert craving hits, this recipe fits any occasion. You’ll learn how to make a custard base that rivals the creamiest ice cream shops, and you can adapt the flavors however you like. Whether you’re a first-timer with the Kitchenaid ice cream maker attachment or a seasoned home cook, this is one recipe you’ll revisit again and again.
Table of contents
Why This Kitchenaid Ice Cream Recipe Just Works
One of the reasons I love this recipe is because it uses a traditional custard base, which gives the ice cream a luxurious mouthfeel and stable texture. It combines heavy cream, whole milk, egg yolks, and sugar in just the right balance, so your ice cream freezes creamy rather than icy. The Kitchenaid ice cream maker ensures consistent churning, which incorporates air evenly and prevents crystallization.
Another win? This base is a blank canvas. Once you master the method, you can swirl in chocolate chips, fold in fruit purée, or layer in cookie dough. You’re not limited to just vanilla or chocolate, the possibilities are endless.
This recipe is also reliable. It’s forgiving for beginners and leaves room for creativity. It includes clear steps and temperature cues that help you avoid curdling the custard or over-churning the mix. Plus, it gives you that fresh, clean flavor that only comes from making your own.
And if you’re dairy-free or watching your sugar, this Kitchenaid ice cream recipe can be easily modified. Substitute coconut milk for the dairy, or try maple syrup or honey instead of granulated sugar. It’s flexible, fast, and oh so satisfying.
Recipe Card
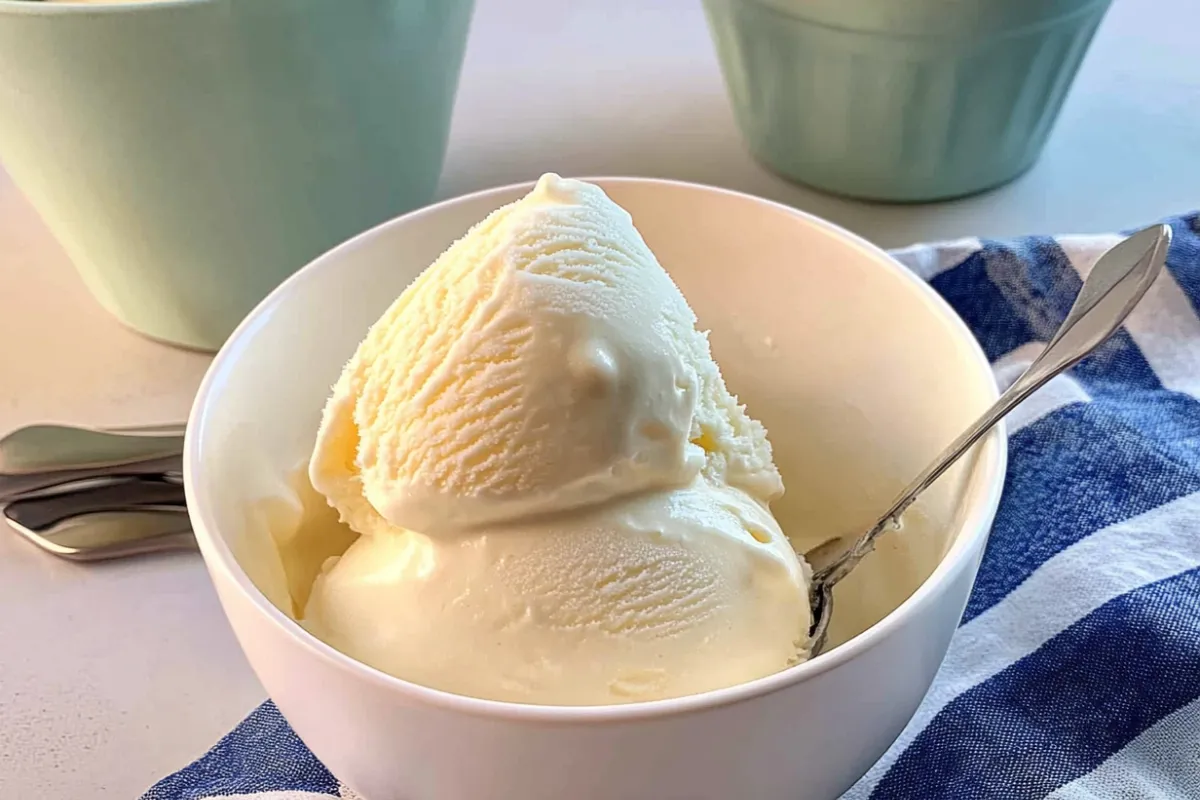
Kitchenaid Ice Cream Recipe
6
servings15
minutes2
hours210
kcalDiscover the ultimate homemade treat with this Kitchenaid ice cream recipe! Smooth, creamy, and bursting with flavor, this easy-to-follow recipe ensures success every time with the Kitchenaid ice cream maker attachment.
Keep the screen of your device on
Ingredients
2 cups heavy cream
1 cup whole milk
¾ cup granulated sugar
1 tbsp pure vanilla extract
Optional: Mix-ins like chocolate chips, fruit, or caramel swirl
Directions
- Prepare the Base:
In a medium bowl, whisk together heavy cream, milk, sugar, and vanilla extract until the sugar dissolves completely. - Chill the Mixture:
Cover the bowl and refrigerate the mixture for at least 2 hours, or overnight, for best results. - Set Up the Kitchenaid Ice Cream Maker:
Attach the frozen bowl to your Kitchenaid stand mixer. Secure the paddle and start the mixer on low speed. - Churn the Ice Cream:
Slowly pour the chilled mixture into the bowl. Let it churn for 20–25 minutes until the ice cream thickens to a soft-serve consistency. - Customize Your Ice Cream (Optional):
Add your favorite mix-ins like chocolate chips or fruit during the last 5 minutes of churning. - Freeze for Firmer Texture:
Transfer the churned ice cream to an airtight container. Freeze for 2–4 hours to achieve a scoopable texture. - Serve and Enjoy:
Scoop and serve your homemade ice cream in cones, bowls, or as part of a decadent dessert!
Notes
- Ensure the Kitchenaid ice cream maker bowl is frozen for at least 15 hours before churning.
- Use fresh and high-quality ingredients for the best flavor.
- Adjust sweetness to your preference by adding or reducing sugar slightly.
Did you make this recipe?
Tag @therecipemasterblog on Instagram and hashtag it with #therecipemaster
Like this recipe?
Follow @therecipemasterblog on Pinterest
Follow us on Facebook!
Follow The Recipe Master on Facebook
Flavor Variations for Your Kitchenaid Ice Cream Recipe
- Freeze the Bowl Properly:
Ensure the Kitchenaid ice cream maker bowl is completely frozen (15–24 hours in the freezer). You’ll know it’s ready when you shake it and hear no liquid sloshing inside. - Chill the Mixture:
Allow the ice cream base to chill for several hours or overnight in the refrigerator. This step enhances the creaminess and flavor. - Avoid Over-Churning:
Keep an eye on the consistency; over-churning can lead to a grainy texture. Stop when the mixture reaches a soft-serve consistency. - Store Smartly:
Store leftover ice cream in an airtight, shallow container. Cover the surface with plastic wrap to prevent ice crystals from forming.
Flavor Variations for Your Kitchenaid Ice Cream Recipe
1. Chocolate Swirl Ice Cream
Add 1/3 cup of melted and cooled dark chocolate during the last 2 minutes of churning. As it hits the cold ice cream, it creates thin, delicious streaks of chocolate that snap in your mouth like magic shell.
2. Strawberry Cheesecake Ice Cream
Stir in crushed graham crackers and chunks of cream cheese after churning. Fold in a strawberry compote made by simmering strawberries and sugar. It’s rich, fruity, and tastes like a summer dessert bar in frozen form.
3. Salted Caramel Pecan
Mix in 1/2 cup of chopped candied pecans and drizzle in thick caramel sauce. A pinch of sea salt intensifies the sweetness and adds a gourmet touch.
4. Vegan Coconut Vanilla
Replace the dairy with full-fat canned coconut milk and use maple syrup instead of sugar. Add pure vanilla extract and churn just the same. It’s creamy, dreamy, and completely dairy-free.
FAQs
Yes! You can substitute almond, coconut, or oat milk for a dairy-free version. However, the texture may be slightly less creamy.
Ensure the mixture is thoroughly chilled before churning, and use an airtight container to store it with plastic wrap pressed directly onto the surface.
While this recipe is designed for the Kitchenaid ice cream maker, you can still make it by stirring the mixture every 30 minutes as it freezes.
It’s best enjoyed within 1–2 weeks for maximum freshness, but it can last up to a month in a well-sealed container.
Health Benefits of Homemade Kitchenaid Ice Cream Recipe
- Quality Ingredients: Homemade ice cream lets you control the quality of ingredients, avoiding unnecessary additives or artificial flavors.
- Customization: Perfect for dietary preferences, such as using plant-based milk or reducing sugar for a healthier option.
- Calcium Source: Dairy-based recipes provide a rich source of calcium, essential for strong bones and teeth.
- Mood Booster: A creamy treat like this can enhance serotonin levels, making you feel happier and more satisfied.
- Less Preservatives: Unlike store-bought ice creams, this version is free from harmful preservatives and chemicals.
Make This Kitchenaid Ice Cream Recipe Your Summer Staple
There’s something incredibly rewarding about churning your own ice cream at home, especially with a reliable Kitchenaid ice cream recipe like this one. It delivers on flavor, texture, and creativity; plus, it makes your kitchen smell like a dessert dream. Whether you stick with the classic vanilla base or venture into your own custom creation, each batch is an opportunity to play, taste, and share.
And trust me, nothing impresses at a summer gathering like a pint of homemade ice cream. Your guests will ask where you bought it, and you’ll smile knowing it came straight from your freezer.
Looking for more dessert ideas? Try this Libby’s Pumpkin Roll Recipe! It’s a perfect pairing for your homemade ice cream, offering a creamy and spiced delight that complements every scoop.


Leave a Reply