- Use the slab technique: press all the meat into one even layer to retain moisture and create uniformly juicy sliders.
- Prevent sogginess: drain cooked beef, place cheese on bottom buns, and toast bottoms briefly before assembling.
- Prep smart and customize: brown beef, grate cheese, and make glaze ahead; swap proteins or toppings for varied flavors.
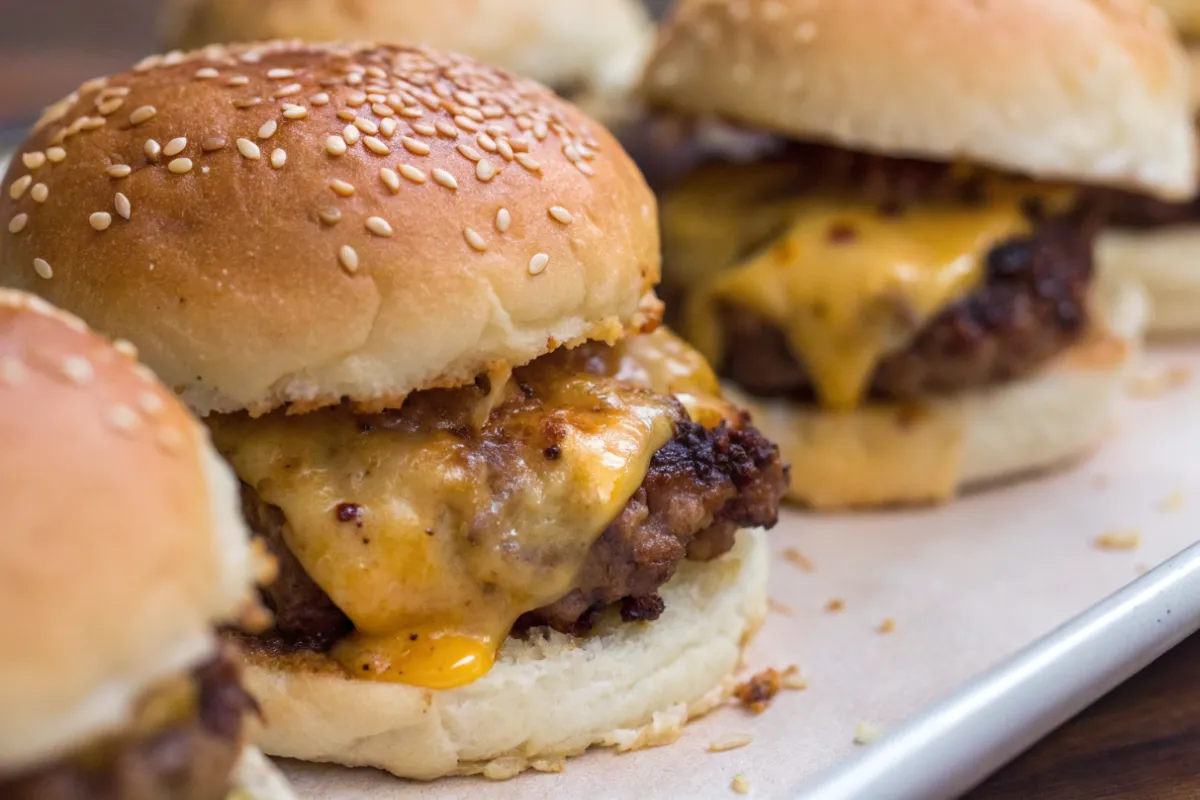
There is a specific kind of magic that happens when you pull a sizzling tray of cheeseburger sliders out of a hot oven. I remember the first time I made these for a casual backyard gathering. I turned around for two seconds to grab napkins, and by the time I looked back, the entire tray was gone. These miniature sandwiches are not just cute; they are flavor bombs.
This recipe fits perfectly into a busy host’s schedule. Whether you need a quick weeknight meal that kids will actually eat or a festive dish for the Super Bowl, this is it. It is also a surprisingly healthy comfort food option when you control the quality of the beef and skip the heavy preservatives found in frozen versions. Since we are strictly avoiding pork, the flavor relies on high-quality beef and a savory glaze that brings everything together.
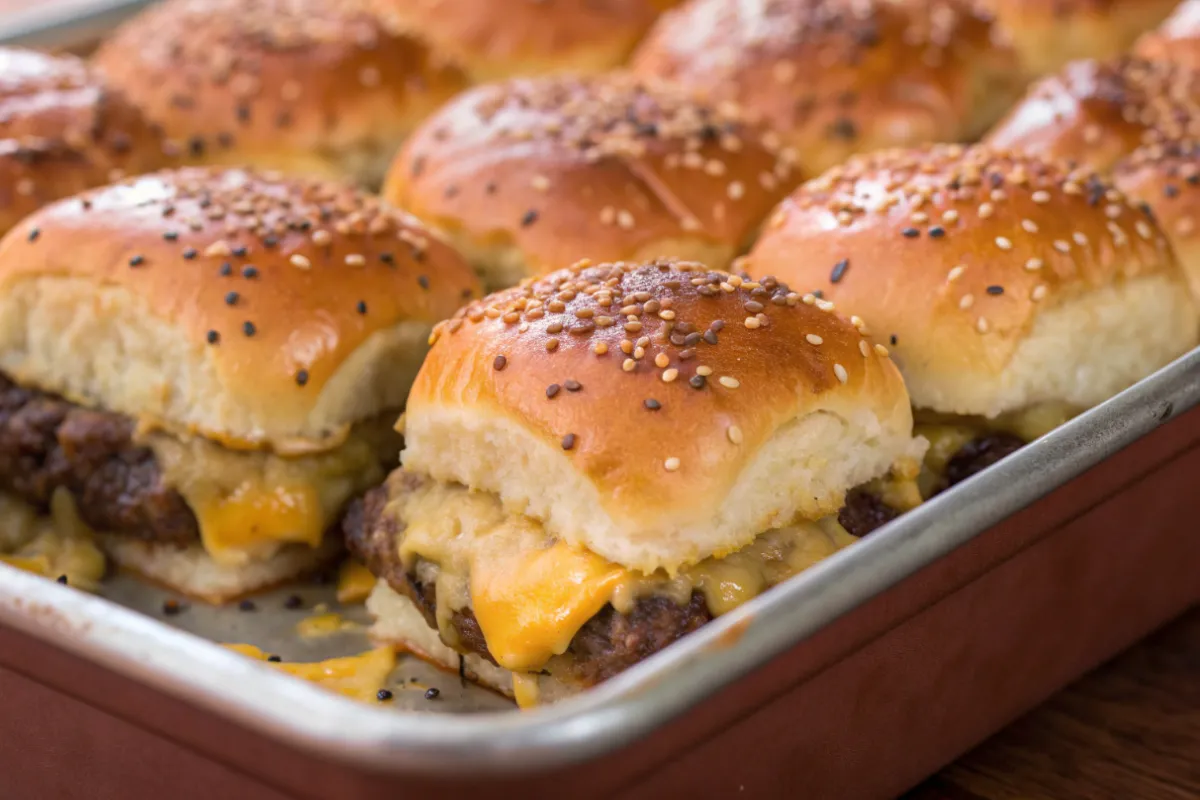
Table of contents
Kitchen Workflow
To make these cheeseburger sliders come together in a snap, a little prep goes a long way.
- Pre-Cook the Beef: You can brown the ground beef mixture with the onions up to 24.0 hours in advance. Store it in an airtight container in the fridge.
- Slice the Rolls: Slice the entire package of rolls horizontally at once. Do not separate them individually yet. Keep them in the bag to stay soft.
- Grate Your Own Cheese: Pre-shredded cheese contains anti-caking agents that prevent a smooth melt. Grate a block of mild cheddar or Colby Jack the morning of your party.
- Prepare the Glaze: Melt the butter and mix in the spices. It can sit at room temperature for a few hours.
Cheeseburger Sliders Recipe Card
Cheeseburger Sliders Recipe
12
servings15
minutes20
minutes280
kcalThese cheeseburger sliders feature savory seasoned beef, gooey melted cheese, and a signature garlic butter glaze. They are baked to perfection in a single tray, making them the ultimate easy party food.
Keep the screen of your device on
Ingredients
2.0 lbs Lean Ground Beef (90/10 preferred)
1.0 package Hawaiian Sweet Rolls (12 count)
1.0 medium Yellow Onion, finely diced
2.0 cloves Garlic, minced
1.0 teaspoon Worcestershire Sauce
0.5 teaspoon Salt
0.5 teaspoon Black Pepper
8.0 slices Cheddar Cheese (or 1.5 cups shredded)
4.0 slices Provolone Cheese
- For the Glaze:
4.0 tablespoons Unsalted Butter, melted
1.0 tablespoon Sesame Seeds
0.5 teaspoon Garlic Powder
0.5 teaspoon Dried Parsley
Directions
- First, preheat your oven to 350°F (175°C). While it heats up, grab a large skillet. Add the ground beef and the diced onion. Cook this over medium-high heat, breaking up the meat with a wooden spoon until it is fully browned. Add the minced garlic, Worcestershire sauce, salt, and pepper. Cook for one more minute until fragrant. Drain the grease very well!
- Next, slice your package of rolls in half horizontally so you have a “slab” of tops and a “slab” of bottoms. Place the bottom slab in a 9×13 inch baking dish. Layer the slices of Provolone cheese over the bread. Then, spread the cooked beef mixture evenly over the cheese. Top the beef with the cheddar cheese. Place the top slab of buns on the sliders.
- In a small bowl, whisk together the melted butter, sesame seeds, garlic powder, and dried parsley. Brush this glorious mixture all over the tops of the buns. Cover the dish with foil and bake for 15.0 minutes. Remove the foil and bake for another 5.0 minutes until the tops are golden brown. Slice and serve immediately.
Notes
- Mayonnaise Secret: Spread a thin layer of mayonnaise on the inside of the bottom buns before baking for extra moisture protection.
- Reheating: If you have leftovers, wrap them in foil and heat in the oven at 350°F for 10.0 minutes. Microwaving makes the bread tough.
- Pan Size: A standard 9×13 pan fits a 12-pack of rolls perfectly.
Nutrition Facts
- Fat: 14g
- Sodium: 480mg
- Carbohydrates: 22g
- Protein: 18g
Did you make this recipe?
Tag @therecipemasterblog on Instagram and hashtag it with #therecipemaster
Like this recipe?
Follow @therecipemasterblog on Pinterest
Follow us on Facebook!
Follow The Recipe Master on Facebook
The Juiciness Factor
The genius of this cheeseburger sliders recipe lies in the “slab” technique. Instead of forming twelve individual mini patties, which often dry out and shrink, we press the meat into a single even layer. This creates a solid seal that traps moisture, ensuring every bite is incredibly juicy.
- Uniformity: Every single slider gets the exact same amount of meat and cheese. No fighting over the “big one.”
- The Glaze: We brush the tops with a garlic-butter mixture. This protects the bun from drying out and adds a savory crust that mimics a pretzel bun.
- Dietary Tweaks: This recipe is naturally pork-free. However, you can easily swap the beef for ground turkey or chicken. If you are gluten-sensitive, simply use gluten-free slider rolls.
For a deeper understanding of why cooking meat in a larger mass retains moisture, you can read about the science of cooking meat to see why this method creates a superior texture.
Avoiding the Soggy Bottom
I have learned a few hard lessons over the years to ensure your cheeseburger sliders are crispy, not soggy.
- Drain the Grease: This is non-negotiable. After browning the beef, drain it thoroughly. Any excess fat will soak into the bottom bun and make it fall apart.
- The Cheese Shield: Place a layer of cheese directly on the bottom buns before adding the meat. This acts as a barrier against moisture.
- Toast the Bottoms: For extra insurance, you can toast the bottom slab of buns in the oven for 3.0 minutes before assembling.
- Tenting with Foil: Bake covered for the first 10.0 minutes to melt the cheese, then uncover for the final 5.0 minutes to brown the tops.
For more safety tips on handling ground meat, check out the USDA guidelines.
Customizing Your Cheeseburger Sliders Tray
The base recipe for cheeseburger sliders is just the beginning. Here are three distinct variations to keep your menu exciting without using pork.
The Caramelized Onion and Swiss
This is the sophisticated cousin of the classic slider. Instead of raw onions in the beef mix, spend 20.0 minutes caramelizing sweet yellow onions until they are deep brown and jammy. Swap the cheddar for slices of Swiss or Gruyère cheese. The nutty cheese combined with the sweet onions makes for a rich, bistro-style experience.
The Spicy Southwest Kick
If you love heat, this variant is for you. Mix a diced jalapeño and a teaspoon of taco seasoning into the beef while it browns. Swap the cheddar for Pepper Jack cheese. For the glaze, add a pinch of chili powder to the butter. These are fantastic served with a side of cool guacamole or lime crema.
The Mushroom Garlic Melt
Sauté 8.0 oz of finely chopped cremini mushrooms with garlic until all the water has evaporated. Mix this into your ground beef. The mushrooms add an incredible umami depth and bulk up the filling without adding fat. Top with Provolone cheese and a sprinkle of dried thyme on the buns.
These sliders pair wonderfully with my Zucchini Fries for a complete meal!
The Slider Q&A
The most important step is draining the fat from the meat. Additionally, placing a layer of cheese on the bottom bun before adding the meat creates a moisture barrier. Toasting the bottom buns briefly before assembly also helps.
For a main meal, plan on 3.0 cheeseburger sliders per adult and 2.0 per child. If serving as an appetizer, 1.0 to 2.0 per person is usually sufficient.
Yes. You can assemble the sliders completely, cover them tight, and refrigerate for up to 4.0 hours before baking. You may need to add 5.0 minutes to the baking time if they are going in cold.
Hawaiian rolls are the industry standard for cheeseburger sliders because their slight sweetness balances the savory beef and salty cheese perfectly. They are also very soft, making the “pull-apart” experience satisfying.
Final Thoughts on This Crowd-Pleaser
Mastering these cheeseburger sliders will make you the hero of your next potluck or family dinner. They deliver all the satisfaction of a full-sized burger without the hassle of firing up the grill. The combination of the savory beef, the melty cheese blend, and that irresistible buttery garlic topping creates a flavor profile that is hard to beat.


Leave a Reply