- Soften cream cheese to room temperature to ensure a smooth, lump-free, creamy base.
- Chill the formed base at least 4 hours, up to 3 days, then roll in toppings shortly before serving.
- Balance flavors and textures: sharp cheddar plus lemon and Worcestershire, finish with fresh chives and toasted pecans.
Few appetizers signal the start of a party, gathering, or holiday celebration quite like a beautifully decorated cheese ball recipe. This classic, retro dish is more than just a throwback; it’s a brilliant way to deliver maximum flavor with minimal effort. My go-to cheese ball recipe is built on a foundation of sharp cheddar and cream cheese, seasoned with a ranch-inspired blend that is utterly addictive. It’s the perfect make ahead appetizer, fitting for a festive dish that requires zero last-minute cooking. This appetizer always disappears first!
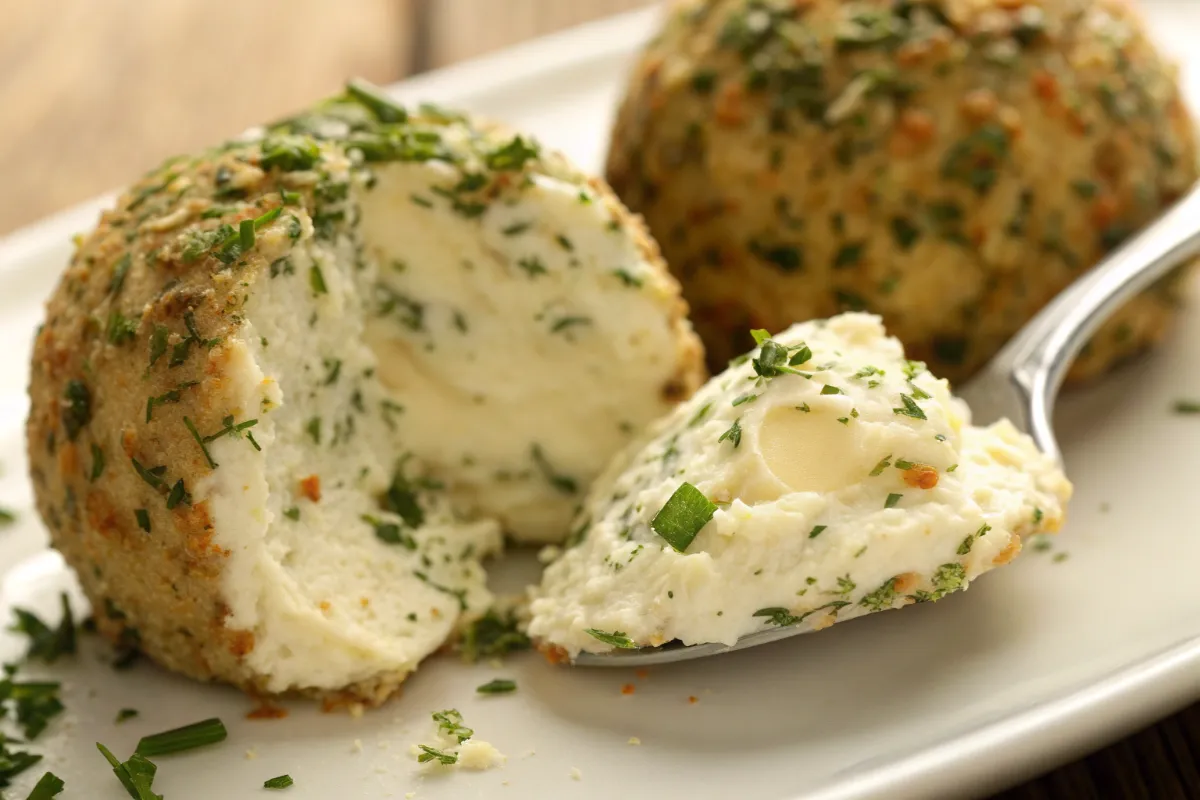
Table of contents
Pre-Party Strategy
The best thing about making a cheese ball is that it must be made in advance. This is the ultimate stress-free party appetizer.
- Soften the Cheese: Ensure the cream cheese is fully softened to room temperature. This is essential for a lump-free, creamy mix.
- Make and Chill the Base: Mix the entire cheese mixture and form it into a ball. Store this unrolled base, tightly wrapped, in the refrigerator for at least 4 hours, or up to 3 days.
- Toast the Pecans: Toast the pecans in a dry skillet until fragrant and let them cool completely. Chop them and store them in an airtight container until you are ready to roll the ball.
Cheese Ball Recipe Card
Cheese Ball Recipe
16
servings15
minutes0
minutes180
kcalThis easy, classic cheese ball recipe features a creamy, sharp cheddar base seasoned with ranch-style spices and rolled in a crunchy pecan coating.
Keep the screen of your device on
Ingredients
1 package cream cheese, fully softened
1 cup shredded sharp cheddar cheese
1 teaspoon dried onion powder
0.5 teaspoon garlic powder
0.5 teaspoon dried dill weed
1 teaspoon Worcestershire sauce
0.5 teaspoon fresh lemon juice
0.1 teaspoon black pepper
0.75 cup pecans, toasted and chopped
0.25 cup fresh chives, finely minced
Directions
- You’ll first want to combine all the base ingredients in a large mixing bowl. Make sure your cream cheese is completely soft. Blend the cream cheese, cheddar, onion powder, garlic powder, dill, Worcestershire, lemon juice, and pepper until the mixture is entirely smooth and creamy.
- Next, you will need to form the cheese mixture into a ball. Scrape the mixture onto a large piece of plastic wrap. Gather the edges and twist the plastic wrap to form a tight, smooth sphere.
- Now, chill the cheese ball in the refrigerator for at least 4 hours. This chilling time is vital; it allows the flavors to deepen and the ball to firm up completely for easy coating.
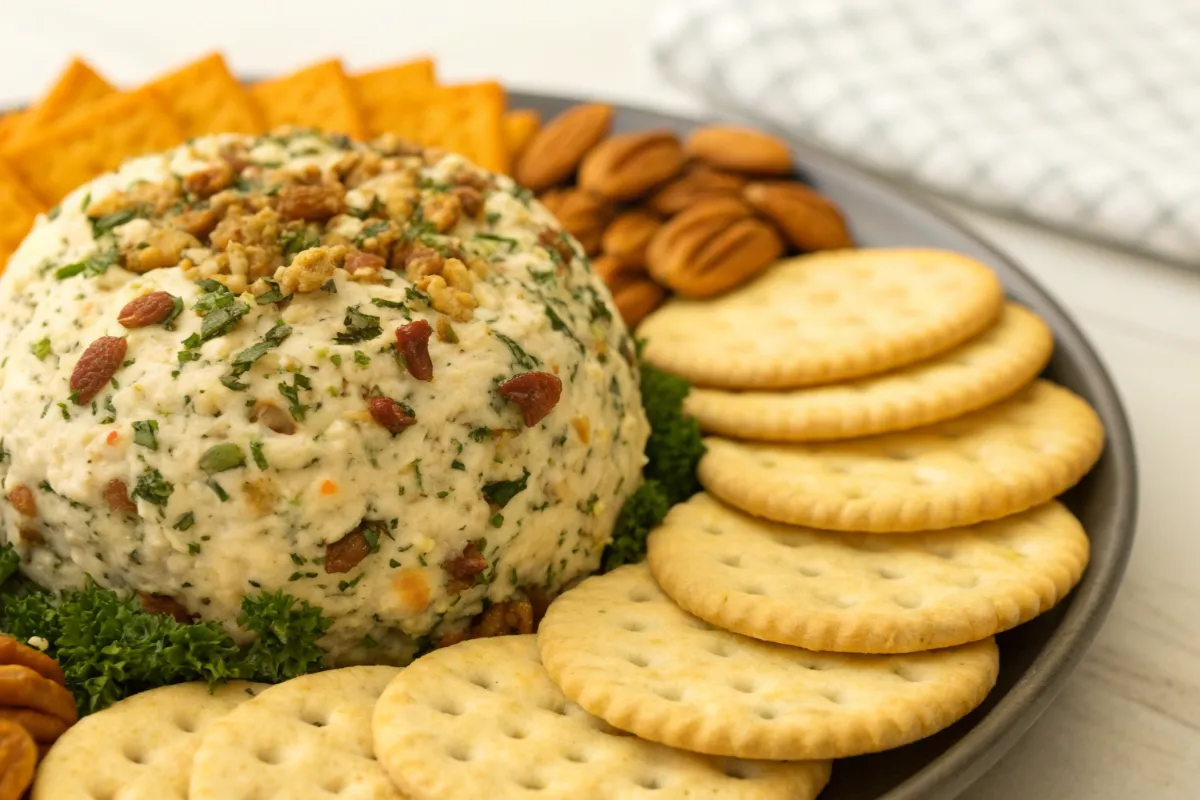
- When you are ready to serve, combine the chopped pecans and minced chives in a shallow dish. Unwrap the chilled cheese ball and roll it firmly and evenly in the pecan-chive mixture until the entire surface is coated.
- Finally, transfer the coated cheese ball to a serving platter. Surround it with crackers, pretzels, and fresh vegetables. Serve cold.
Notes
- Don’t Over-Chill: Take the cheese ball out of the refrigerator 15-20 minutes before serving. This slight warm-up will make the interior soft and creamy for easy spreading.
- Make it Savory: For an extra layer of flavor, mix 1/4 cup of cooked, crumbled bacon into the interior cheese mixture.
- Safety First: Because this appetizer contains cream cheese, always follow the food safety rules for cold appetizers and do not leave it out at room temperature for more than 2 hours.
Nutrition Facts
- Fat: 16g
- Sodium: 210mg
- Carbohydrates: 3g
- Protein: 6g
Did you make this recipe?
Tag @therecipemasterblog on Instagram and hashtag it with #therecipemaster
Like this recipe?
Follow @therecipemasterblog on Pinterest
Follow us on Facebook!
Follow The Recipe Master on Facebook
Texture layering
This specific cheese ball recipe consistently delivers a superior result because it focuses on a balanced blend of textures and the critical role of chilling.
- The Sharp/Cream Base: We combine two types of cheese: the tang and stability of softened cream cheese and the robust, sharp flavor of grated aged cheddar. The cheddar provides depth that a plain cream cheese base simply cannot match.
- The Binder and Zest: A crucial addition is a small amount of Worcestershire sauce and fresh lemon juice. The Worcestershire adds a deep, savory umami note, while the lemon cuts through the richness, preventing the cheese ball from feeling too heavy.
- Topping Texture: We use a double coating, finely minced fresh chives and toasted pecans. The chives add a visual pop and fresh onion flavor, and the pecans provide a necessary, crisp contrast to the soft, creamy interior.
This recipe is naturally gluten-free. To adapt it for a vegetarian cheese ball, simply ensure your Worcestershire sauce is anchovy-free or use soy sauce as a substitute for the umami. For a low-carb option, serve exclusively with sliced cucumbers, bell peppers, and low-carb crackers.
Chef’s Pro Tips for the Perfect Cheese Ball
Achieving a perfectly seasoned and shaped cheese ball requires attention to detail, especially during the mixing and chilling phases.
- Room Temp is Mandatory: The cream cheese must be fully softened. If it’s cold, you will end up with frustrating lumps and an over-mixed, tough base. Let it sit out for at least an hour.
- Use Fresh Herbs: Do not substitute dried chives for fresh. The fresh chives are essential for the visual appeal, aromatic freshness, and subtle onion bite.
- The Plastic Wrap Trick: Use plastic wrap to form the ball. Once the mixture is combined, dump it onto a large piece of plastic wrap, gather the edges, and twist it tightly. This creates a beautifully tight, perfect sphere without the mess.
- Roll Right Before Serving: Wait to roll the cheese ball in its pecan and chive coating until about 1-2 hours before serving. This ensures the nuts and herbs remain crunchy, not softened by the chilling time.
What to Serve With
The vehicle for transporting this glorious cheese ball to your mouth is just as important as the ball itself! Always offer a variety. I suggest using sturdy crackers (like butter crackers or water crackers), pretzel crisps (for a salty crunch), and a mix of fresh raw vegetables like carrots, celery, and bell pepper strips.
Creative Comfort Spins
Hot Jalapeño Popper Cheese Ball Turn up the heat by incorporating 4 ounces of finely minced pickled jalapeños and a half cup of crumbled crispy bacon into the base. Use Monterey Jack cheese instead of cheddar. Omit the pecans and coat the finished ball entirely in the remaining crispy bacon and a few extra sliced jalapeño rings for garnish. This version is a spicy, smoky party favorite.
Pesto Sun-Dried Tomato Cheese Ball
For a Mediterranean twist, omit the ranch seasoning and spices. Mix the cream cheese base with 2 tablespoons of jarred pesto and 1/4 cup of finely chopped, oil-packed sun-dried tomatoes. Use Parmesan cheese instead of cheddar. Coat the finished ball in chopped fresh basil and toasted pine nuts for a vibrant, Italian-inspired appetizer.
Sweet Dessert Cheese Ball
Believe it or not, a sweet cheese ball is a delicious option! Omit all savory seasonings and substitute the cheddar with a small amount of brown sugar and cinnamon. Mix in mini chocolate chips or candied ginger. Roll the final ball in a coating of crushed vanilla wafers or cocoa powder. Serve with graham crackers or fresh apple slices.
Appetizer Troubleshooting (FAQs)
Lumps occur when the cream cheese is not fully softened. It must be at room temperature for at least an hour to blend smoothly with the cheddar and seasonings.
You can make and chill the unrolled cheese ball base up to 3 days in advance. For maximum crunch, wait to roll it in the pecan coating until the day of your event.
Cracking usually happens if the ball is too cold or was not formed tightly enough. When forming the ball, press it firmly. If you see cracks, gently press the surface back together with your hands before coating.
Final Scoop (Conclusion)
This ultimate cheese ball recipe is proof that the classics never fade for a reason. It delivers a perfect blend of rich, creamy flavor, zesty seasoning, and satisfying crunch that everyone, from kids to grandmas, adores. It’s elegant, easy to execute, and best of all, you can make the entire thing ahead of time, freeing you up to enjoy your party.


Leave a Reply